Here is an email chain sent to me by Eric Christianson who thought that this would be a nice topic for the IPMS Seattle Blog.
The names have not been changed to protect the innocent.
Airbrushing Vallejo Acrylics
____________________________________________________________
Andrew, Eric, and Thomas,
I am having significant difficulty airbrushing the Vallejo Model Air dark yellow onto my tank models. I’ve read through the Vallejo on-line instructions and watched some of the Utube videos and I don’t seem to be able to replicate the results of other. Specific details are:
Iwata Eclipse
Operating Pressure 15 psi
thinner: Vallejo airbrush thinner
paint/thinner mixture 3/1
primer: Mr Hobby Surfacer 1500 black
Vallejo Acrylic retarder
I experimented on a sheet of clean styrene using combinations of air pressure and settled on the above combination to try on a pair of Pzkw IIIs. However, the results were disappointing. The paint has a glossy, watery texture and is very thin. I have to give the model several coats just to get a decent color and it is rather glossy.
I am thinking that the Vallejo paint and Mr. Hobby primer don’t work well together so I took another model and I primed it Tamyia black and I’ll overpaint the Vallejo paint on that to see what it does.
Have any of you tried to paint the Vallejo Model Air directly on top of the Mr Hobby Surfacer? Did you have any problems?
Do you have any other suggestions when using the Vallejo Model Air paint?
Interestingly, I do not have this problem with the Tamyia paint. I just painted three of my Russian models using Flat Green as the base and modulating the color with Deck Tan. I use the Mr. Hobby level thinner with the Tamyia paint and I am very pleased with those results and three of the four models were primed with the Mr. Hobby Surfacer 1500 black.
Thanks for the help,
Bruce Biskup
____________________________________________________________
Hi Bruce!
There is no better painting experience than Tamiya + Gunze Leveling Thinner. That said, the paint is pretty toxic and the color choices are limited.
I have switched over to Vallejo products for these reasons and have (finally) dialed them in. My setup is different – I am using a siphon-feed single-action airbrush (Pasche H, #3 tip) and higher pressure (20lbs). I have watched and listened to all things Vallejo, and discarded everything. Nothing worked. What I learned, I learned by doing.
I airbrush 4-5 times a week and my most recent sessions (last three kits) using all three types of with Vallejo paint use the following ratios and products. This includes their primers as well (which are excellent by the way, although the German Grey is too dark)
I take an empty plastic 1-oz cup (from a fast food place) and put three drops of Liquitex Flow Aid. I add 20 drops of Vallejo Airbrush Thinner. Then I add 20 drops of paint, any paint. I swish that around and pour it into the airbrush cup. That amount of paint is usually all I need for a Sherman sized vehicle, whether I’m putting on primer or the camo coats.
I spray the paint on like I spray Future. The amount of paint I put on at one time is not as important as keeping the airbrush moving as I spray. I hold the model in such a way so I can see the reflected light show paint hitting the surface. In this way I don’t put on too much paint in one spot.
I love the paints and I no longer have to sit in a room getting asphyxiated!
By the way, I use three paints for German Yellow over a black primer: Dark Yellow (71.025), Sand Yellow (71.028) and Sand (Ivory) (71.075)
Regarding primers – I have excellent results painting Vallejo over any type of primer, including Vallejo own product, Tamiya NATO Black, Gunze Mr. Finishing Surfacer 1500 Black, and Alclad Black Primer and Microfiller.
My last Tiger I was also Vallejo over their own primer, but I used new colors for the German Yellow: Vallejo Model Air 71.030 Green Brown for the ‘German Yellow’ color, and Vallejo Model Air 71.024 Khaki Brown for the slightly darker color

Good luck!
Thanks!
Eric
____________________________________________________________
Sorry, am late to the party, as I was working late this evening.
Firstly, I think Mr Surfacer is an awesome primer, I now use their 1500. With lacquer thinner, it bites into the plastic. If left to cure (de-gas) for a couple of days, it shouldn’t cause any issues with an acrylic overcoat, such as Vallejo.
Secondly, each paint brand seems to react differently to changes in PSI, thinning ratios etc. Sometimes even within a brand range, PSI and thinning ratios need to be changed about.
If the paint you were using was supposed to be matt, or semi matt, and it turned out glossy, this often means the paint wasn’t mixed well. My very first airbrushing disaster back in 1976 ended up being glossy paint when it should have been matt. Reason: I didn’t stir up the paint well enough.
If your paint is watery, it probably means it is too thin, too much thinner. That said, if you lightly mist it on, and don’t put so much on it pools or runs, then all thin paint should mean is that it takes longer to get an opaque coating.
As Eric says, pop by his place on Thursday (it’s his birthday) and join the gang, and bring your airbrush, paint and thinner and have a “session” in the paint booth?
What annoys me about Vallejo is that while they have a huge range of colors, they can’t seem to bother themselves to come out with specific military colors such as RLM, US and German armor etc. That said, they do produce a few sets that are useful specifically for armor modelers. In fact now that I think about it, they have a US OD set for WW2 US armor.
Cheers
Andrew
____________________________________________________________
Andrew and Eric,
Thanks for the comments.
I actually tried the paint at 30 psi, 20 psi, and 15 psi without any thinner. At the high pressure it sputters. I tended to get the best results at 15-20 psi when spraying on the clean sheet of styrene. However, when I sprayed the paint onto the primed model, it was very light and runny. That’s what was leading me to believe that there was some incompatibility between the paint and the primer.
I starting adding the flow improver and the thinner to help push more paint through the airbrush.
This morning I looked at the models and they are not that bad and now that the paint has dried, it is matt. It is just that the coats are very thin and the model is still mostly black even after several coats of paint. The gloss color would seem to be a combination of the paint being wet and translucent so the glossy primer is showing through.
My feeling is that the paint is very fine pigmented so it is rather translucent. Vallejo does mention that you will apply several coats of the paint and as Eric pointed out, it does last a long time in the airbrush. I’m more use to the Tamyia paint where I spray one coat and then when dry in about 30 minutes, I painted my modulated coat.
Unfortunately, my work responsibilities and the new improvements to I405 make it difficult for me to take off from Everett and make it down to Redmond during the week.
I’ll continue to experiment. I do think I need to mix the paint better. I stir the paint up while in the dropper but it felt fairly consistent. I’ll start mixing it in a mixing jar first in the 10:1 ratio of paint/flow improver and try that. I have the latex flow improver so I’ll try that too.
If everything fails, I have plenty of windex to clean it off and try again. It would not be the first time.
Emil is having a airbrush workshop on a weekend in November. I might as well make plans to attend that.
I’ll let you know how it goes.
Bruce Biskup
Bothell, WA
____________________________________________________________
Good Morning Bruce –
The only addition I need to make is that I found the paint unusable from an airbrush if I didn’t thin it 50/50 with thinner, and that’s after it has 2-3 drops of Flow Aid – including their ‘Model Air’ line. Before I started thinning it like that, it used to puddle and appear water-like because I would spray and spray and spray, trying to get coverage. I know that logic sounds backwards, but it is what it is.
Thanks!
Eric
____________________________________________________________
Good Morning All –
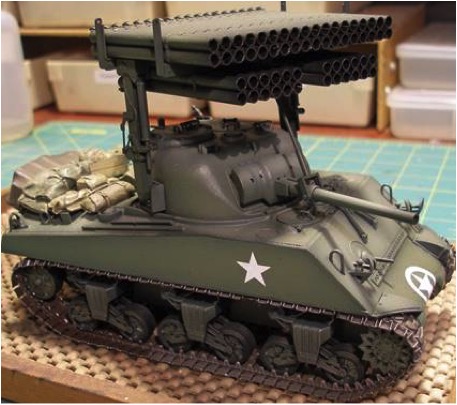
Before you spend money on that OD set from Vallejo, may I suggest that save some money and just buy the relevant colors separately – Emil at Skyway has most of them. The package set includes thinner or Matt varnish or something like that if I recall. According to Vallejo themselves, all you need are the following:
US OD = Vallejo Model Air 71.016 Dark Green and then Vallejo Model Air 71.044 Light Grey Green for post-shading. This will get you a ‘green’ Sherman. I don’t know what to use (yet) for the ‘brown/khaki’ Sherman – that’s coming soon. Here are two examples of the above paints (the Calliope is not weathered yet, the M61 is finished with Flat Varnish) – both are Vallejo over black primer (rattle-can Rustoleum on the M61, and Gunze on the Sherman.

____________________________________________________________
Sorry, am late to the party, as I was working late this evening.
Firstly, I think Mr Surfacer is an awesome primer, I now use their 1500. With lacquer thinner, it bites into the plastic. If left to cure (de-gas) for a couple of days, it shouldn’t cause any issues with an acrylic overcoat, such as Vallejo.
Secondly, each paint brand seems to react differently to changes in PSI, thinning ratios etc. Sometimes even within a brand range, PSI and thinning ratios need to be changed about.
If the paint you were using was supposed to be matt, or semi matt, and it turned out glossy, this often means the paint wasn’t mixed well. My very first airbrushing disaster back in 1976 ended up being glossy paint when it should have been matt. Reason: I didn’t stir up the paint well enough.
If your paint is watery, it probably means it is too thin, too much thinner. That said, if you lightly mist it on, and don’t put so much on it pools or runs, then all thin paint should mean is that it takes longer to get an opaque coating.
As Eric says, pop by his place on Thursday (it’s his birthday) and join the gang, and bring your airbrush, paint and thinner and have a “session” in the paint booth?
What annoys me about Vallejo is that while they have a huge range of colors, they can’t seem to bother themselves to come out with specific military colors such as RLM, US and German armor etc. That said, they do produce a few sets that are useful specifically for armor modelers. In fact now that I think about it, they have a US OD set for WW2 US armor.
Cheers
Andrew
____________________________________________________________
Andrew and Eric,
Thanks for the comments.
I actually tried the paint at 30 psi, 20 psi, and 15 psi without any thinner. At the high pressure it sputters. I tended to get the best results at 15-20 psi when spraying on the clean sheet of styrene. However, when I sprayed the paint onto the primed model, it was very light and runny. That’s what was leading me to believe that there was some incompatibility between the paint and the primer.
I starting adding the flow improver and the thinner to help push more paint through the airbrush.
This morning I looked at the models and they are not that bad and now that the paint has dried, it is matt. It is just that the coats are very thin and the model is still mostly black even after several coats of paint. The gloss color would seem to be a combination of the paint being wet and translucent so the glossy primer is showing through.
My feeling is that the paint is very fine pigmented so it is rather translucent. Vallejo does mention that you will apply several coats of the paint and as Eric pointed out, it does last a long time in the airbrush. I’m more use to the Tamyia paint where I spray one coat and then when dry in about 30 minutes, I painted my modulated coat.
Unfortunately, my work responsibilities and the new improvements to I405 make it difficult for me to take off from Everett and make it down to Redmond during the week.
I’ll continue to experiment. I do think I need to mix the paint better. I stir the paint up while in the dropper but it felt fairly consistent. I’ll start mixing it in a mixing jar first in the 10:1 ratio of paint/flow improver and try that. I have the latex flow improver so I’ll try that too.
If everything fails, I have plenty of windex to clean it off and try again. It would not be the first time.
Emil is having a airbrush workshop on a weekend in November. I might as well make plans to attend that.
I’ll let you know how it goes.
Bruce Biskup
Bothell, WA
____________________________________________________________
Good Morning Bruce –
The only addition I need to make is that I found the paint unusable from an airbrush if I didn’t thin it 50/50 with thinner, and that’s after it has 2-3 drops of Flow Aid – including their ‘Model Air’ line. Before I started thinning it like that, it used to puddle and appear water-like because I would spray and spray and spray, trying to get coverage. I know that logic sounds backwards, but it is what it is.
Thanks!
Eric
____________________________________________________________
Good Morning, All:
Here are the most important aspects to remember when airbrushing:
1/ Air Pressure, PSI: the higher the PSI, the faster the paint flies out of the tip of the airbrush. This increases the atomization of the paint, thus creating a finer mist (all other things being equal). However, the finer the atomization, the quicker the drying time of the paint. If the paint is coming out too quickly, and is being atomized very finely AND the airbrush is too far from the surface of the model, then the paint will literally dry before it hits the model’s surface. This is when you get the “pebble” or “sandpaper” effect on the surface, a rough finish. To try and compensate for this, lower the PSI, add flow enhancer/paint drying retarder, and move the airbrush closer to the surface of the model.
2/ thinning ratio. Obviously the more thinner you add, the less paint will be used. This then makes the layers of paint per pass of the airbrush thinner, and thus more translucent. Also, the more thinner you add, the slower the paint application dries, especially if you have added a flow enhancer/retarder to it. This is when you have issues with the paint running/pooling. One way to help compensate for this is to have a hand held hair dryer plugged in and ready to use. Apply a few light coats of paint, then hit the model with warm air, to help improve the paint drying. Be careful though, as while you are drying the paint with the hair dryer, the paint is attempting to dry in the tip of your airbrush. So always have a Q-tip and some thinner, to wipe the airbrush tip from time to time.
3/ Distance of airbrush from surface of the model: as mentioned earlier, the further the paint has to travel once it leaves the airbrush tip, before it hits the surface of the model, the more likely the paint is to start drying. Adding flow enhancer/retarder to the paint helps, but simply moving your airbrush closer to the surface of the model also is key if you are having premature drying issues. The closer the airbrush is to the model, the lower you need to have the PSI/air flow. Put your airbrush a half inch from the model, and blast the paint out at 30PSI, and you will have a mess. Thin the paint a bit, lower the PSI to 12PSI, and if you are using a gravity feed airbrush, this low PSI should be fine.
4/ paint drying time. The cooler the temperature, the slower the drying time of most paints. Also, various thinners evaporate at faster speeds than others. Lacquer thinner dries very rapidly. Acrylic thinner with flow enhancer/retarder added dries quite slowly. So if you are airbrushing in a cool environment (an unheated garage in winter, say), then have a hair dryer handy to speed up the drying.
If the paint is too “wet”, and you apply too much at once, it runs or pools. After a while of using a given paint mix, you should get a feel for how things “look”, and you will be able to visually avoid runs/pooling. Once it looks dubious, stop, and get out the hair dryer. I am constantly using a hair dryer especially during non-summer months.
Drying time, rules of thumb: lacquers dry quickest, followed by enamels, lastly acrylics. Matt paints dry quicker than gloss paints, no matter what the medium.
Hope the above is helpful.
Cheers
Andrew
____________________________________________________________
Yeah!!!! Celebrate!!! Fantastic!!!! More Blog stuff from the great guys in the club!!!!! Careful- its habit forming!!!!! Love your article and topic! John D.
Andrew, Eric, and Thomas,
I spent some time last night working with the Vallejo model air paint by painting a few of my Pzkw IIIs and IVs in the dark yellow paint.
I used Eric’s recommendation and mixed the paint to a 1:1 paint/thinner ratio (20 drops of each) after adding 2-3 drops of the liquidtex flow improver to the paint. I mixed the paint in a jar to make sure that the paint, thinner, and the flow improver were throughly mixed. I then sprayed the mixture at 20 psi on a sheet of styrene and then on my model. The results are shown on picture 1 which is same behavior I had before.
I then remembered that Eric had mentioned using the Vallejo cleaner instead of the Vallejo thinner so I tried that but I reduced the paint thinner to 2:1 paint/thinner. The results were a little better and I used that mixture to finish up the two Pzkw IIIs in the base dark yellow as shown in picture 2.
I decided to try and spray a different color of paint. I have a bottle of Vallejo sand yellow and I sprayed that at a 2:1 paint to thinner ration after adding the 2-3 drops of the flow improver and still at 20 psi. That paint worked. It sprayed very nicely and I got a nice thin layer of paint on the model with no runs. Like Eric mentioned, I just kept the airbrush in motion to prevent any pooling of the paint. The results of that effort are shown in Picture 3.
For comparison, Picture 4 shows my T-34 painted with Tamyia paint next to my Pzkw III in the Vallejo paint. Both paint jobs are showing the modulation technique that I am trying to learn how to apply. The Vallejo paints appear to be semi-gloss and will require a matt coat but I am happy with the results.
My feeling is that I have either a bad bottle of Vallejo dark yellow or it is just a property of that color of paint. The sand yellow came in the same set as the dark yellow so I would expect that the paint would be of similar age. I plan on stopping by HobbyTown on the way home and picking up another bottle of Vallejo model air dark yellow and if they have it the Model Color dark yellow and the Model Air sand to test that theory.
Thanks for the help and recommendations. I’ll have several of these tanks finished for the next club meeting and I’ll try and write something for the blog to share my experience.
Bruce Biskup
Bothell, WA
Good Morning Bruce!
I’m glad to see you are getting somewhere with Vallejo paints. The Mk III in the final shot looks good, for sure. The Dark Yellow In picture one is the right color, slightly greenish in hue. It is the (first) of (three) colors that comprise German Yellow, according to Vallejo. The photos below shows all three in action:
The quickest way to that color is Tamiya Dark Yellow followed by a post shading using Tamiya Deck Tan. But then it’s back to Tamiya and lacquer – like weaning yourself from candy and steak.
The difference is thinning might be due bad paint, environment, or to the differences between a siphon-feed airbrush (mine) and a gravity-feed airbrush (yours), I don’t know. Try it a few more times at 2:1 and if it workee, we will know what the perfect ratio for your setup is. Someone should be writing all of this down! (John?)
Thanks!
Eric
Here’s the second image for the above post.
Thanks!
Eric
Eric,
What would you recommend as the modulated colors for Vallejo Panzer grey? I have a Pzkw IIIe, Pzkw IIIG, Pzkw Ib, and a PSW 223 that are all in the classic panzer color.
I might as well get those colors as well.
Thanks,
Bruce Biskup
Bothell, WA
I still like candy and steak.
Thomas Dunford
Hi Bruce –
The relative colors from the Early War Set are below, but I have yet to purchase and use them. I doubt you will use all 4, since their pattern has been three shades for German Yellow and American Green. I went to HobbyTown in Redmond and they were out, so I went with candy and steak for the 35(t) review, below.
I have about five different takes on German Grey that I have used with success. These two are shown with and without flash. I will be applying decals, washes and filters on these tonight. The 35(t) is Tamiya Ocean Grey 2 (RAF) over Vallejo German Grey Primer, the 251 is the same with a post-shading coat of the Ocean Grey and Tamiya Flat Flesh 50/50 over Tamiya NATO Black Primer.
Both the Tiger and Mk III below use Model Master DunkelBraun RLM 61 with a post shade coat of the same, mixed with MM
Flat Insignia White, over a NATO Black primer.
Finally, the 38(t) below is in Tamiya XF-63 German Grey with a post-shading coat of that and Tamiya Flat Flesh, over NATO Black primer.
Thanks!
Eric
Attached image: