Tips and Tricks
- Basic Modeling Techniques
- General Modeling Techniques
- Advanced Techniques
- Creating realistic Bamboo
- Biplane Rigging Jig Assembly Instructions
- Rigging Instruction Guide
- WWII German Figure Painting Guide
- YouTube Video - Chipping and Chip Types
- A Slick Trick
for Drag Slicks - Airbrushing Armor
- Building an Airbrush Cleaner
- Building an Airbrush Paint Booth
- Airbrushing Using C02
- Keeping it Clean
- Using Filters
- Wonder Tape
- Working with Photoetch parts
- EXTERNAL SITE REFERENCES
Fine Scale Modeler Magazine Techniques - Scale Auto Magazine Techniques
- Scale Model Guide Techniques
- Cyber Modeler
- Genesis Models
Basic Weathering Series - Modeler Site
- Model Aces
- Testors Scale Workshop with Brett Green
- PlasticModels.eu
- Armorama Techniques
- Mig Step-by-Step Series Features
- Dirt and Grease - Mig Jimenez
- Jet Exhaust - Alexander Kutovenko
- Acrylic Washes - Sergiusz Pęczek
- Photoetch tips - Javier López de Anca
- Step-by-Step: Weathered Tank Wagon
- Step-by-Step: How to Paint a BTR 80
- Step-by-Step: How to Use Camouflage Masking Putty
- Step-by-Step: F-16 Fighter USAF
- Step-by-Step: Egyptian M109 2011
- Step-by-Step: Rusted Rails
- Step-by-Step: French Fighter Cover
- Step-by-Step: Colors in the Ukrainian Conflict
- Step-by-Step: How to Use Dry Earth Tracks
- Step-by-Step: How to Use Wet Earth Tracks
- Step-by-Step: World Rally Car
- Step-by-Step: How to Paint a NATO Truck
- Step-by-Step: Making Mud
- Step-by-Step: Finishing Tracks for Armor Projects
- Step-by-Step: French Fighter Cover
- Step-by-Step: Grey Scale - Painting in Modulation and Light
- Step-by-Step: MAXX-PRO
- Step-by-Step: Mud Splashes
- Step-by-Step: Weathering a T-34-85
- Step-by-Step: How to use Transparator
- Step-by-Step: Painting US NAVY F-14
- Step-by-Step: Winter Camouflage Painting - Episode 1 - Slightly Weathered
- Video - How to do streaking rust on a Zaku Lucca 2015
- Video - How to use filters on a Zaku Lucca 2015
- Video - How to make shadows on a Zaku
- Video - How to make Grazes, chips and scratches on a Zaku Lucca 2015
- Video - How to create dirt with pigments on a Zaku
- Video - How to create an accumulated dirt effect on a Zaku
- Video - How to use chipping effect on a Zaku
- Video - How to make Grease and wet effects
- Video - How to make Fading effects with oils
- Video - How to make Splashed dry mud
- Video - Chipping Effect
- Video - How to use Washes and pigments on rust
- Video - How to create winter camouflage mud effect
- Video - How to Create streaking rust on winter camouflage
- Video - Winter camouflage highlights and shadows using oil paints
- Video - Winter camouflage chipping
- Video - Winter camouflage streaking grime
- Video - How to Create highlights with oil paints on winter camouflage
- Video - How to use enamel washes on winter camouflage
- Video - How to Create streaking grime on panels
- Video - How to Create paneling on metal surfaces
- Video - How to Create base rust effects and final touches
- Video - How to use a washable base color
Tips and Tricks
Keeping it Clean - Eric Christianson - August 2013
How many times are your best intentions of keeping your model room organized thwarted by attempting to accomplish too much in too little space? It used to happen to me a lot (and still does now and then), but I’ve come up with some ideas that I’d like to pass along which might help solve that problem.
Looking around my modeling area I realized that a lot of my materials and supplies were only used when I was doing specific tasks. For example, there were a dozen little things that I use when applying decals that just take up space the rest of the time. I purchased a small plastic case, labeled it ‘Decal Kit’, and put those things in it. Bang – look – empty spaces. I did the same with photo-etch tools and equipment, putting all that stuff in an identical case labeled ‘Photo-Etch Kit’. Wow – that actually made a difference – it doesn’t take much to get a modeler excited!
I decided to tackle the elephant in the room – my weathering and finishing tools and supplies. As an armor builder I do a lot of weather- ing, a job that can get messy in a hurry. Simply applying pigments and/or working with slow-drying oil paints can lay down an impres- sive layer of un-invited goo in no time. I could see doing two things that would significantly clean up my modeling area: 1) remove all weathering and finishing materials from the shelves and tabletops, and 2) find a way to only see that pile of stuff when I needed it.

To this end I started with an old modeling tray that IPMS member Don Conrard gave me a while back. It was large, sturdy and most importantly, had an expansive, thick glass top to work on. I added several wooden trays and nooks to hold the items I needed to store, slapped a heavy-duty handle where I needed it on the back, and started to move stuff out. I was impressed. Not only did I clear off a lot of space from my main modeling table, but the entire contraption could be moved and set out of the way on top of my airbrush booth – still close by, but not in my face.
The ‘weathering tray’ had room for washes along the right side, pigments along the left and back, places for seven type of brushes organized by function (filter, pin wash, streaking, dry pigment, wet pigment, etc.), space for tube oils, colored and lead pencils, and plenty of room for pre-mixed products from manufacturers. All of this surrounded a large, goo-proof work area. Now when I have built and completely painted a model, I clear off my desk, drop this big tray down, do the weathering and put the tray back where it came from. Bingo.
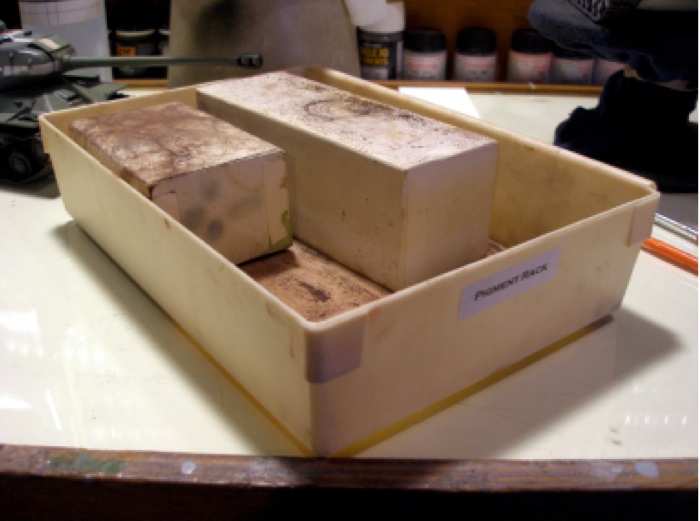
One last item I came up with is what I called a ‘pigment rack’. This is simply a plastic tray with a business-card box inside in it. This set- up allows me to place a tank on the upside-down box in the middle of the tray for applying pigments. The vehicle stays put pretty well, and all the excess pigment that falls off is neatly caught below for reuse with the next application. This thing really works well for doing tracks.
I hope that you have found this article helpful and can find similar ways to organize your modeling area. As always, if you have a modeling tip or technique that you would like to pass along, or any questions or comments, feel free to email me directly at modelreric@comcast.net
