Tips and Tricks
- Basic Modeling Techniques
- General Modeling Techniques
- Advanced Techniques
- Creating realistic Bamboo
- Biplane Rigging Jig Assembly Instructions
- Rigging Instruction Guide
- WWII German Figure Painting Guide
- YouTube Video - Chipping and Chip Types
- A Slick Trick for Drag Slicks
- Airbrushing Armor
- Building an Airbrush Cleaner
- Building an Airbrush Paint Booth
- Airbrushing Using C02
- Keeping it Clean
- Using Filters
- Pigments Revisited
- Wonder Tape
- Working with Photoetch parts
- EXTERNAL SITE REFERENCES
Fine Scale Modeler Magazine Techniques - Cyber Modeler
- Genesis Models
Basic Weathering Series - Modeler Site
- Testors Scale Workshop with Brett Green
- PlasticModels.eu
- Armorama Techniques
- Mig Step-by-Step Series Features
- Dirt and Grease - Mig Jimenez
- Jet Exhaust - Alexander Kutovenko
- Acrylic Washes - Sergiusz Pęczek
- Photoetch tips - Javier López de Anca
- Step-by-Step: Weathered Tank Wagon
- Step-by-Step: How to Paint a BTR 80
- Step-by-Step: How to Use Camouflage Masking Putty
- Step-by-Step: F-16 Fighter USAF
- Step-by-Step: Egyptian M109 2011
- Step-by-Step: Rusted Rails
- Step-by-Step: French Fighter Cover
- Step-by-Step: Colors in the Ukrainian Conflict
- Step-by-Step: How to Use Dry Earth Tracks
- Step-by-Step: How to Use Wet Earth Tracks
- Step-by-Step: World Rally Car
- Step-by-Step: How to Paint a NATO Truck
- Step-by-Step: Making Mud
- Step-by-Step: Finishing Tracks for Armor Projects
- Step-by-Step: French Fighter Cover
- Step-by-Step: Grey Scale - Painting in Modulation and Light
- Step-by-Step: MAXX-PRO
- Step-by-Step: Mud Splashes
- Step-by-Step: Weathering a T-34-85
- Step-by-Step: How to use Transparator
- Step-by-Step: Painting US NAVY F-14
- Step-by-Step: Winter Camouflage Painting - Episode 1 - Slightly Weathered
- Video - How to do streaking rust on a Zaku Lucca 2015
- Video - How to use filters on a Zaku Lucca 2015
- Video - How to make shadows on a Zaku
- Video - How to make Grazes, chips and scratches on a Zaku Lucca 2015
- Video - How to create dirt with pigments on a Zaku
- Video - How to create an accumulated dirt effect on a Zaku
- Video - How to use chipping effect on a Zaku
- Video - How to make Grease and wet effects
- Video - How to make Fading effects with oils
- Video - How to make Splashed dry mud
- Video - Chipping Effect
- Video - How to use Washes and pigments on rust
- Video - How to create winter camouflage mud effect
- Video - How to Create streaking rust on winter camouflage
- Video - Winter camouflage highlights and shadows using oil paints
- Video - Winter camouflage chipping
- Video - Winter camouflage streaking grime
- Video - How to Create highlights with oil paints on winter camouflage
- Video - How to use enamel washes on winter camouflage
- Video - How to Create streaking grime on panels
- Video - How to Create paneling on metal surfaces
- Video - How to Create base rust effects and final touches
- Video - How to use a washable base color
Tips and Tricks
A few new things I’ve learned about working with photoetch
by Eric Christianson
While several armor kit manufacturers have earned a reputation for stuffing their kits with photoetch, I was ill-prepared for what I found when I started building my 1/350th scale U.S.S. Wasp Marine Assault Carrier. The truth is, modelers who build steel-navy ship have forgotten more about using photoetch than I have ever learned building armor. Word.
Let’s face it, photoetch makes or breaks a steel-navy ship model. You might (initially) be attracted to a ship model by its big guns, or perhaps a detailed flight deck, or even the nice lines of a large man-o-war, but it will be the PE that will produce the ‘whoa!’ factor. My ship is literally buried in the stuff, and either I had to learn a great deal more about photoetch, or retreat back to the safe harbor of armor. Along the way, I found some new products and techniques that I hope will help others.
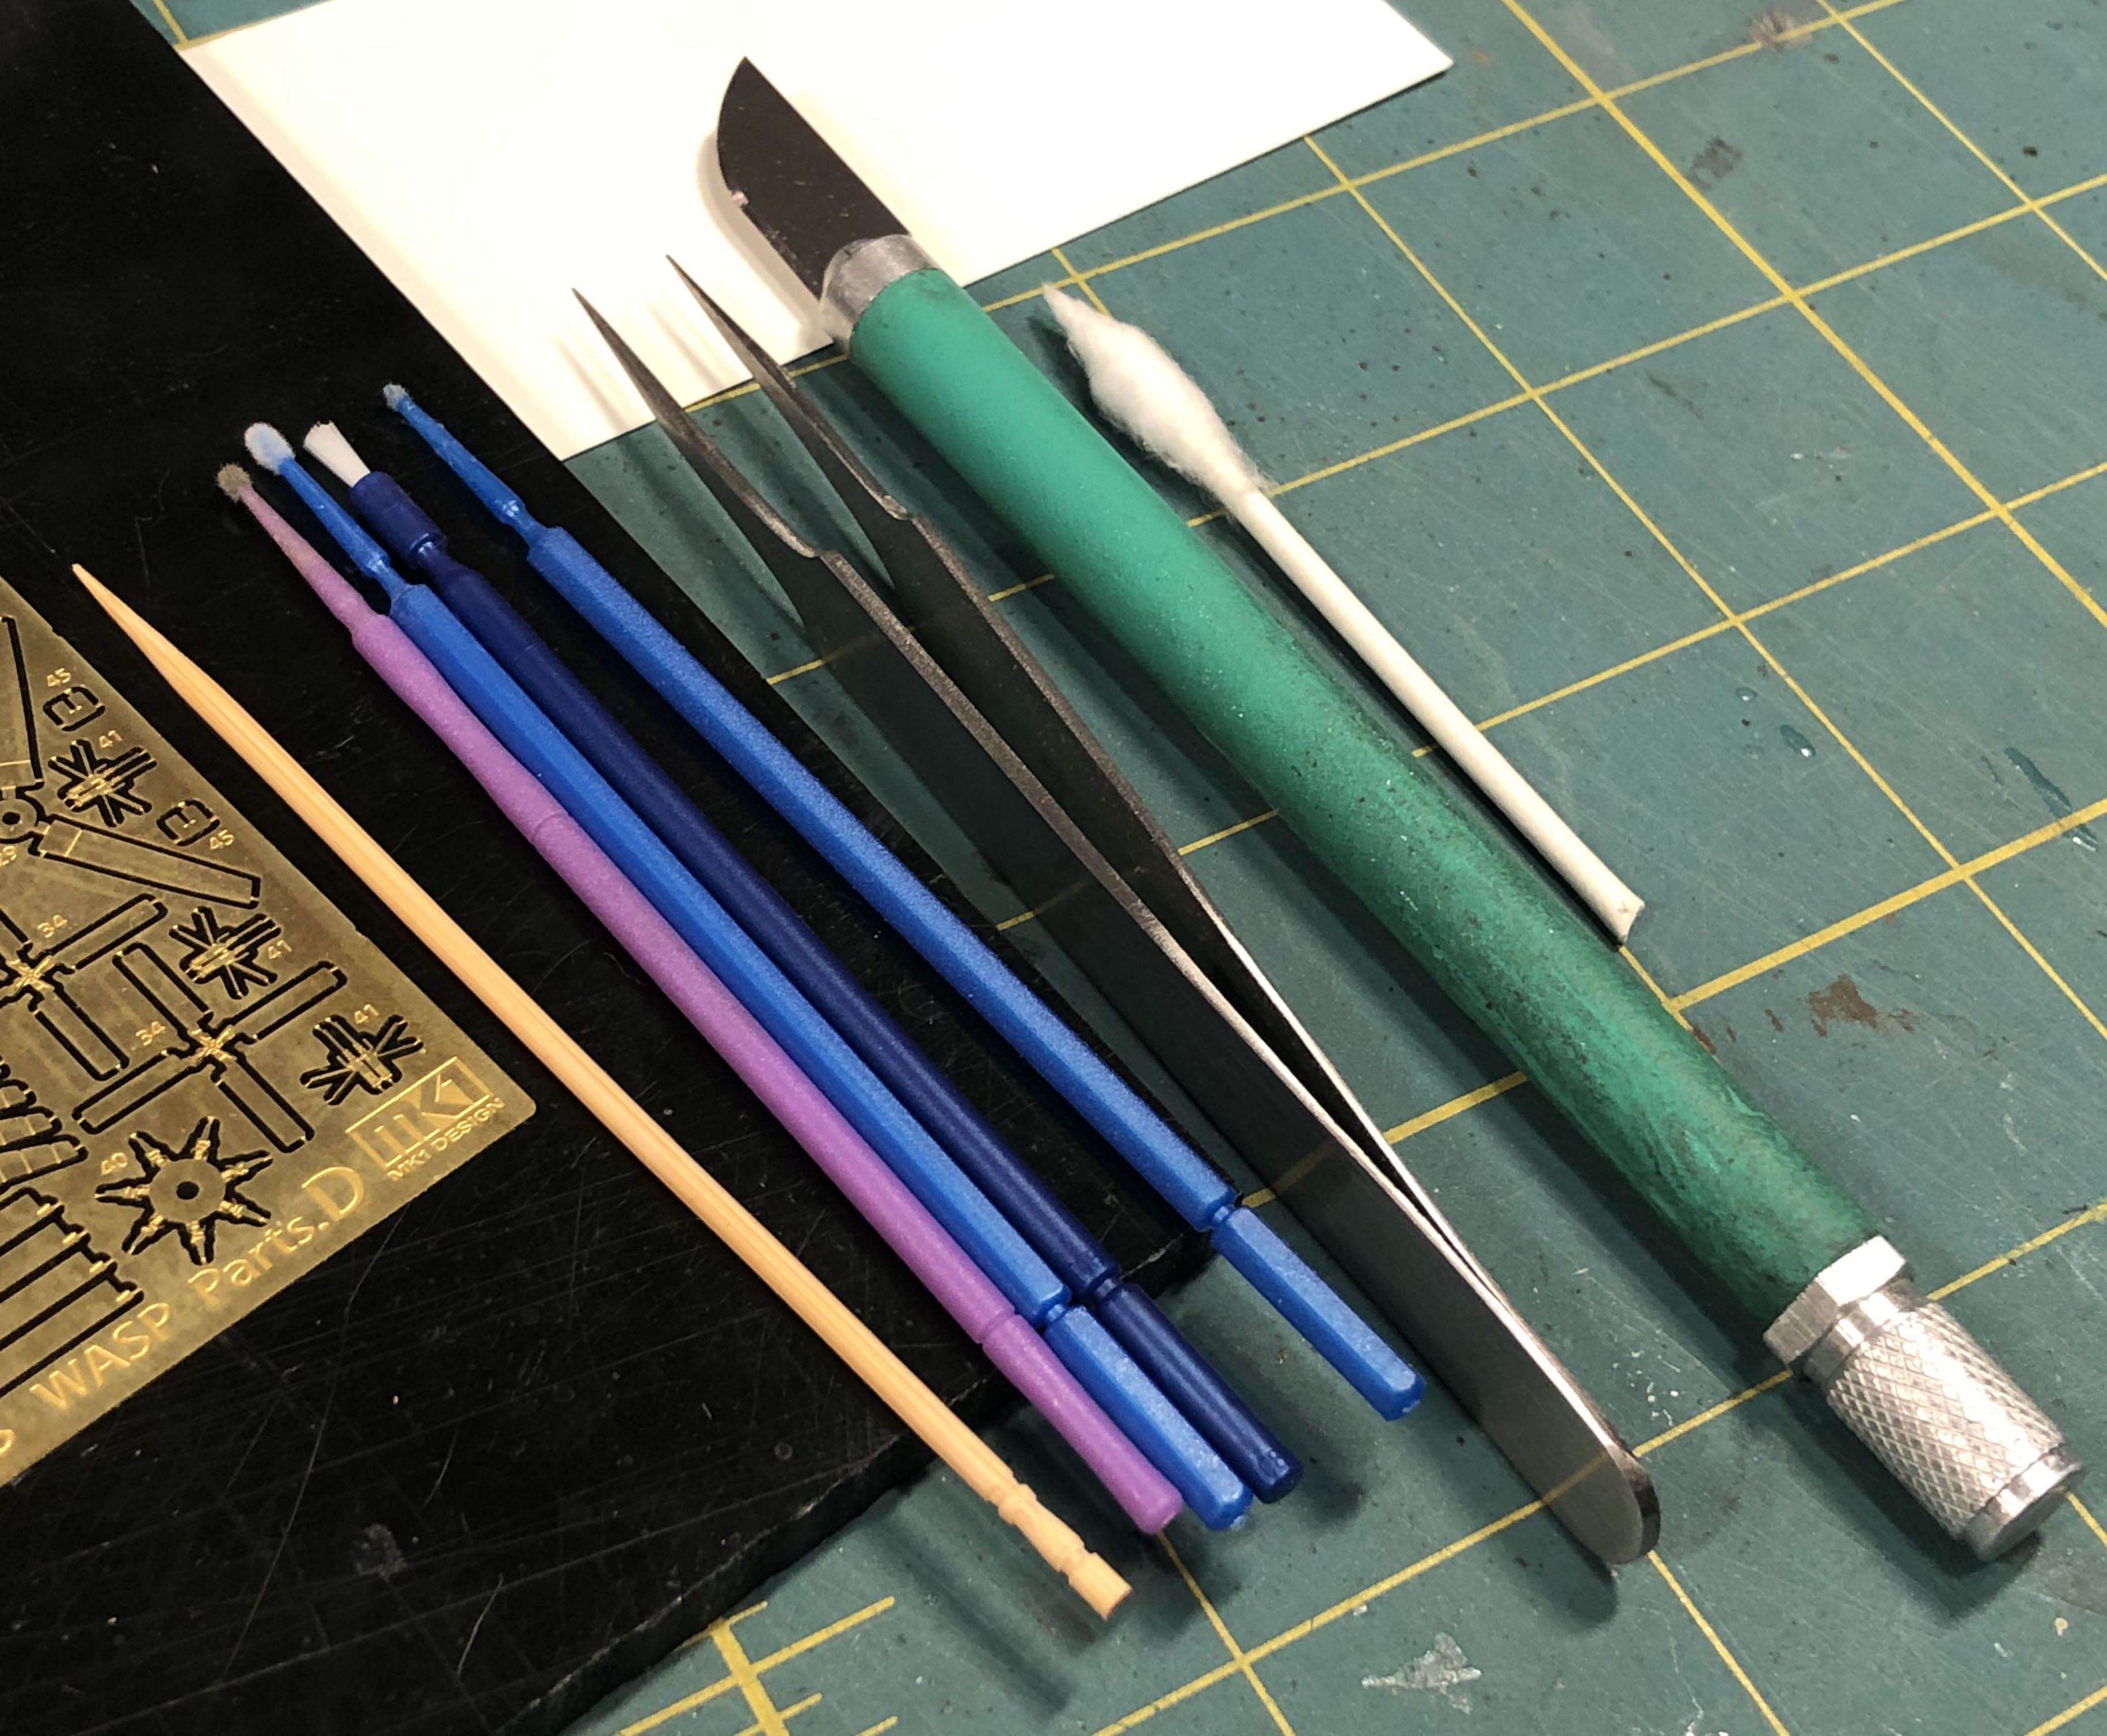
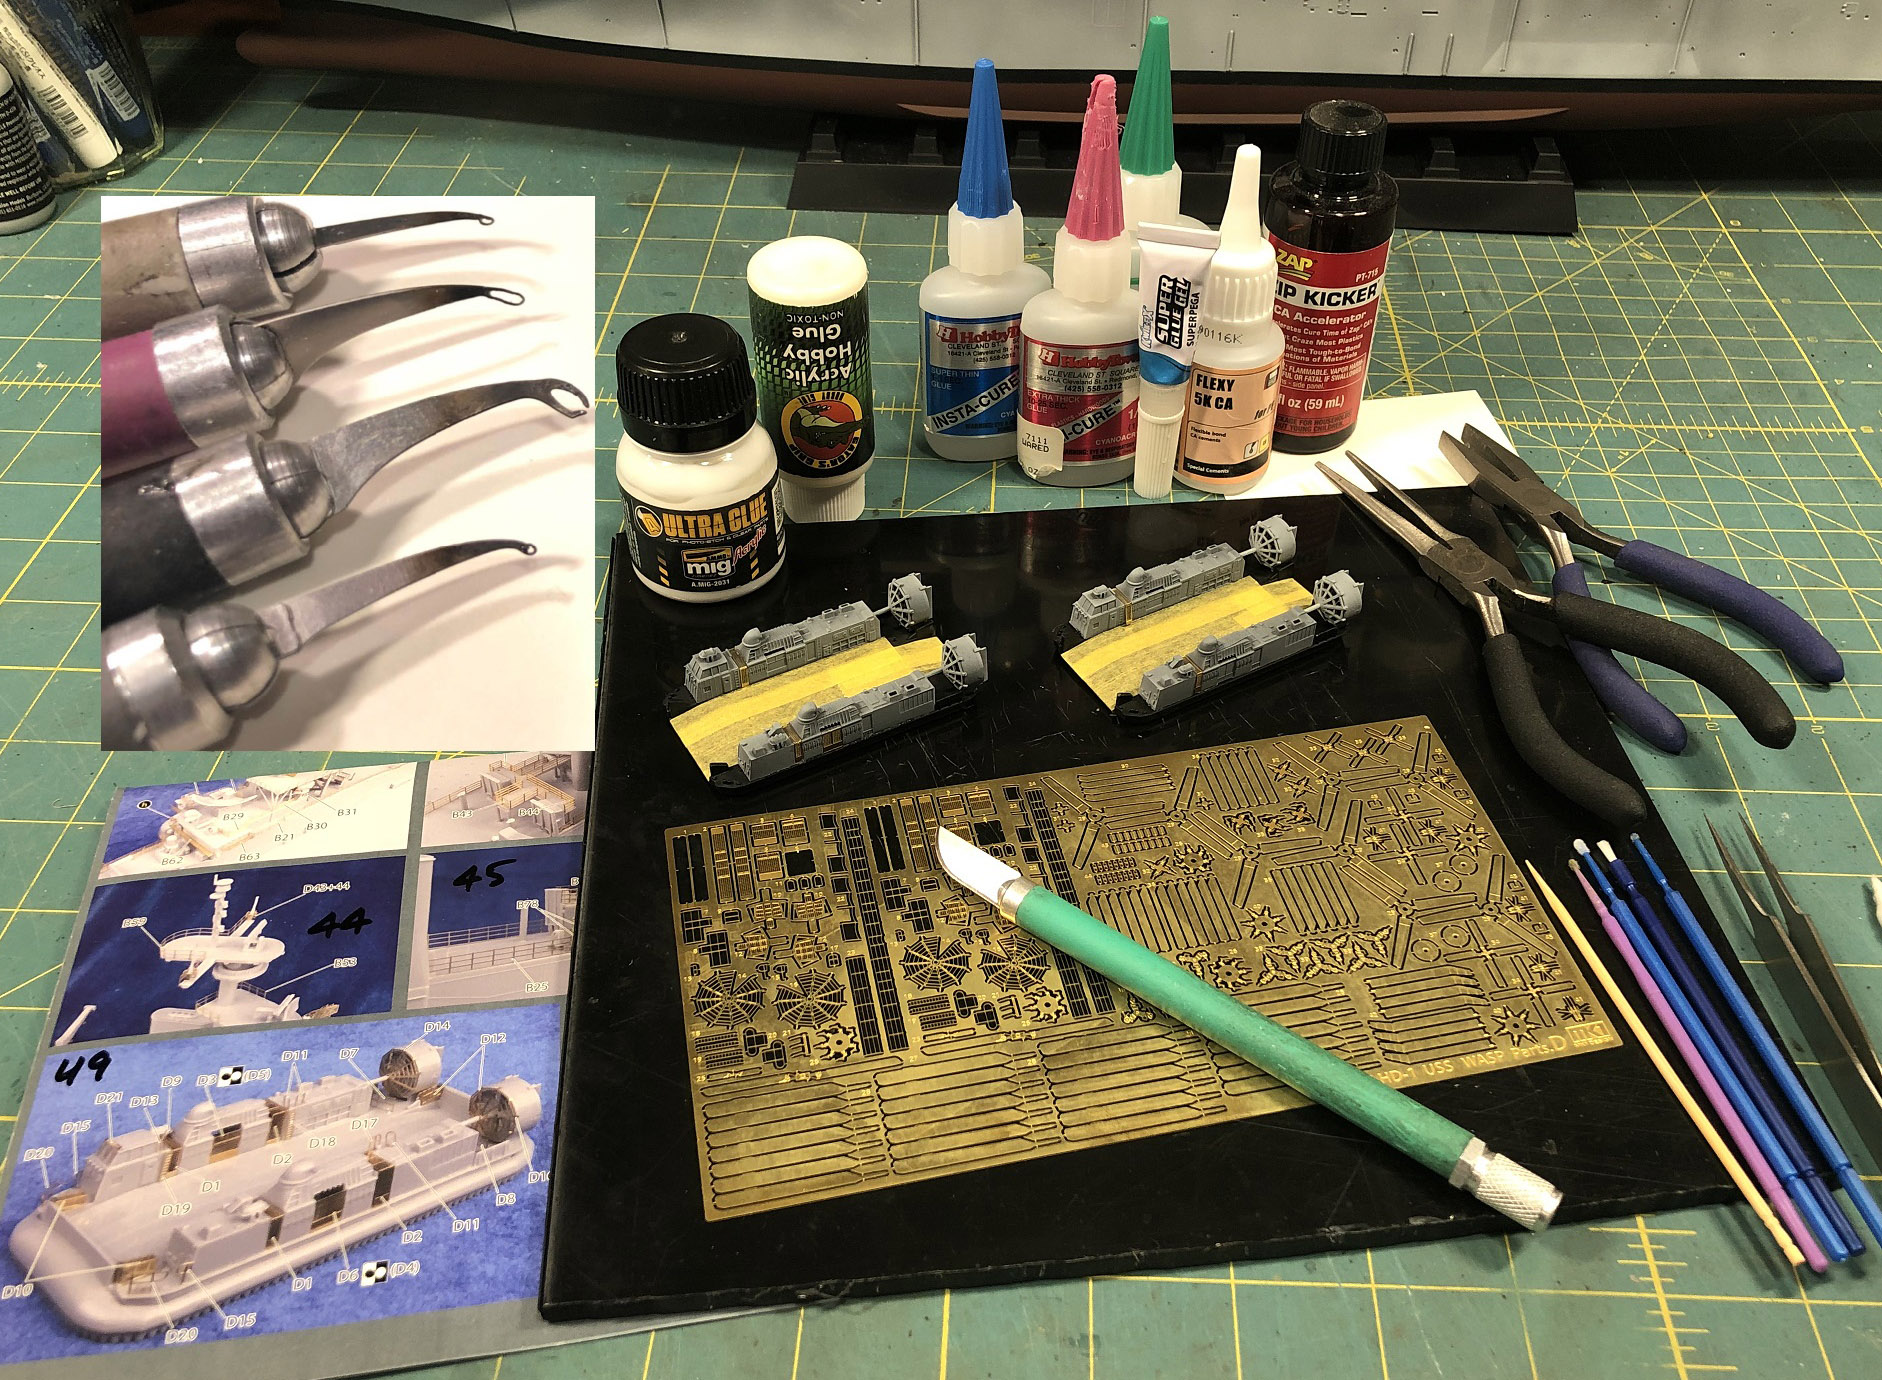
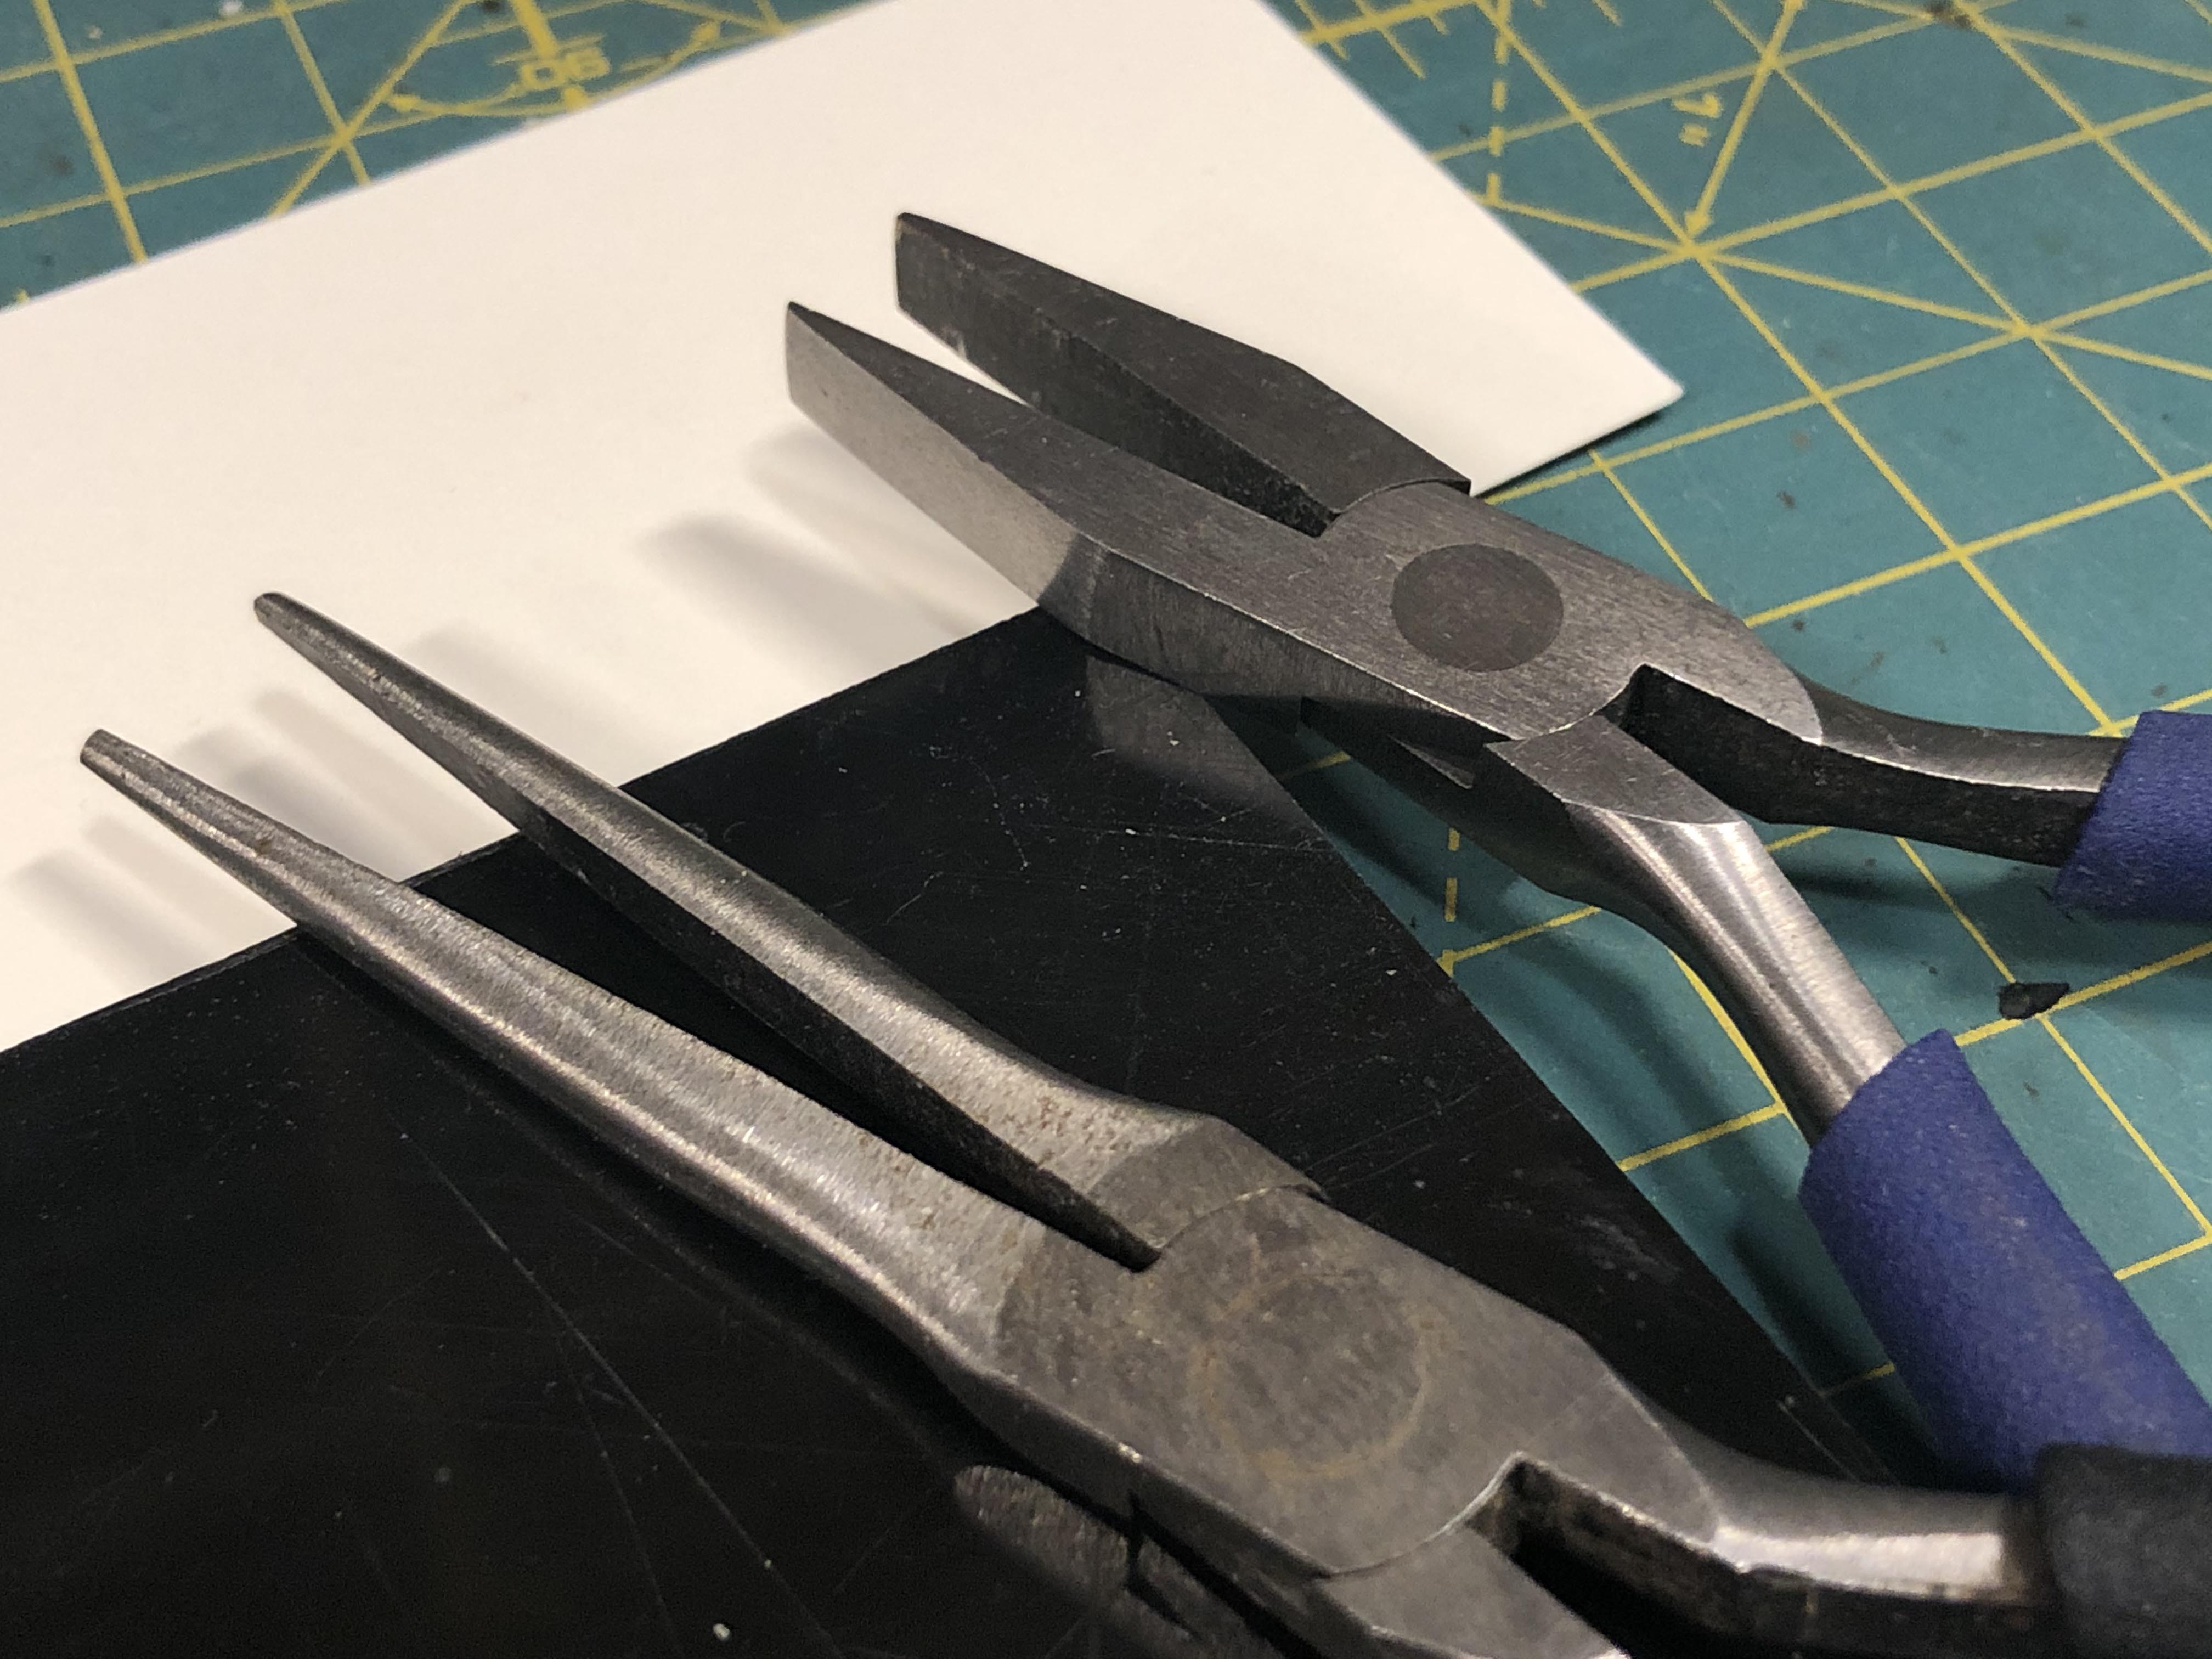 Bending hardware: Years ago, I spent a lot of money on various bending tools from The Small Shop and similar vendors. I have totally replaced their function with about $10 worth of smooth-faced pliers from JoAnn (see image). The key is that the surfaces are smooth and the edges are squared off. I use a long, needle-nosed pair and a shorter, squared-end pair. Since changing over, I have yet to pick up my $60 Small Shop tool once. The pliers are easier to manage, hold tight, and are capable of the complex bends prevalent with PE on ships.
Knife and Cutting Surface: After much experimentation, I have found that using an Xacto #10 curved blade on a LARGE piece of very hard, black plastic (found at TAP plastics) works the best. A glass surface tends to dull my blades pre-maturely, and the cuts in the plastic can easily be sanded out, if necessary. Also, the black background color tends to make the process of cutting right on the edge of the pieces easier, without leaving nubs that would need sanding off. This is especially important with ship railings.
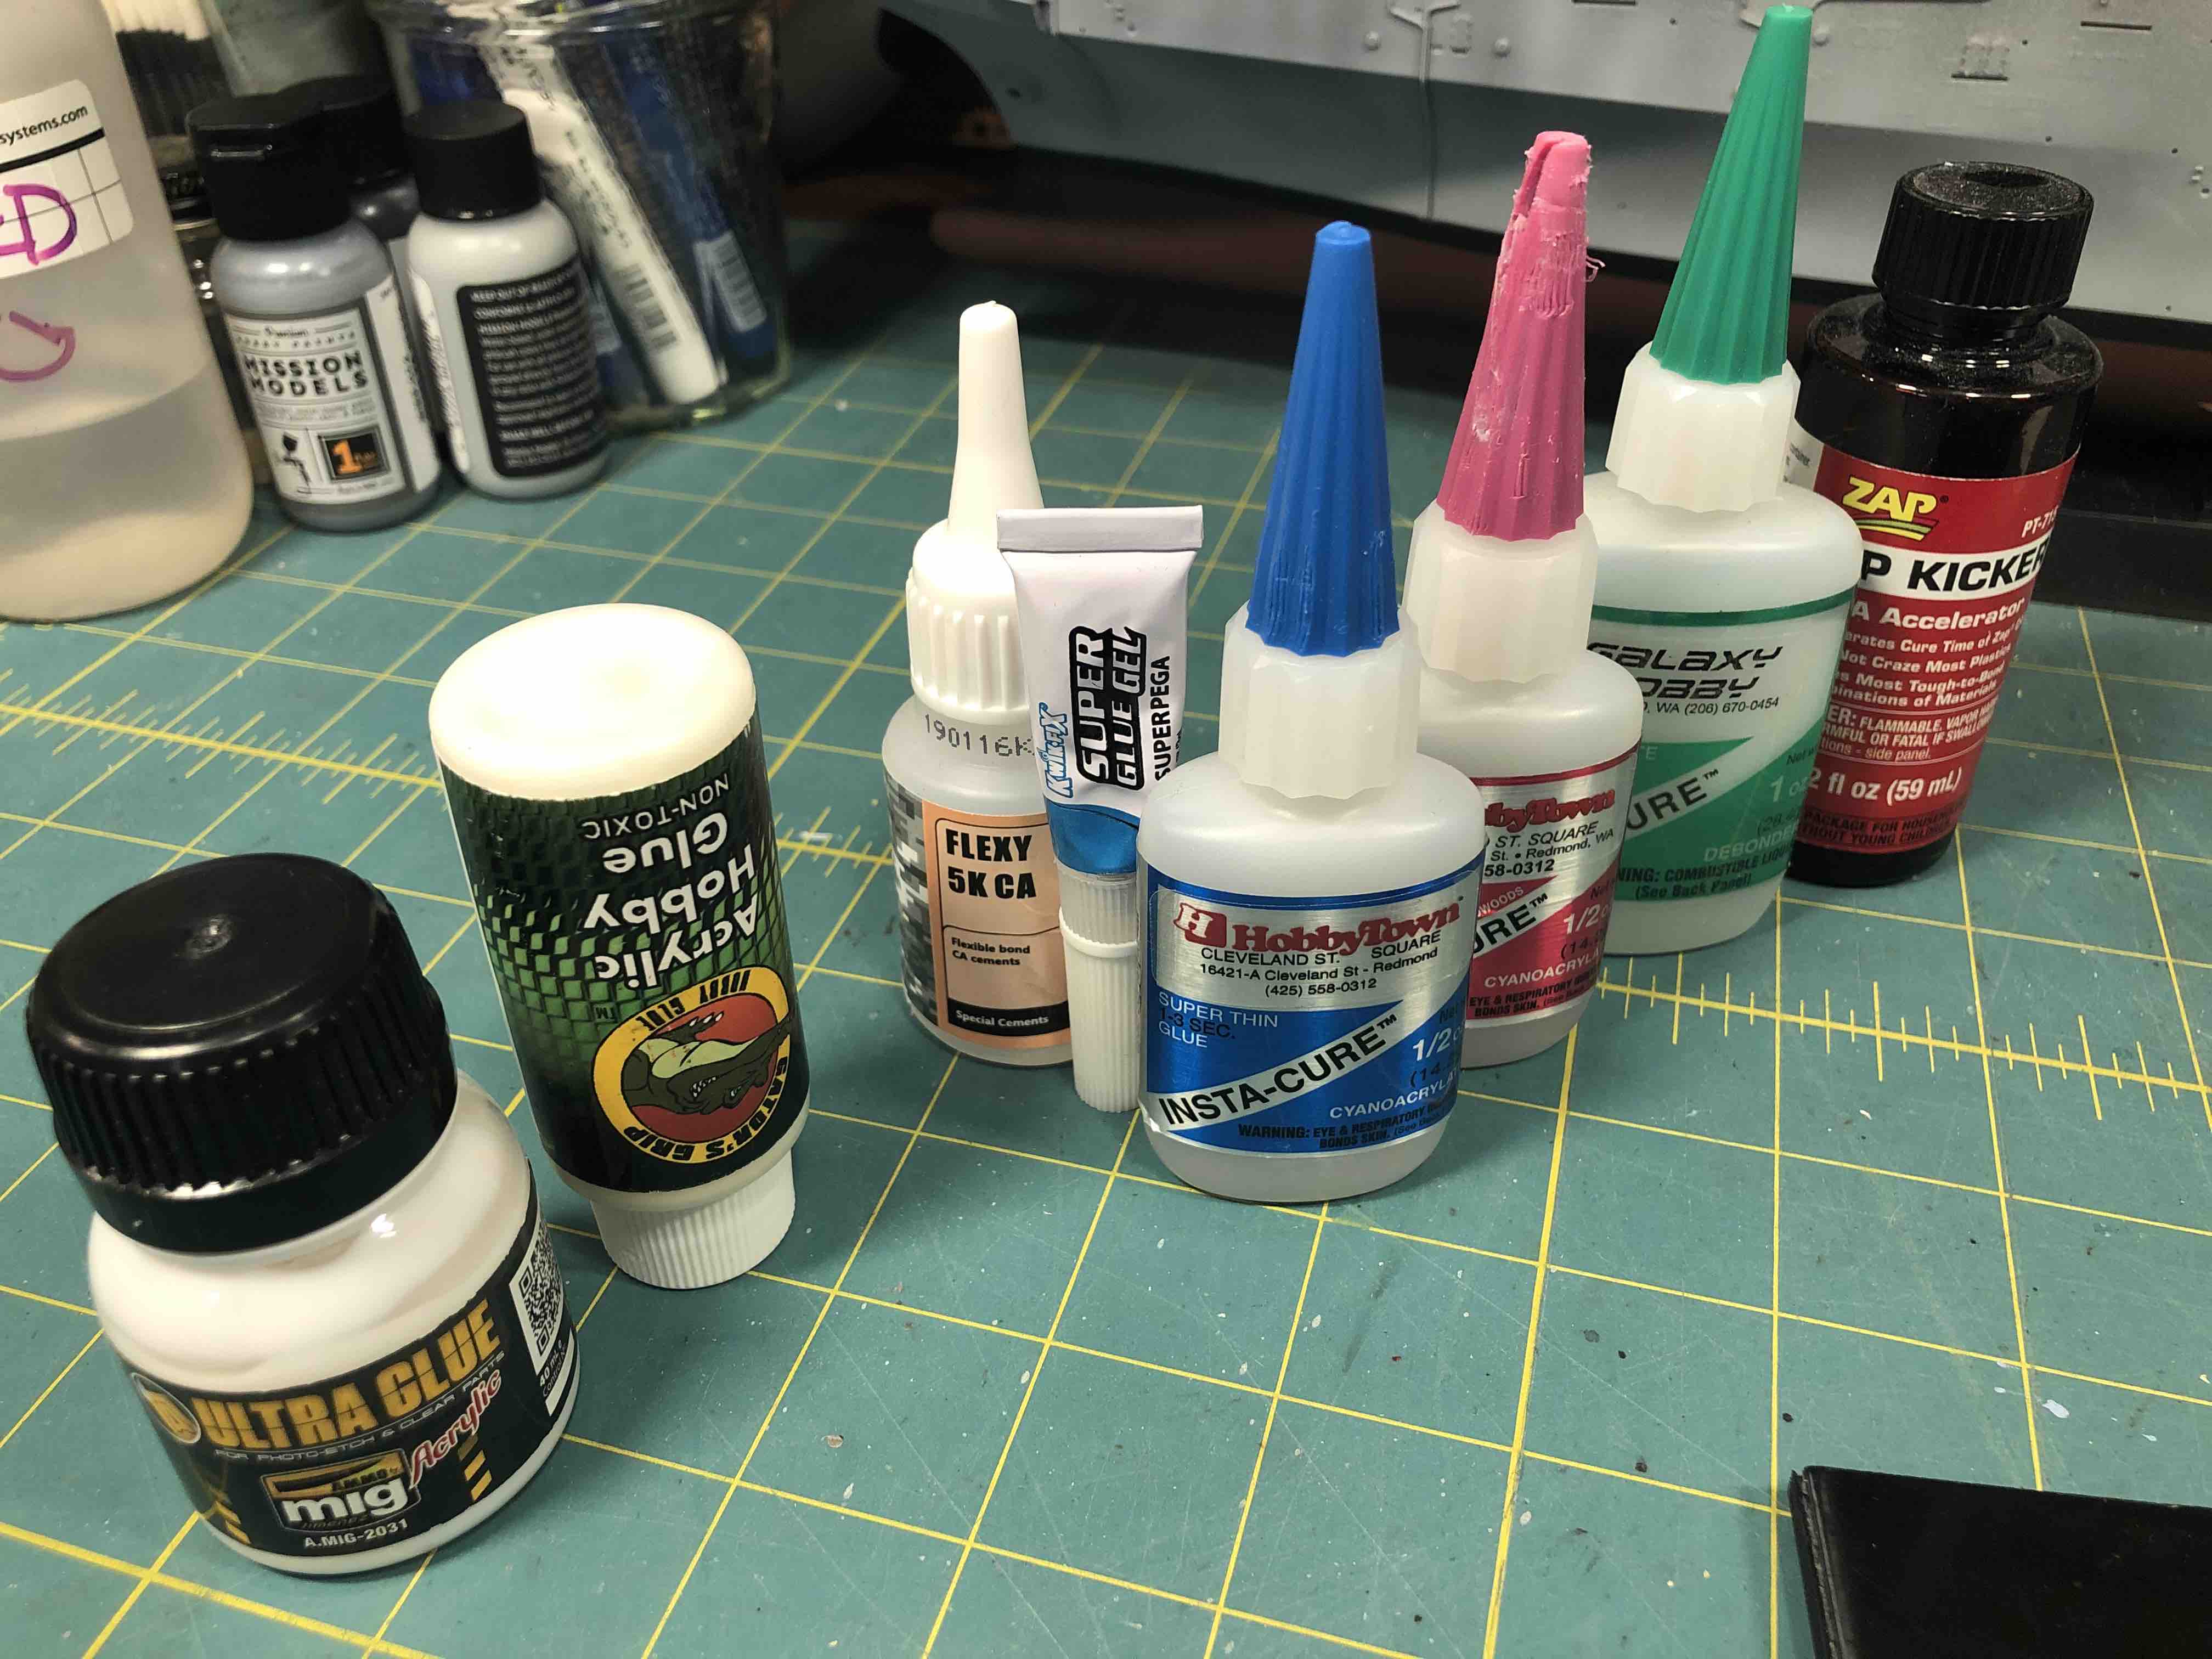
Adhesives: There will always be a time and place for using CA glue with photoetch, but there are new products that have replaced that tricky, and often infuriating, approach to attaching PE to a model (and only the model). A few years ago, a guy down in the South found the right mix of ‘horse nose and alligator toes’, coming up with an acrylic white glue ‘on steroids’ (gatorsmask.com). Unlike CA glue, this thick, acrylic formula is super tacky at first touch – meaning you can put a small smear on a surface, press a ship railing into the smear, and then do the same at the other end, relying on the various finishing coats of paint and varnish to hold everything else in place. If you make a mistake, you can easily clean it up, or remove the glue completely with a damp Q-tip. Ammo Products by Mig has come out with a similar product called Ultra Glue – they both work the same, and have become a game-changer in the PE world.
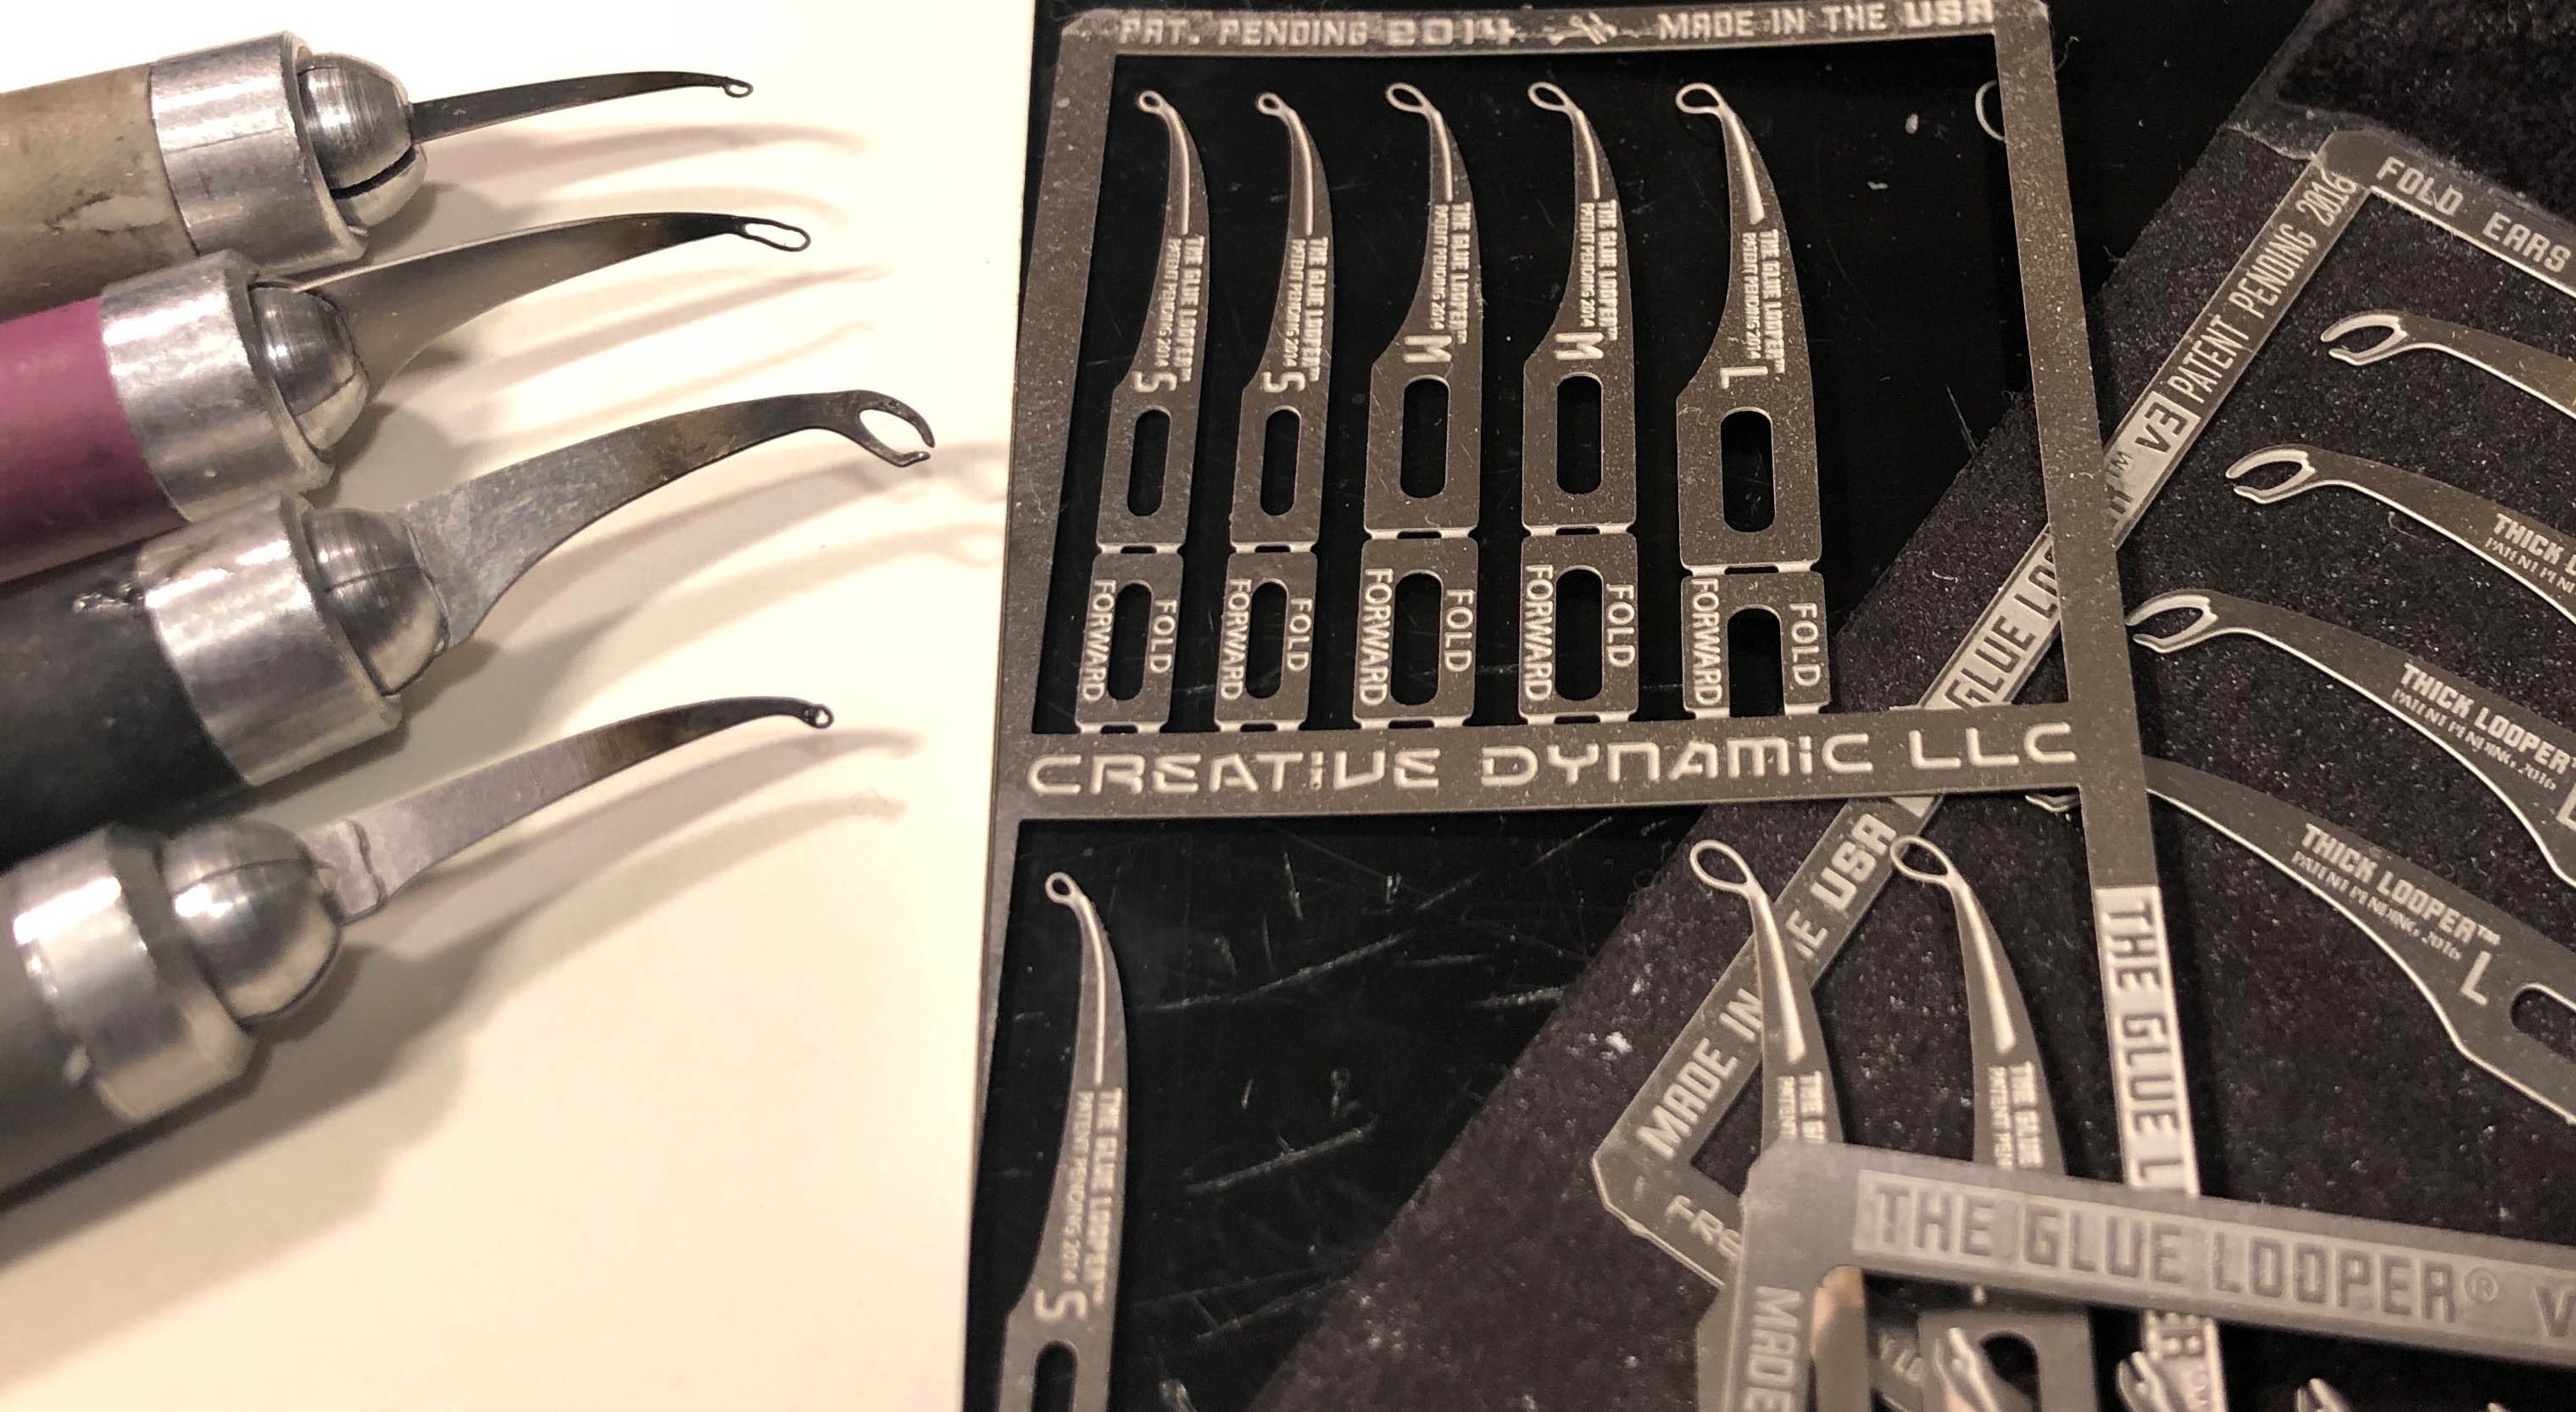 Applicators: I use two kinds of adhesives, so the type of applicators I use depends on what glue I am using. For CA glue, nothing will beat the various tools sold under the title ‘Glue Looper’ (creativedynamicllc.com). In my opinion, if you swear by using a home-made tool, such as a ‘dowel-and-cut-needle’ type of applicator, you haven’t yet tried a Glue Looper. Similar idea, totally different experience. Simply drag the looper through a drop of CA glue on a CD (or similar surface) and touch it to the part being glued and you’ll understand. The Loopers come in different sizes depending on the type of CA glue you are using and the application. The tough, steel tips can be chucked into standard Xacto handles and cleaned by exposing them to open flame. The ends on my loopers are still the original ones I bought several years ago.
For the other type of adhesive (an enhanced, acrylic ‘white’ glue), I use one of several different tools (or a toothpick), again, depending on the application. I can easily wipe the excess glue off the tool using a wet paper towel or Q-tip. Do not use your tongue, as this stuff is not Elmer’s!
And that’s it. You may surely do things differently with PE, and that’s great – you’re getting it done! These materials and techniques work best for me.
Thanks, and Model On!
Eric