Reviews
Armor
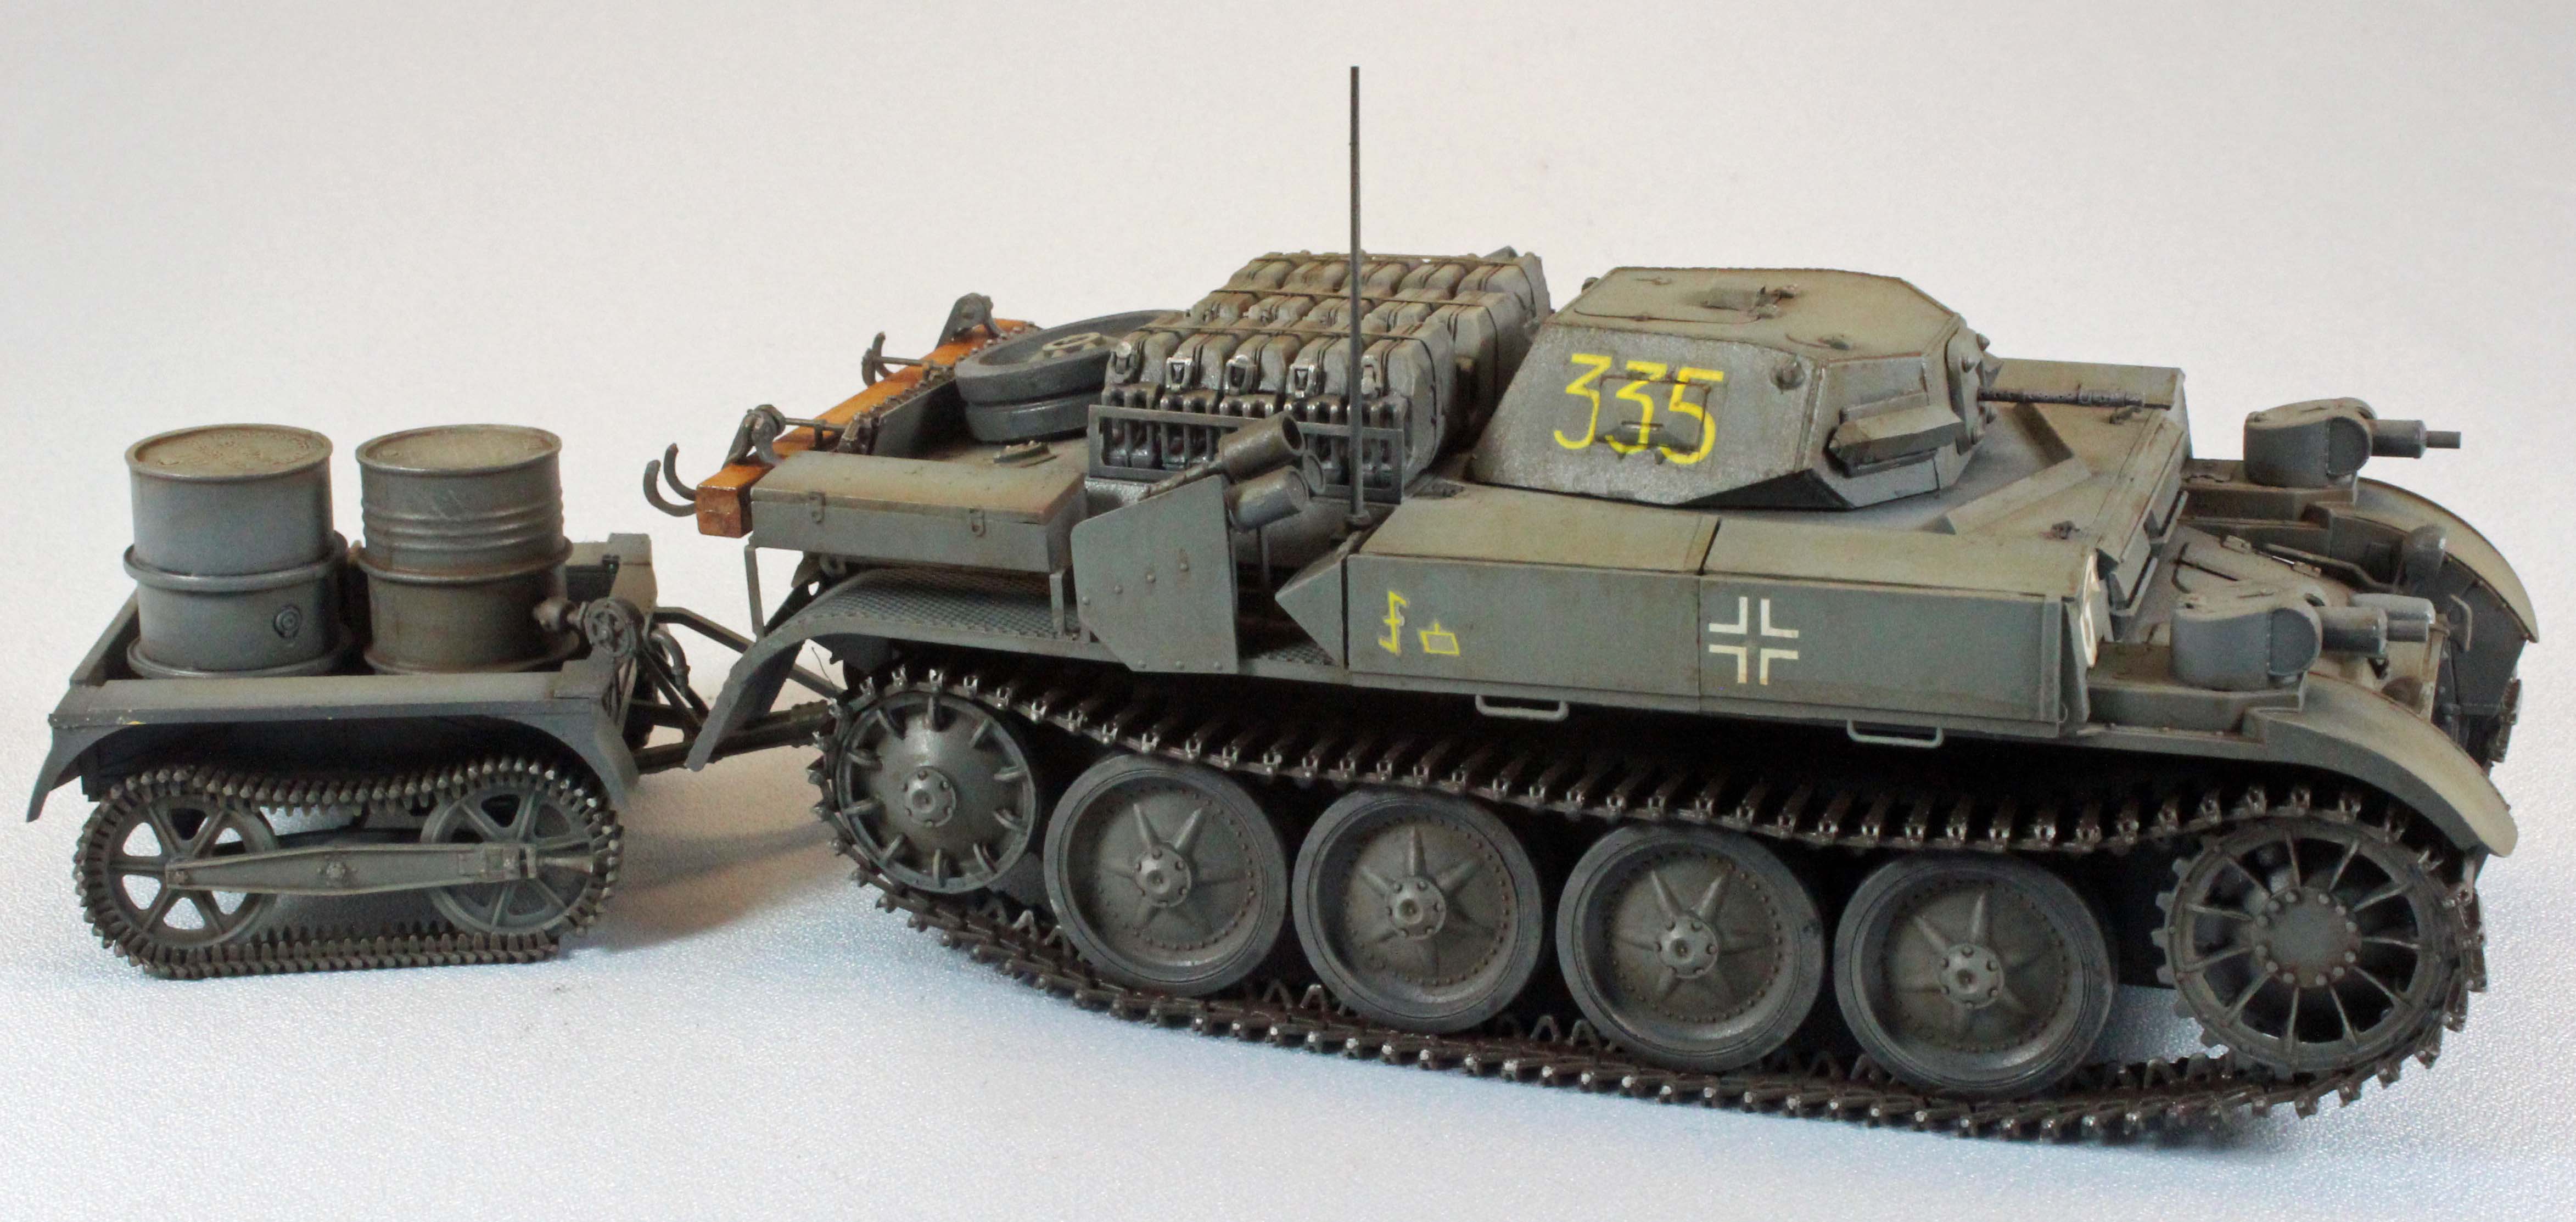
Bronco PanzerKampfwagon II Sd.Kfz.122 (F) w/UE Trailer
by Eric Christianson
 Model: PanzerKampfwagon II Sd.Kfz.122 (F) w/UE Trailer
Reviewed by: Eric Christianson, IPMS # 42218
Scale: 1/35
Company: Bronco Models
Price: $45.99
Product/Stock #: CB35090
Website: Bronco Models
Product Web Page: View
Product provided by: Dragon Models USA
Summary
Newly offered in injection-molded plastic by Bronco Models out of China, the Sd.Kfz.122(F) Flammpanzer is a real gem of a kit. Bronco had previously released an all-new version of the gun tank, but this is the first Flamm version since the discontinued kit from ICM/Alan in 2006. It comes with a (captured) French tracked trailer and enough jerry cans and oil drums to make any diorama-minded modeler happy. The fuel and water cans and the oil drums are straight from a separate Bronco offering reviewed here: http://ipms-seattle.org/reviews/armor/2014-EC-Bronco-AB3557.pdf The French UE trailer appears to be a knock off of the one offered by Tamiya in its ‘Chenillette’ French Armored Carrier kit. Combined, Bronco’s new Flammpanzer kit is a solid offering, and a real value.
Keep in mind; Bronco kits are not for the faint of heart, but the parts fit, they are well-engineered, and with a little patience, will build into great models.
Background
In1939, the German Army ordered the development of a Flammpanzer (flame-thrower tank) based on the PzKpfw II Ausf D/E’s chassis. The new vehicle was armed with two flame-throwers mounted on track guards on each side. Each flame-thrower was mounted in a special turret-like case that allowed them to operate at 180 degrees radius, facing forward. Each weapon had its own fuel tank with 160 liters capacity - enough to fire 80 bursts at a range of 25 meters. The fuel consisted of a mixture of oil and gasoline that was ejected with the help of nitrogen stored in six pressurized tanks. Defensive armament consisted of a single, turret-mounted Mg34, for which 1800 7.92mm rounds were carried inside. The vehicles crew consisted of three men (driver, radio operator and commander/flame-thrower operator) and its armor protection ranged from 14.5mm to 30mm thickness. The PzKpfw II (F) was powered by a 6-cylinder Maybach HL62 TRM engine, with total power of 140hp.
A fully restored and operational Flammpanzer II can be seen in the "Wehrtechnik Museum" in Koblenz Germany.
The contents of the box include:
- 13 sprues of soft, light grey plastic
- 5 sprues of soft, light brown plastic (track links)
- 1 sprue of clear plastic (glass parts)
- 1 trailer hull, packaged separately
- 1 piece of white twisted cotton string
- 1 medium sheet of decals, thin, but in perfect register
- 2 sheets of photo-etch, including jerry can inserts and plenty of other detail
- 1 color print of the box art suitable for framing
- 1 large instruction booklet, totaling 26 pages with 47 steps, printed in color
The Instructions
As with many other Bronco kits, the instructions come in a beautifully rendered, fully illustrated, color 8.5x11 booklet. The CAD images are sharp and show the assembly from a variety of different angles to help the modeler throughout the build. That said, this is a complex kit representing a complex vehicle. It is relatively easy to have things go sideways unless you pay very close attention to what you are doing.
There are basically two display options, based mostly on rear-deck loads, so a little up-front work is in order to figure out what you want to do.
The instructions come with specific paint call-outs for Mr. Hobby, Hobby Color, Humbrol and Tamiya paints to help with painting.
Assembly sequence varies by modeler but the general flow of things go pretty much as Bronco intended. The exceptions I made are identified in the text, below.
Eight and a half pages of color schemes are included – all dark German Grey (!) – and represent the following units:
- 1. Pz.Abt.(F)100 1940/1941 French/Belgian/Netherlands coast
- 2. Pz.Kpfw.II(F) 100 Russia, 1941 (4 options)
- 3. Kompanie of Pz.Abt.(F) 101 East Prussia 1941
Things to consider before building:
There is a lot of photo-etch without plastic alternatives included in the kit. Some of it is detail that could be left off for those modelers so inclined, but other parts are up front and center on the finished model and need to be used, such as the brackets for the front headlights (Step 12) and the smoke dischargers (Step 23). To make things even more interesting, many of the PE parts attach to plastic along their ‘knife-edge’. If you aren’t good at PE before you begin, you will be when you are done!
The kit also contains a many parts that have (male) connection tabs, but their (female) counterparts are not as much holes as they are very small indentations in the surface receiving the part - if they exist at all. As a consequence, more often than not the part doesn’t seat correctly and/or stands just proud of the surface. To resolve this you can either deepen the indentations or sand down the tabs to fit. Either way, test fit everything before applying glue.
The rear deck can be smothered with jerry cans and a spare wheel, or not, so you’ll need to decide up front what you want to do.
Most hatches can be modeled in the open position, and some of them come with impressive detail on the inside of the hatch. Unfortunately, there is no (tank) interior detail provided.
Construction:
Construction begins with the lower hull and suspension. The four part lower hull comes together well. There are six impossibly small wingnuts that affix to three fluid excavation plates in the back. I lost two, but managed to attach the remaining four. We’ll see if they make it through the build!
Interesting design here - eight axle stubs are attached to the sides of the hull, with a wheel on each. The two center wheels on each side, however, are position-able. I’m not sure what Bronco had in mind here. What I would like to think is that they wanted to provide a way for some modelers to show the vehicle running over an object … while at the same time not saddle the rest of the modelers with assembling everything needed to make ALL the wheels position-able.
Whatever the case, once the wheels are attached, you can simply let gravity align the free-moving wheels with their neighbors as the glue dries, sitting on a table top. Two of the parts labeled B36 were removed once I discovered they prevent the wheels that are attached over them from aligning.
Assembly of the remaining parts making up the running gear went without a hitch and fit well. The ‘rubber’ tires are molded separate from the wheels, but are easy to clean since the sprue attachment points are on the outside of each tire, instead of the inside. Thank you, Bronco.
The rear end of this tank is like everything else in the build; made with layers of detail. In Step 6, I annealed the PE exhaust cover before rolling it into the shape needed and pushing it into place on the cylinder. I suggest you let this (and the next two assemblies) dry thoroughly before combining them at the end of the Step – it’s tricky getting everything to fit – but it does. In Step 7, be aware that the rear tow pintle is the same one that you will attach the trailer to, later. No glue on that bolt handle (Part A14)!
The rear deck (Steps 9-11) can either be covered with an assortment of jerry cans and spare equipment, or be left clear so that three prominent hatches can be modeled open. Keep in mind, these hatches, and area underneath them, do contain any detail.
Step 12 of this build taxed every skill I had as a modeler with the assembly of the front headlight brackets. The design is atrocious – it may be accurate, but any benefit resulting from that comes at a cost to the modeler who must put it together. Three parts, two of them PE, and the prominent (plastic) headlight, depend on the strength of a fourth part (also PE), which attaches to plastic hull along its unsupported, knife-edge. While I babied these two assembles into place I had to keep in mind that the front hull has a slightly downward cant, requiring me to angle the headlights properly. I would suggest that you attach the headlight assemblies last, before painting, but I found I needed 360 degree access due to the delicate nature of the task.
Steps 14 – 25 involve most of the visible detail on the top deck. The two flame nozzles up forward come pre-drilled out, but are somewhat fiddley to bring together. One problem is that the diameter of the small hatches on top of each unit are exactly the same diameter as the hole they are meant to cover, falling right through without some sort of solution to hold them in place. I simply applied some glue and then poked them in and out until they dried reasonably even.
The two antenna mounts have the same issue – the hatches are the same size as the holes they are meant to cover.
I felt the antenna (Part C15) was short and way over-scale in thickness. I remembered seeing an unused spare antenna in the box, so after performing a little surgery on both the antenna and the base, I used that one instead. In the end, however, I accidentally broke off the tip of the thinner one (and lost it) so it ended up looking just like the thicker one I was supposed to use. Oh well.
The fenders went on without a hitch – the photoetch and other protuberances fit under, around, and between things if you’ve done everything right.
In Step 18 the two fuel cylinders are assembled. Bronco provides a way to expose these with open doors or cover them up with closed doors. Either way, the brackets that hold them act as supports for other parts so the cylinders must be built even though they might be covered up.
In Step 22 the covers for the fuel cylinders can be installed in the open or closed position. Take care and study the picture carefully. The covers and doors can go on the wrong way – they need to line up with each other, and they are sided. I strongly suggest that you take your time here and dry fit everything.
I thought I had followed the directions to the letter, but somehow things got mixed up anyway. There are two ‘longer’ pairs of cover/door parts that go together on each side, but something went wrong. The raised panel-bar that should line up down the middle of the two doors on each side, didn’t. My gut says that the instructions show mis-labeled parts since the doors and covers seem to fit over the cylinders and on to the superstructure only one way.
Frustrated, I ended up shaving off the only locator pins provided and making the most with what I had, resulting in the raised bar not lining up on each side. Moving on.
The smoke dischargers in Step 23 and 24 looked at first like another challenging task, but turned out to be quite simple. Sturdy and well designed, I had no problems.
In Step 25, Bronco incorporates cotton string to serve as the rope attaching large hooks to the rear of the tank via two very thin and delicate bars. Using my modeler’s license, I nixed that approach and simply glued the large hooks to the brackets holding the ‘wood’ beam.
I chose to load the rear of my SdKfz 122 up with lots of jerry cans, which neatly fit into two very nice, photo-etch racks. Before dropping them into place, however, I wrapped each bundle with the thin PE strips provided.
The individual track links come on sprues and have four attachment points each. Even though they are numbered ‘1’ and ‘2’ on the sprue, there are no differences between them, and they are not sided. Bronco says to use between 90 and 93 links per side, I tried 93 on the first side and removed a link, settling on 92 for each side. Once the links have been carefully snipped and cleaned, they easily slip onto each other and have enough mass to stay put while constructing the runs. I used two drops of Testor’s black bottle cement per link to bring the entire run together as one piece. After drying for 45 minutes on a glue proof surface, the run could easily be lifted up and draped over the wheels and attached with glue. Done and done.
The turret is remarkably small, and, I think, gives the vehicle character. Dominated by a relatively huge hatch, the armament consists of a detailed, nine-piece machine gun that can be seen from the hatch opening, if it is modeled that way. The inside of the hatch is also well-detailed; sporting two ‘leather’ cushions, a five-piece visor block, and dual hatch handles. All three of the viewports can be modeled open or closed, and open ports contain a clear ‘glass’ lens. That’s a lot of ‘busy’ inside a turret only slightly larger than my thumb!
The trailer comes on a sprue that is lighter and made of slightly translucent, grey plastic. That, and the fit problems encountered, tell me that this part of the kit comes from a different source.
The center bar in Step 38 (Part Ga5) was not anything like what I had in the kit, and the grab-handles shown in Step 40 were missing altogether. I cobbled what I needed, however, without much of a problem.
What looked like the most complex part of the trailer (the track) actually comes together quite well. The wheels and bogies, however, were another story. Each had a very weak and poorly designed attachment point, and I feared snapping them off for the reminder of the build.
The jerry cans and oil drums, on the other hand, are simply brilliant. These are the same as found in their Hungarian Jerry Can set (link above). The cans come with a PE center strip that acts as a weld seam, and the barrels have separate lids and even have support straps in some cases. All have raised lettering and detailed add-on hardware, including a nice set of pumping nozzles for one of the barrels.
Since all the schemes provided in the instructions used German Grey, I guess my Sd.Kfz.122 would be German Grey. Recently I’ve moved over to using Vallejo acrylics, but I still have a significant amount of Tamiya paints left around, so I thought I’d use up some of that.
(Note: I thin all Tamiya paints 50/50 with Gunze Leveling Thinner, a lacquer. I swish that around until it is mixed and pour it into the color cup on my Pasche-H Single-Action airbrush, Number #3 tip, set at 20 lbs. pressure.)
I started by airbrushing a primer/pre-shade coat of Gunze Mr. Finisher 1500 Black to give the plastic and PE some grip for the following coats, and to fill in the recesses and create a shadow effect near the flat surface edges, adding depth for the subsequent coats to come. Once that had a chance to dry and de-gas overnight, I gave everything a base coat of Tamiya Ocean Grey 2, leaving enough black showing through for the effect I wanted. I then applied a post-shading coat using a (50/50 mix) Tamiya Ocean Grey 2 and Tamiya Flat Flesh, lightening up all the panels moving from the center outwards, paying special attention to the upper surfaces exposed to sunlight, and leaving what was in shadow, darker.
With painting finished, I air-brushed the surface areas that would be receiving decals with a coat of Future floor polish to give the decals a smooth surface to slide on. I decided to use Scheme 5: (# 335) in Russia, 1941, since it sported the most markings of the bunch and I felt the unicolor grey finish needed all the help it could get.
Once the Future was dry, I used the Red and Blue MicroSol/MicroSet products to apply the decals without any problems. The unit numbers and Balkan cross on the turret all had to snuggle over prominent viewing ports, so I was relieved that Bronco’s decals were very thin and responded well to MicroSet.
Once the decals were dry, I gave the entire vehicle a good coat of Future to seal the decals and prepare the surfaces for washes and streaking.
I used AK Interactive Track Wash for the track, including the spare links in the back, and Windsor & Newton VanDyke Brown Artists Gouache for an overall wash. I like using gouache for weathering since it mixes with water and remains workable until you cover it with a barrier, such as Future or a finishing coat (flat or semi-gloss). No other product or medium gives me the same working time.
I used a mix of Vallejo New Wood and Vallejo Sand Ivory for the wooden beam in the back. To achieve the wood-like effect, I let a coat of Mig Wash Brown oil paint soak on the surface of the beam overnight before rubbing off most of it using a Q-Tip. I used Uschi Chrome Pigment for steel detail here and there, including the machine gun.
I added a little additional bling using Gamblin Silver oil paint and an Artists blender, and highlighted edges here and there by dry-brushing Model Master Afrika Dunkelgrau RAL 7027.
Next I airbrushed Vallejo Light Brown along the bottom of the vehicle and trailer to simulate road dust, and shot a little Vallejo Matt Varnish on any remaining shiny spots.
Finally, I added a mix of Mig Black and Brown pigments to the running gear and track, and the rear of the vehicle. Off to the photo-booth for this little guy!
Conclusion
As I said before, this kit is not for the faint of heart. You have to know what you’re doing, you have to have a lot of patience, and you need to know how to slow down. Sometimes there are no easily-defined connection points between parts, or they are absent altogether. I think this is a result of Bronco prioritizing accuracy over build-ability, which is fine, but someone planning to build this kit needs to understand that. Dry fitting and methodical inspection is ‘de rigueur’ for this project.
In the end, however, extra effort breeds satisfying results. The finished product is unique and I was able to experience a real sense of accomplishment with this challenging and interesting build.
I recommend this kit for experienced modelers only due to the complexity of some of the subassemblies and the challenges that some of the photoetch offers. All things considered, however, the build went relatively smoothly and the result is worth the effort. My hat is off to Bronco for providing yet another ambitious and interesting project.
I would like to thank Bronco Models for providing this kit for review, and to IPMS USA for giving me the opportunity to build it.
Photos


