Reviews
Armor
M32B1 Armored Recovery Vehicle (ARV)
by Eric Christianson
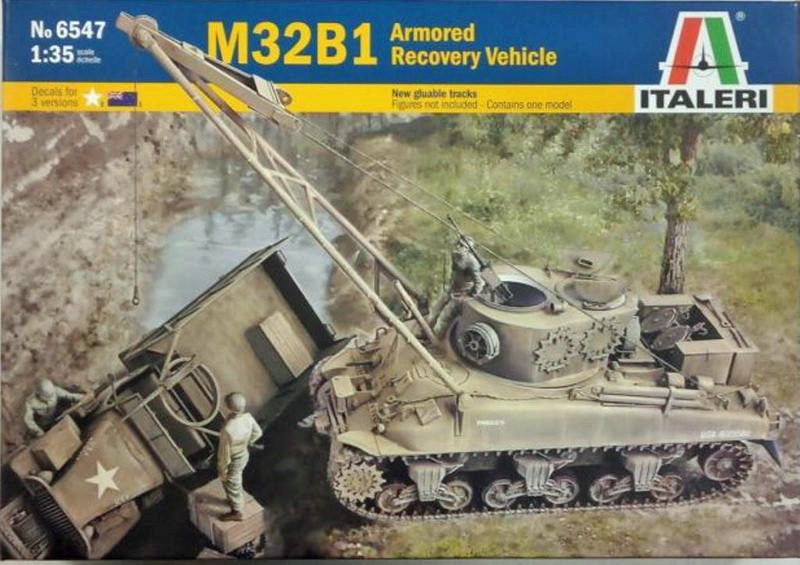 Model: M32B1 Armored Recovery Vehicle (ARV)
Reviewed by: Eric Christianson, IPMS # 42218
Scale: 1/35
Company: Italeri
Price: $29.99
Product/Stock #: ITL6547
Website: Italeri
Product Web Page: View
Product provided by: Italeri
The Italeri M32B-1 Armored Recovery Vehicle (ARV) Kit # 6547, originally released way back in 1980, was, at the time of release, still standing sentry duty as the only injection-molded set of sprues for this Sherman-based Allied tank recovery vehicle readily available. The model has gone through a number of updates and improvements since, culminating in what you see reviewed here. After all this time, however, Italeri’s offering ‘still has it goin’ on’, sporting a relatively detailed interior and winch/cable assembly; all housed in a decent Sherman chassis. As boxed, this kit is one heck of a value.
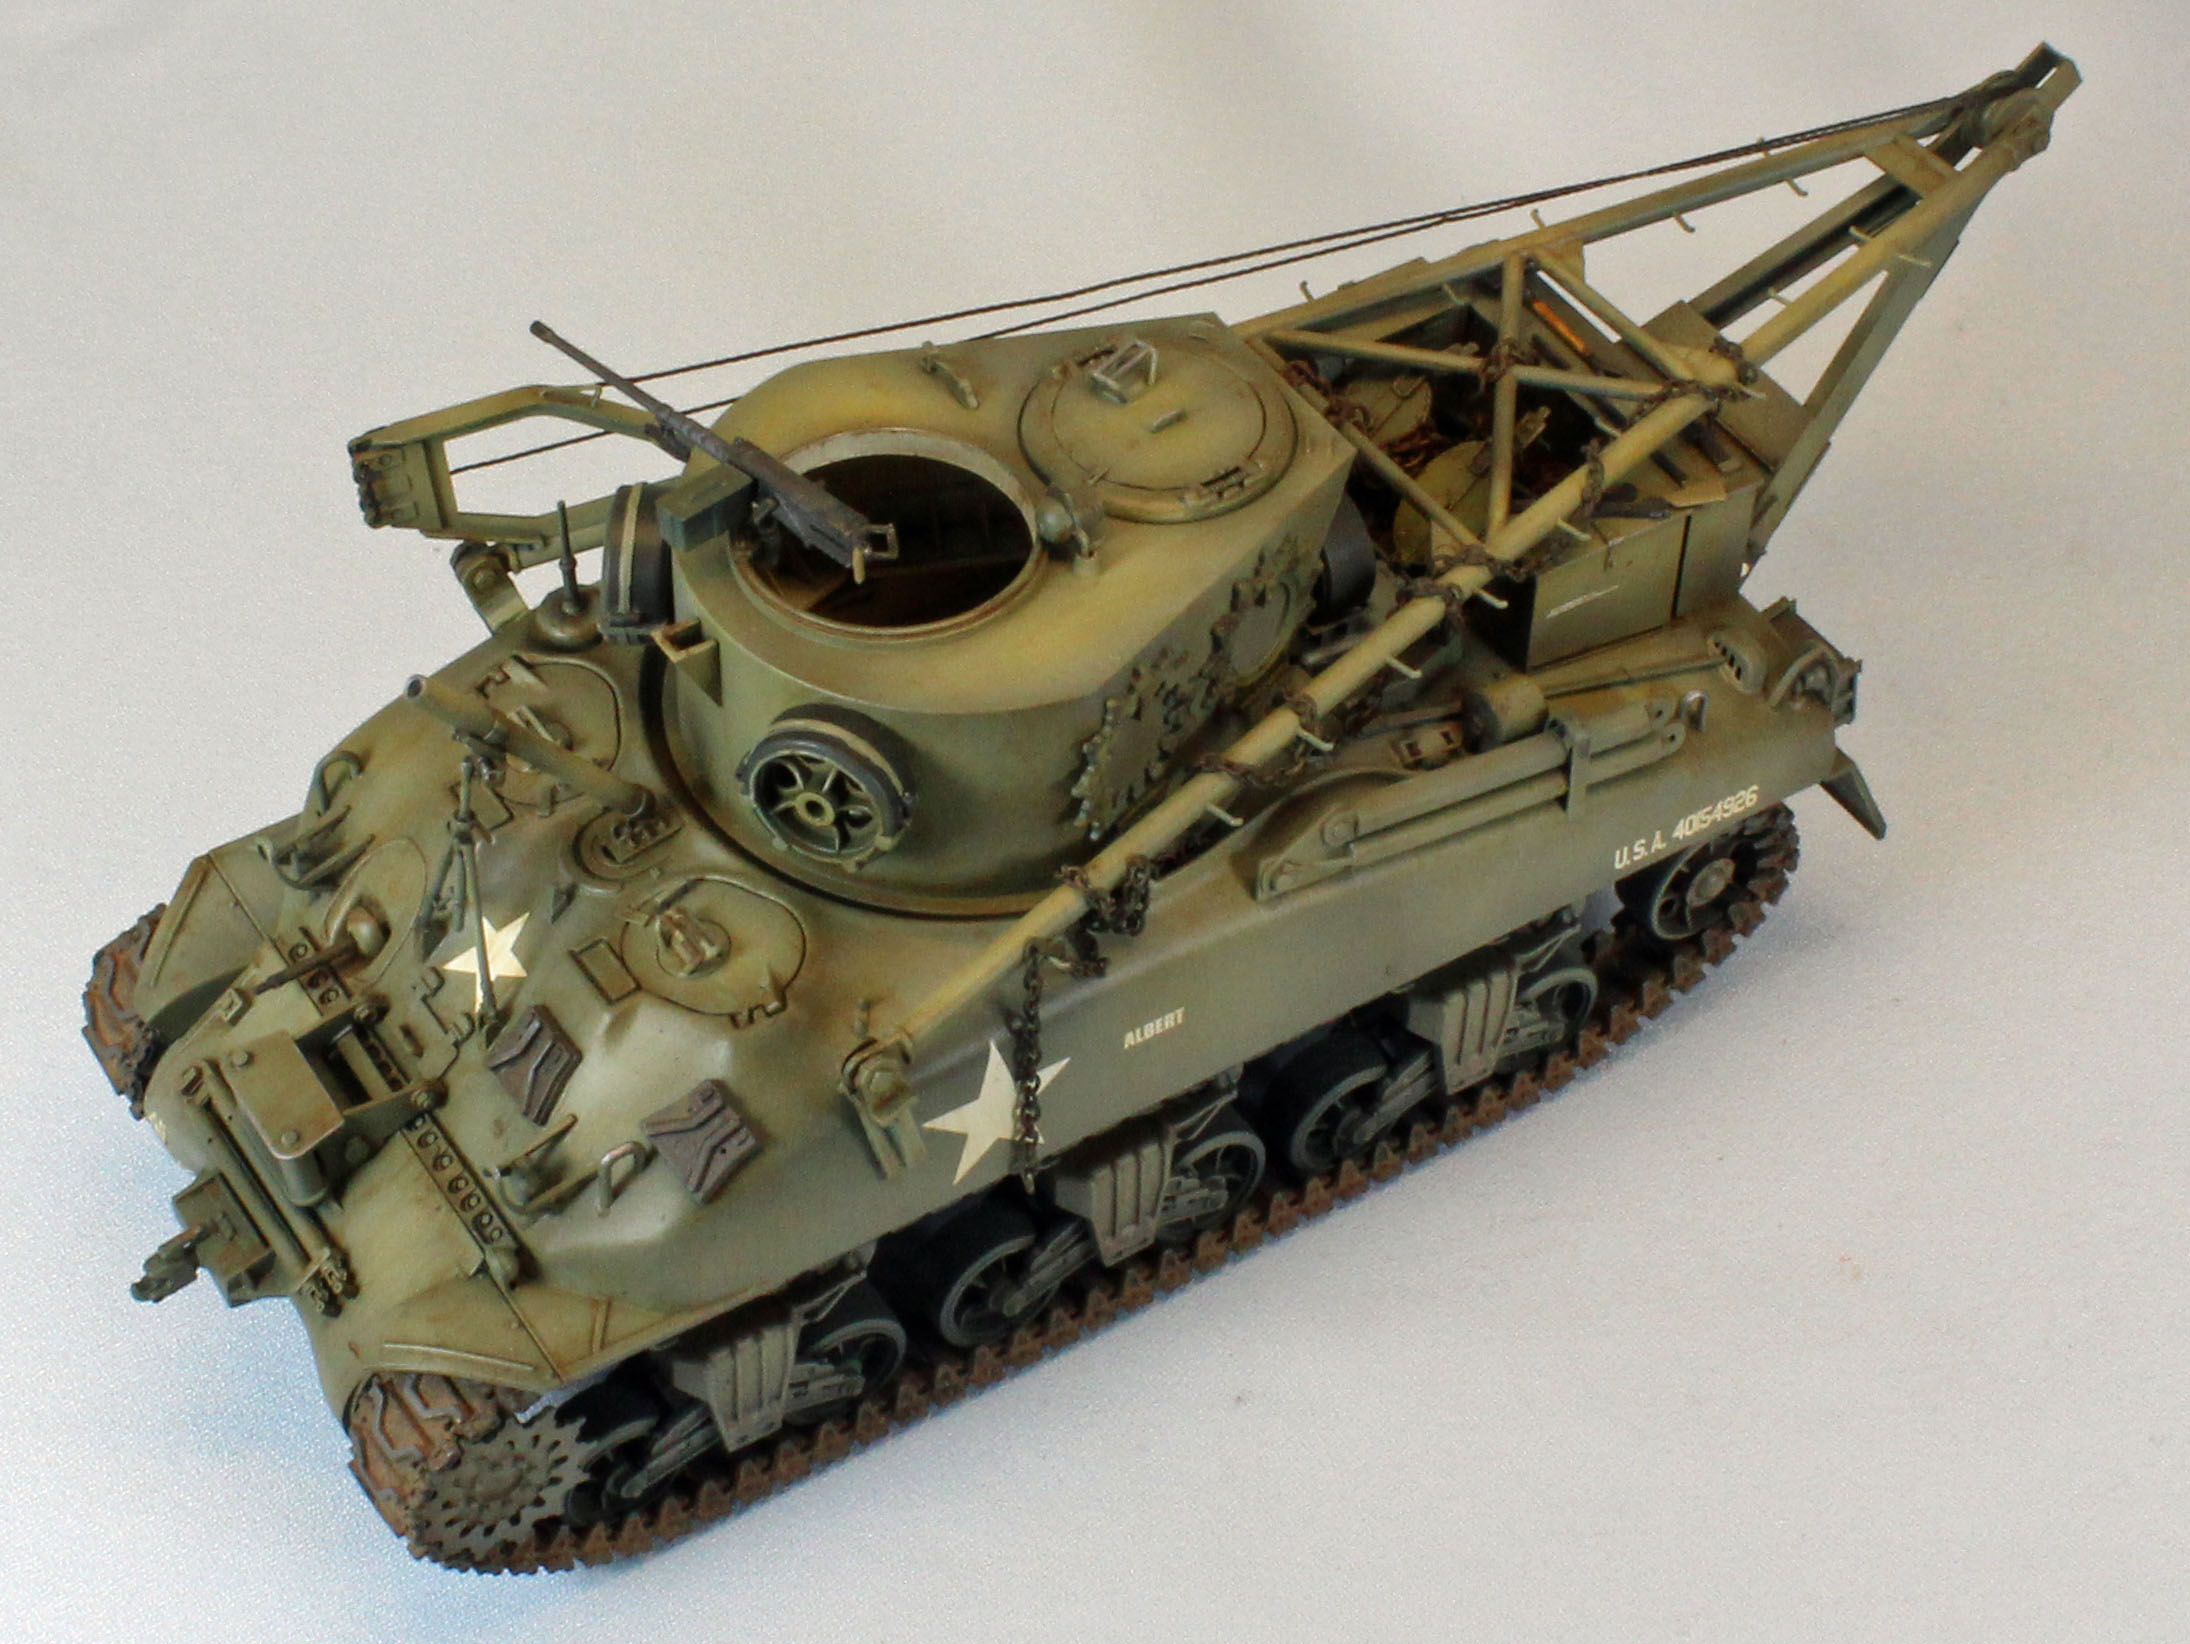
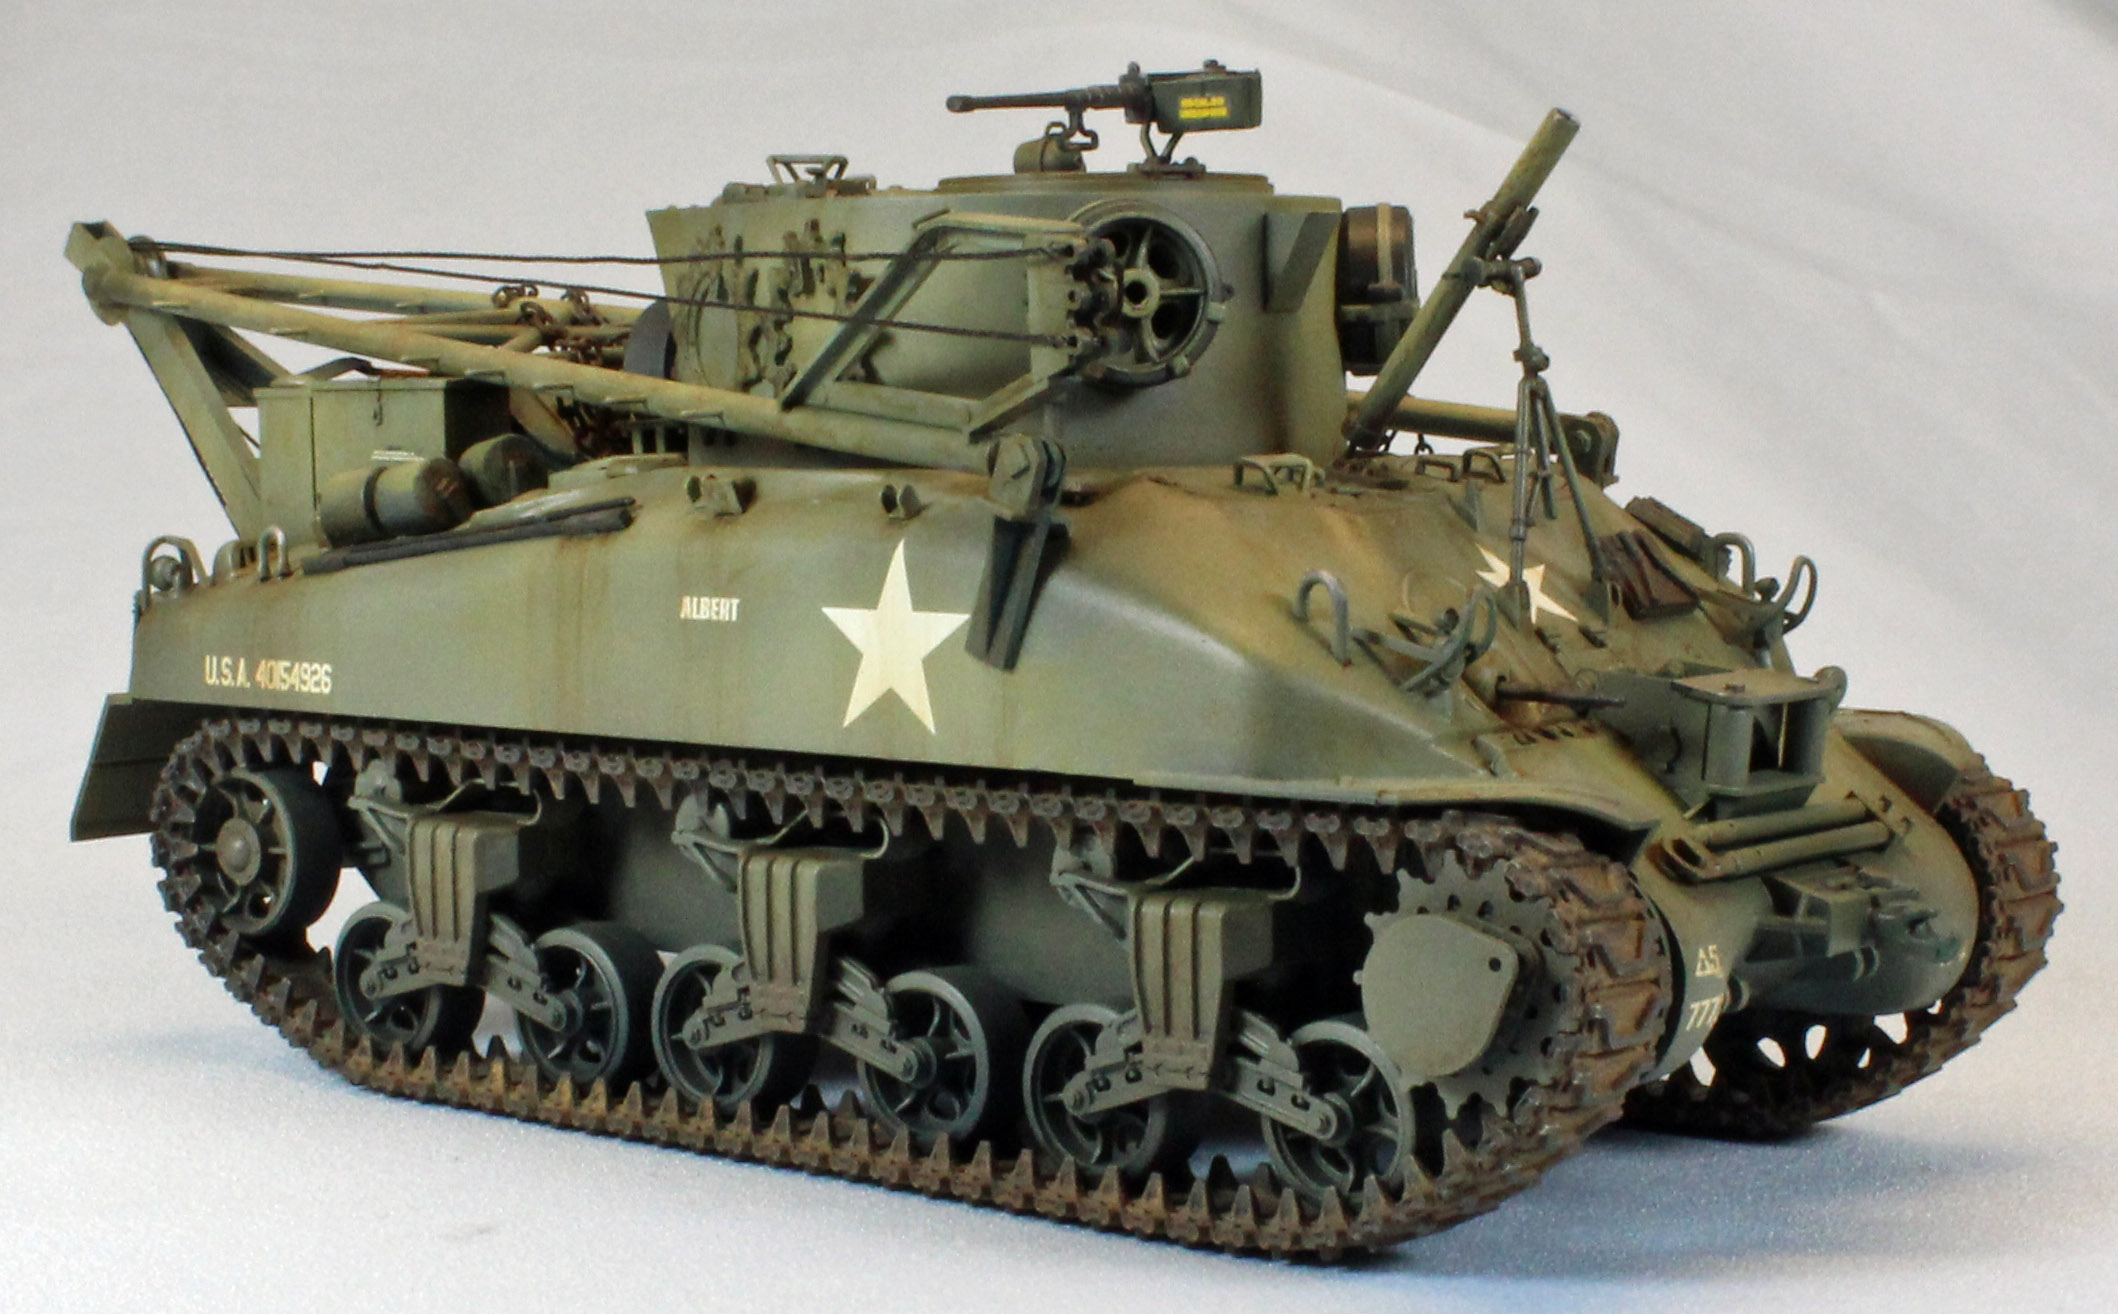
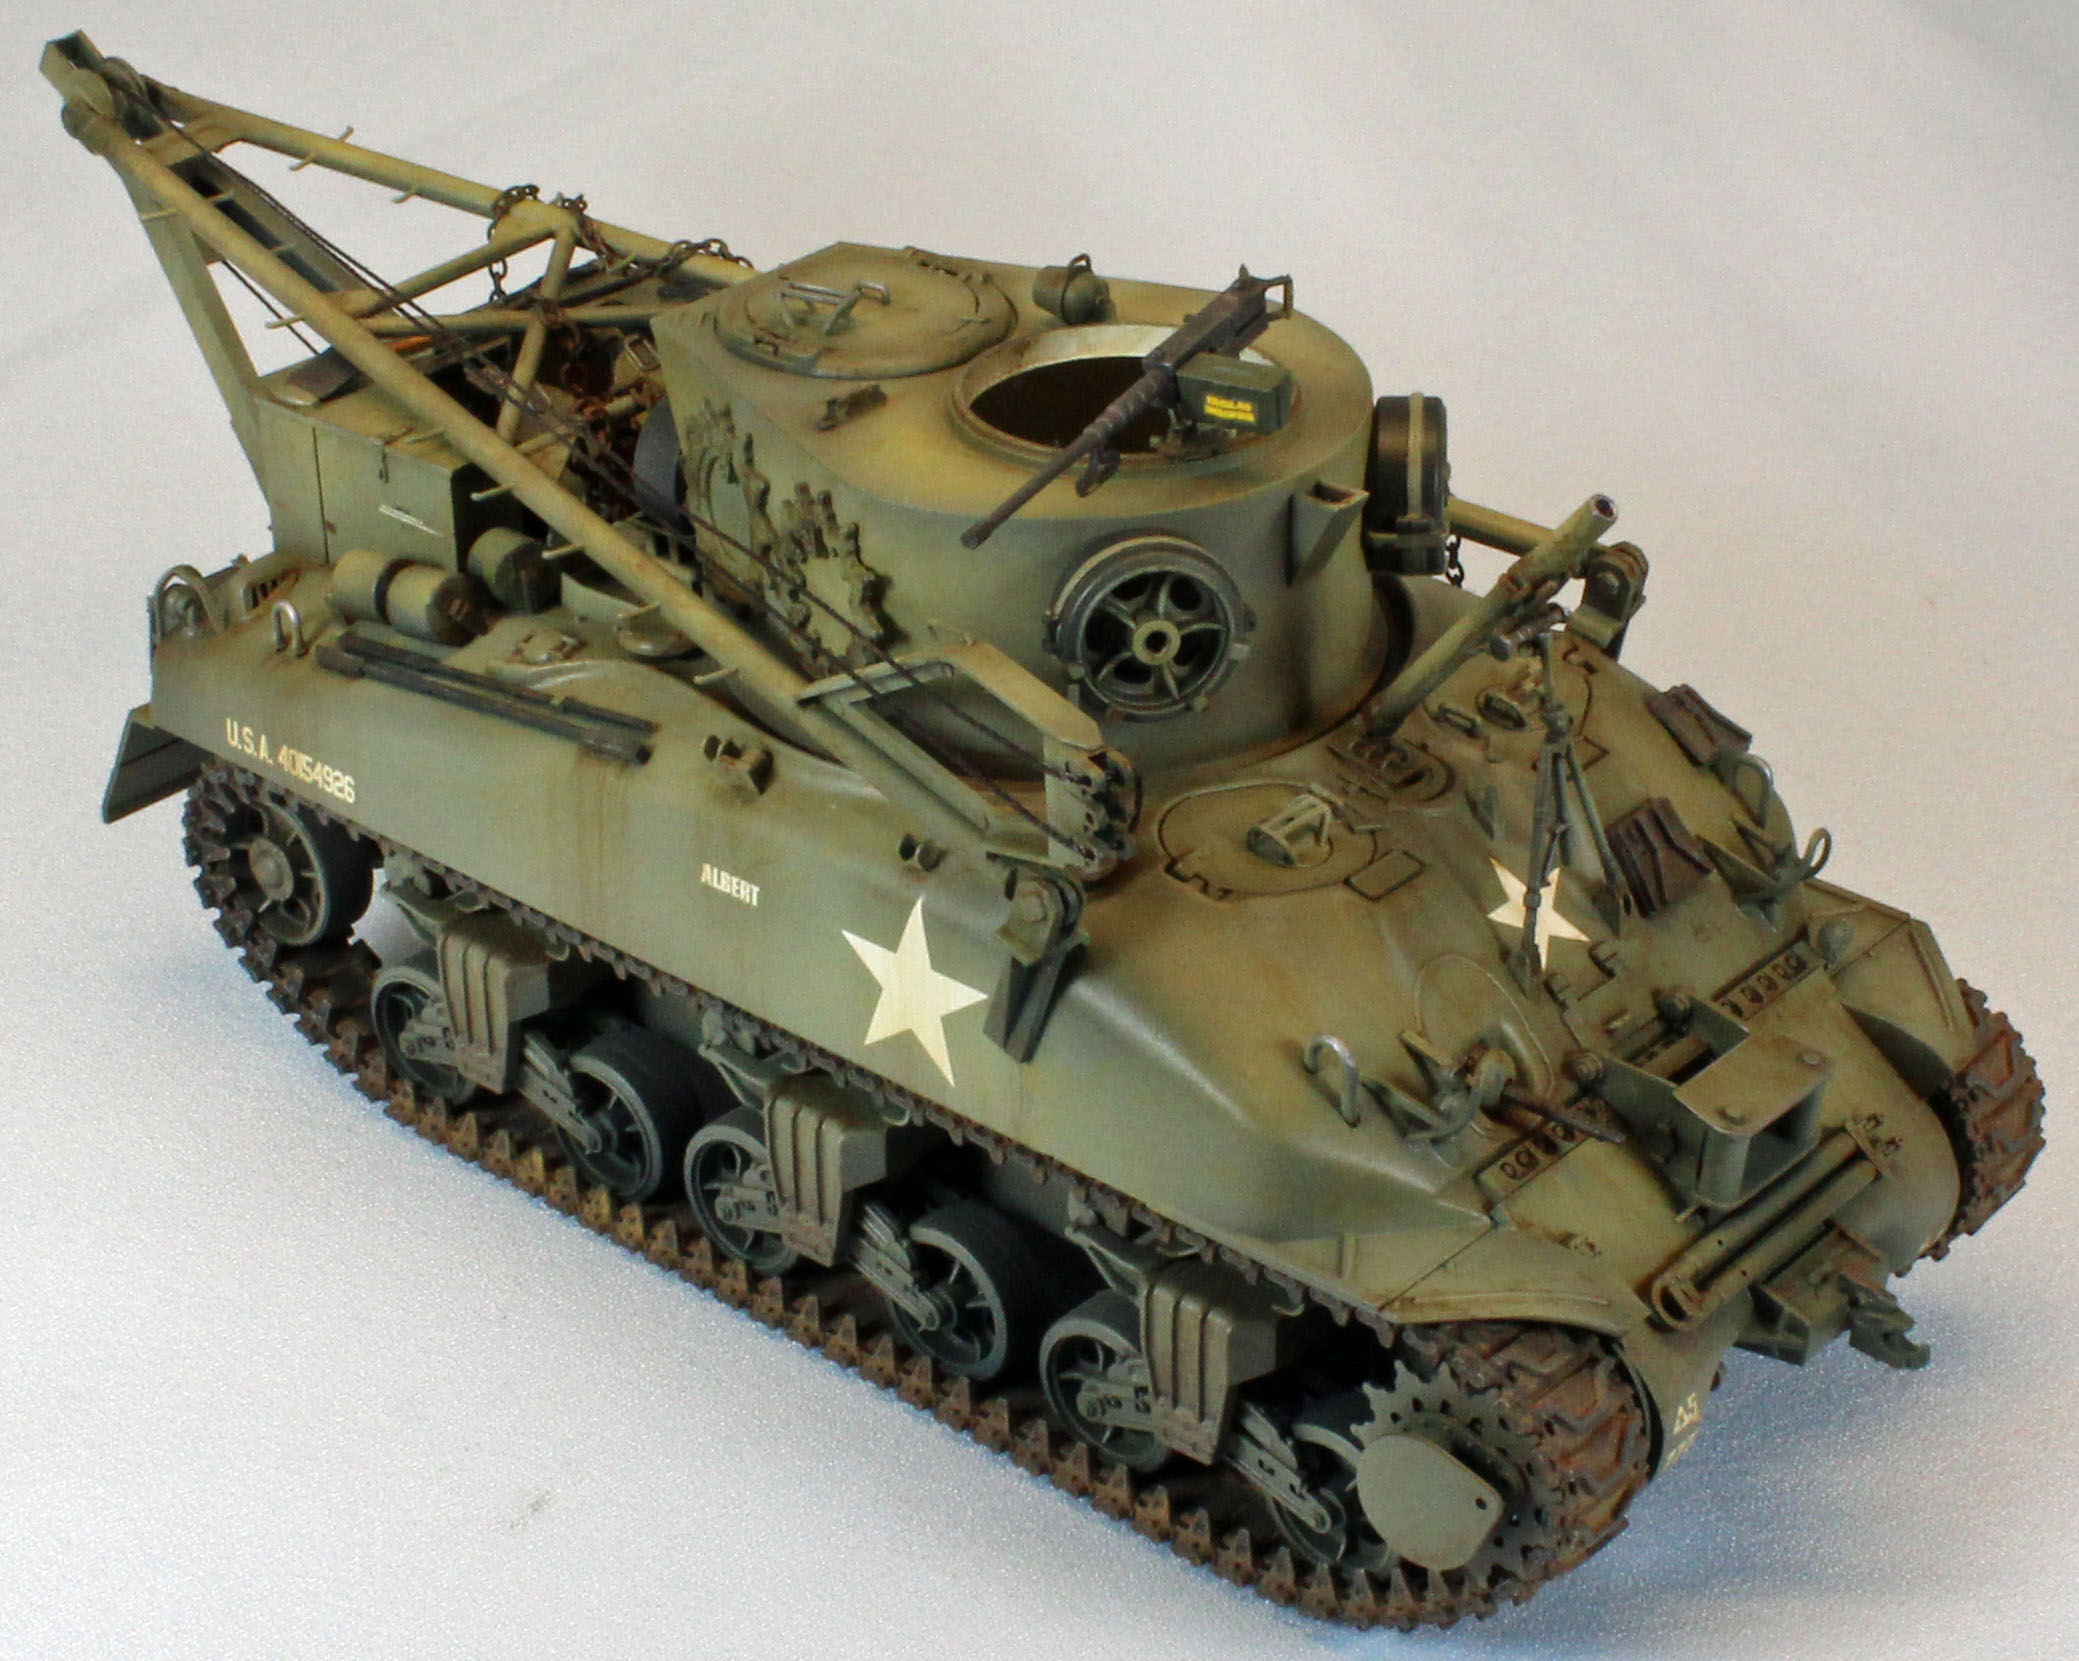
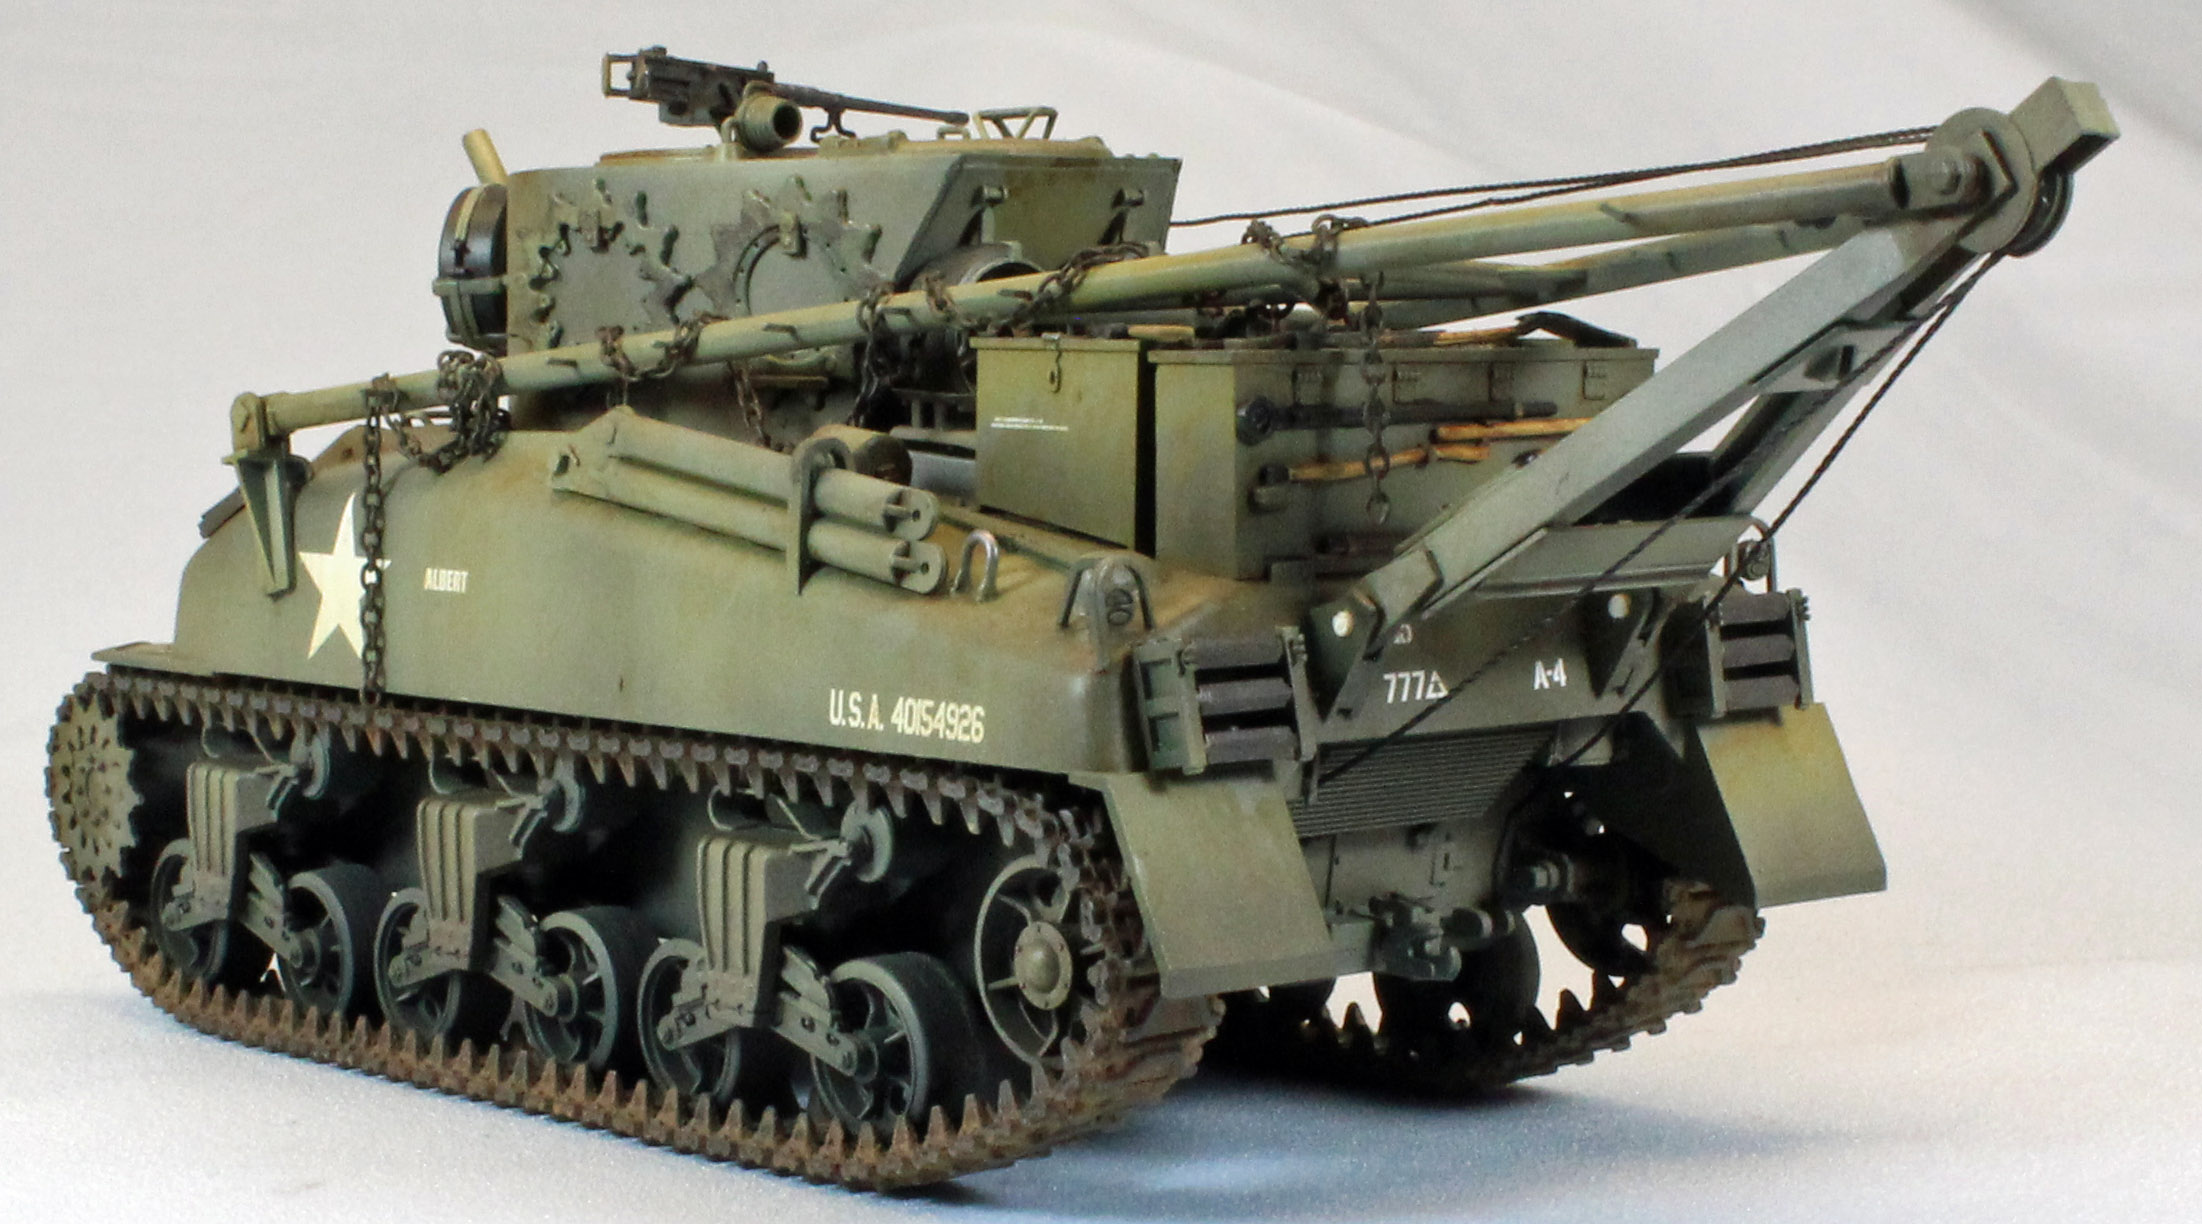
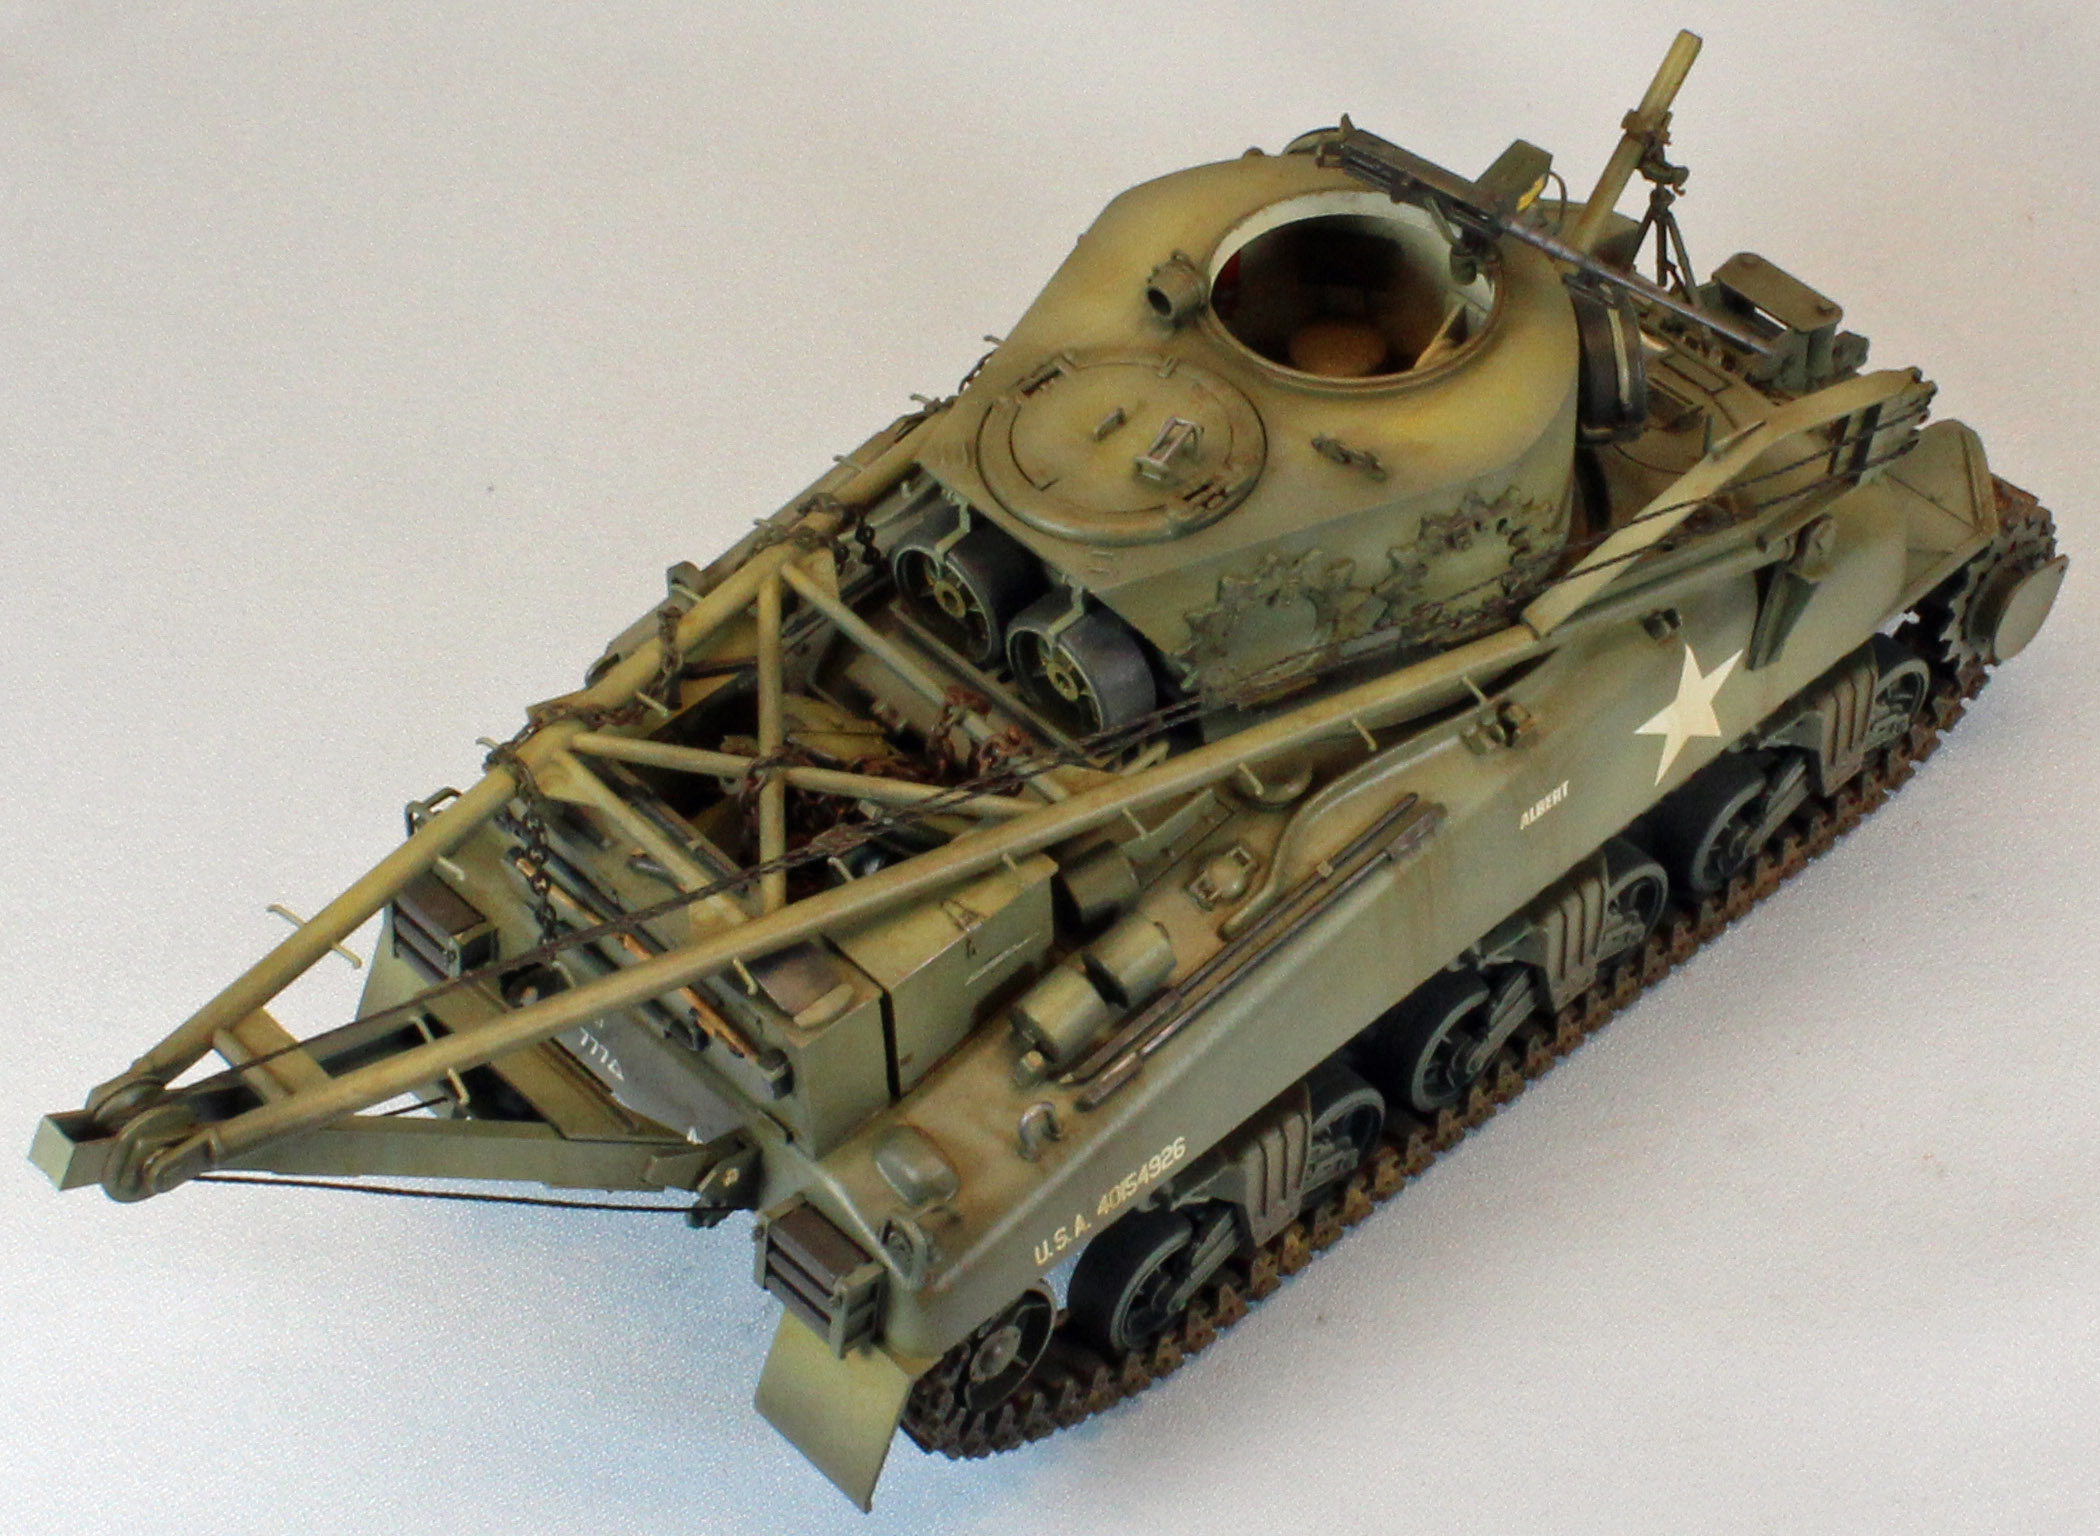
The M32 ARV was used by the allies during World War II and afterwards, during the Korean war. The first prototypes were produced in early 1943 and the M32 entered combat after Operation Overlord in June of 1944, eventually employed in all corners of the European Theater of Operations. It was also used during the Korean War, but phased out after the introduction of the M74 Tank Recovery Vehicle in 1954, when heavier tanks like the M46 Patton were fielded. The M32 weighed just over 27 tons, and contained a winch, an 18-ft. boom, and an A-frame jib. It was armed with two machine guns and a mortar to provide cover for an emergency retreat.
Opening the box
After building newer kits with hundreds and hundreds of parts, photo-etch sheets, brass barrels, and multi-part track links, opening the Italeri M32 box was breath of fresh air.
The finish, I knew, would be complex because of the amount of on-board detail and relatively large open hatch exposing the interior, but the actual build would be a breeze when it comes to parts count. The plastic is soft, free of flash, and reasonably detailed. There are some visible ejection pin marks that will need to be filled and/or covered with weathering, but that’s about it.
The contents of the box include:
- 3 sprues in soft, dark green plastic, packaged in separate bags
- 2 nylon track sections
- 2 lengths of string and a short length of thin wire
- 1 8-page black and white instruction sheet with 14 steps
The kit comes with three finishing schemes represented using black and white three-view drawings, and a medium sheet of decals, perfectly registered. These schemes include:
- 1st US Army, 5th Corps, 102nd Cavalry Group, ETO 1944/1945
- 1st US Army, 5th Corps, 777th Tank Battalion, Germany 1945
- 4th New Zealand Armoured Brigade, 20th Armoured Regiment, Italy, 1944/1945
The Instructions
Italeri instructions contain an introduction written in six languages (including English) and describe the assembly steps using symbols only. Paint color callouts only list paints from the Italeri Acrylic Paint line, but Federal Standard (FS) paint codes are listed as well. The black and white, exploded-view images are clear, relatively uncluttered, and free of errors.
The sprues hold some part numbers, but not all, and the instructions show images that likewise are missing (some) part numbers. Thankfully, the instructions also contain a parts map showing the sprues and part numbers - a little sleuthing should clear things up.
Things to consider before starting:
The M32 has two openings up top; one with a hatch and one simply exposed to the elements. Both openings are relatively large, so I decided to assemble, paint and weather the interior before addressing the exterior of the vehicle. In other words, the ‘build it all and then paint it’ approach might not be the best course to take. The interior includes a visible corrugated floor, side stowage panels, seats, fire extinguishers, etc., and serves as a good start for super-detailers.
While Italeri provides locators for much of the on-deck equipment and detail, the placement of a lot of it is up to the modeler, which is probably a lot like it was in real life.
You will have complete access to the track, which can be attached at any time, although with the fragile nature of the completed vehicle I chose to add the track early in the build, as instructed.
Finally, while Italeri provides white string and wire to represent scale cable and such; I have a roll of very nice pigmented waxed wound string that I use for this kind of thing. I added small bits of chain from my spare parts box as well.
The Build
Lower Hull and Running Gear
Due to the low parts count, the lower chassis of the Sherman is a breeze compared to most of the other AFV’s I’ve built. Steps 1 and 2 take you through the assembly of the lower chassis and running gear. While the bogies are designed to be articulated, the high tension on the track will tend to turn the outer two wheels up at each end once you attach the track. Gluing the bogies in place once they have been aligned using a flat surface will prevent that from happening.
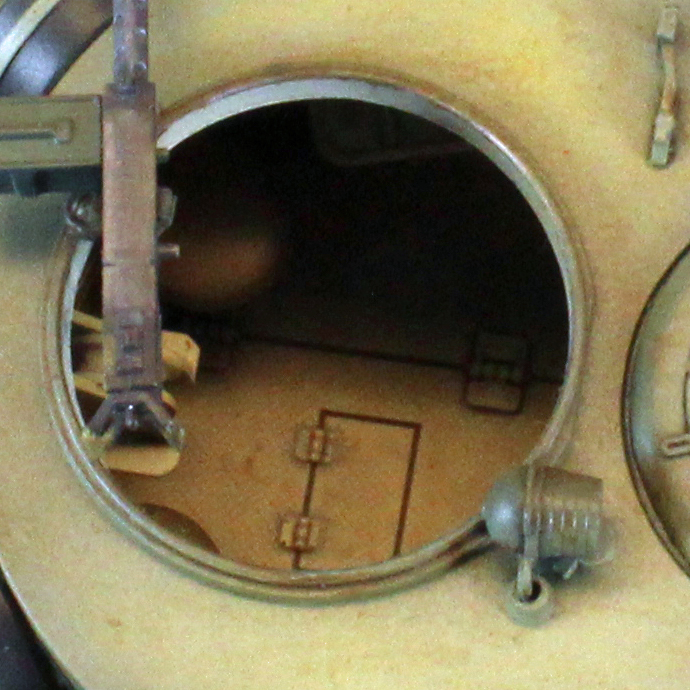
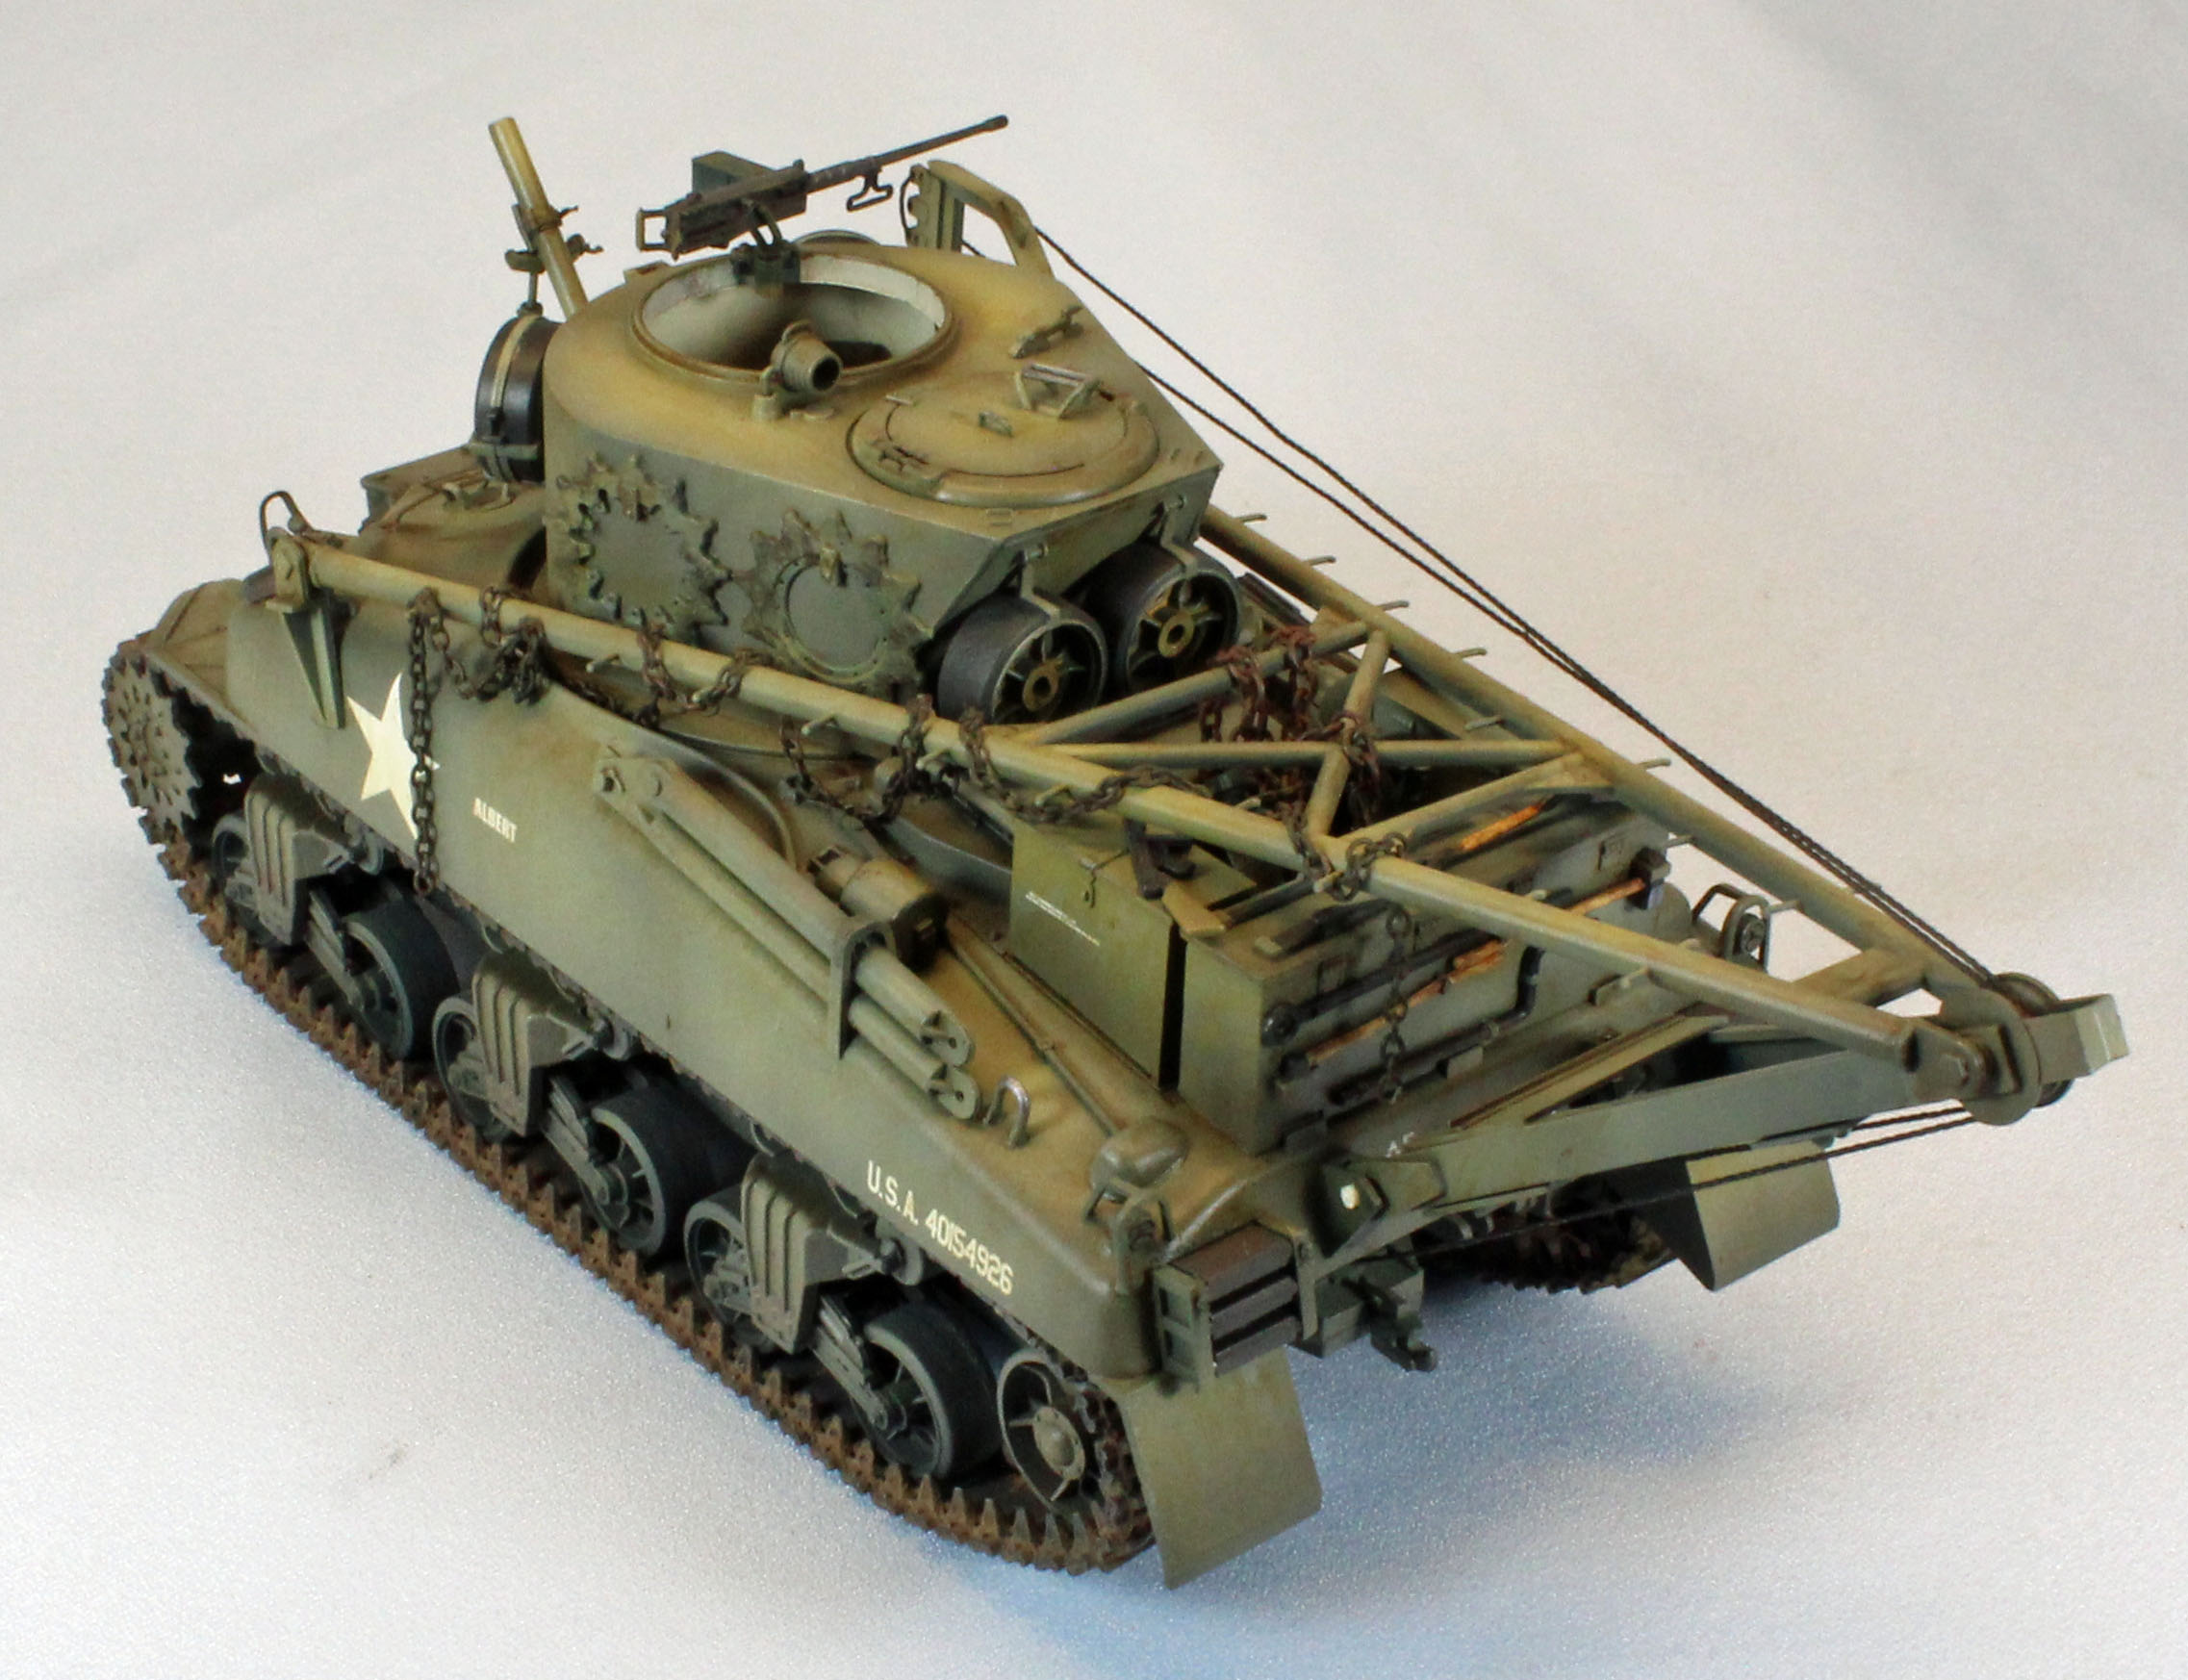
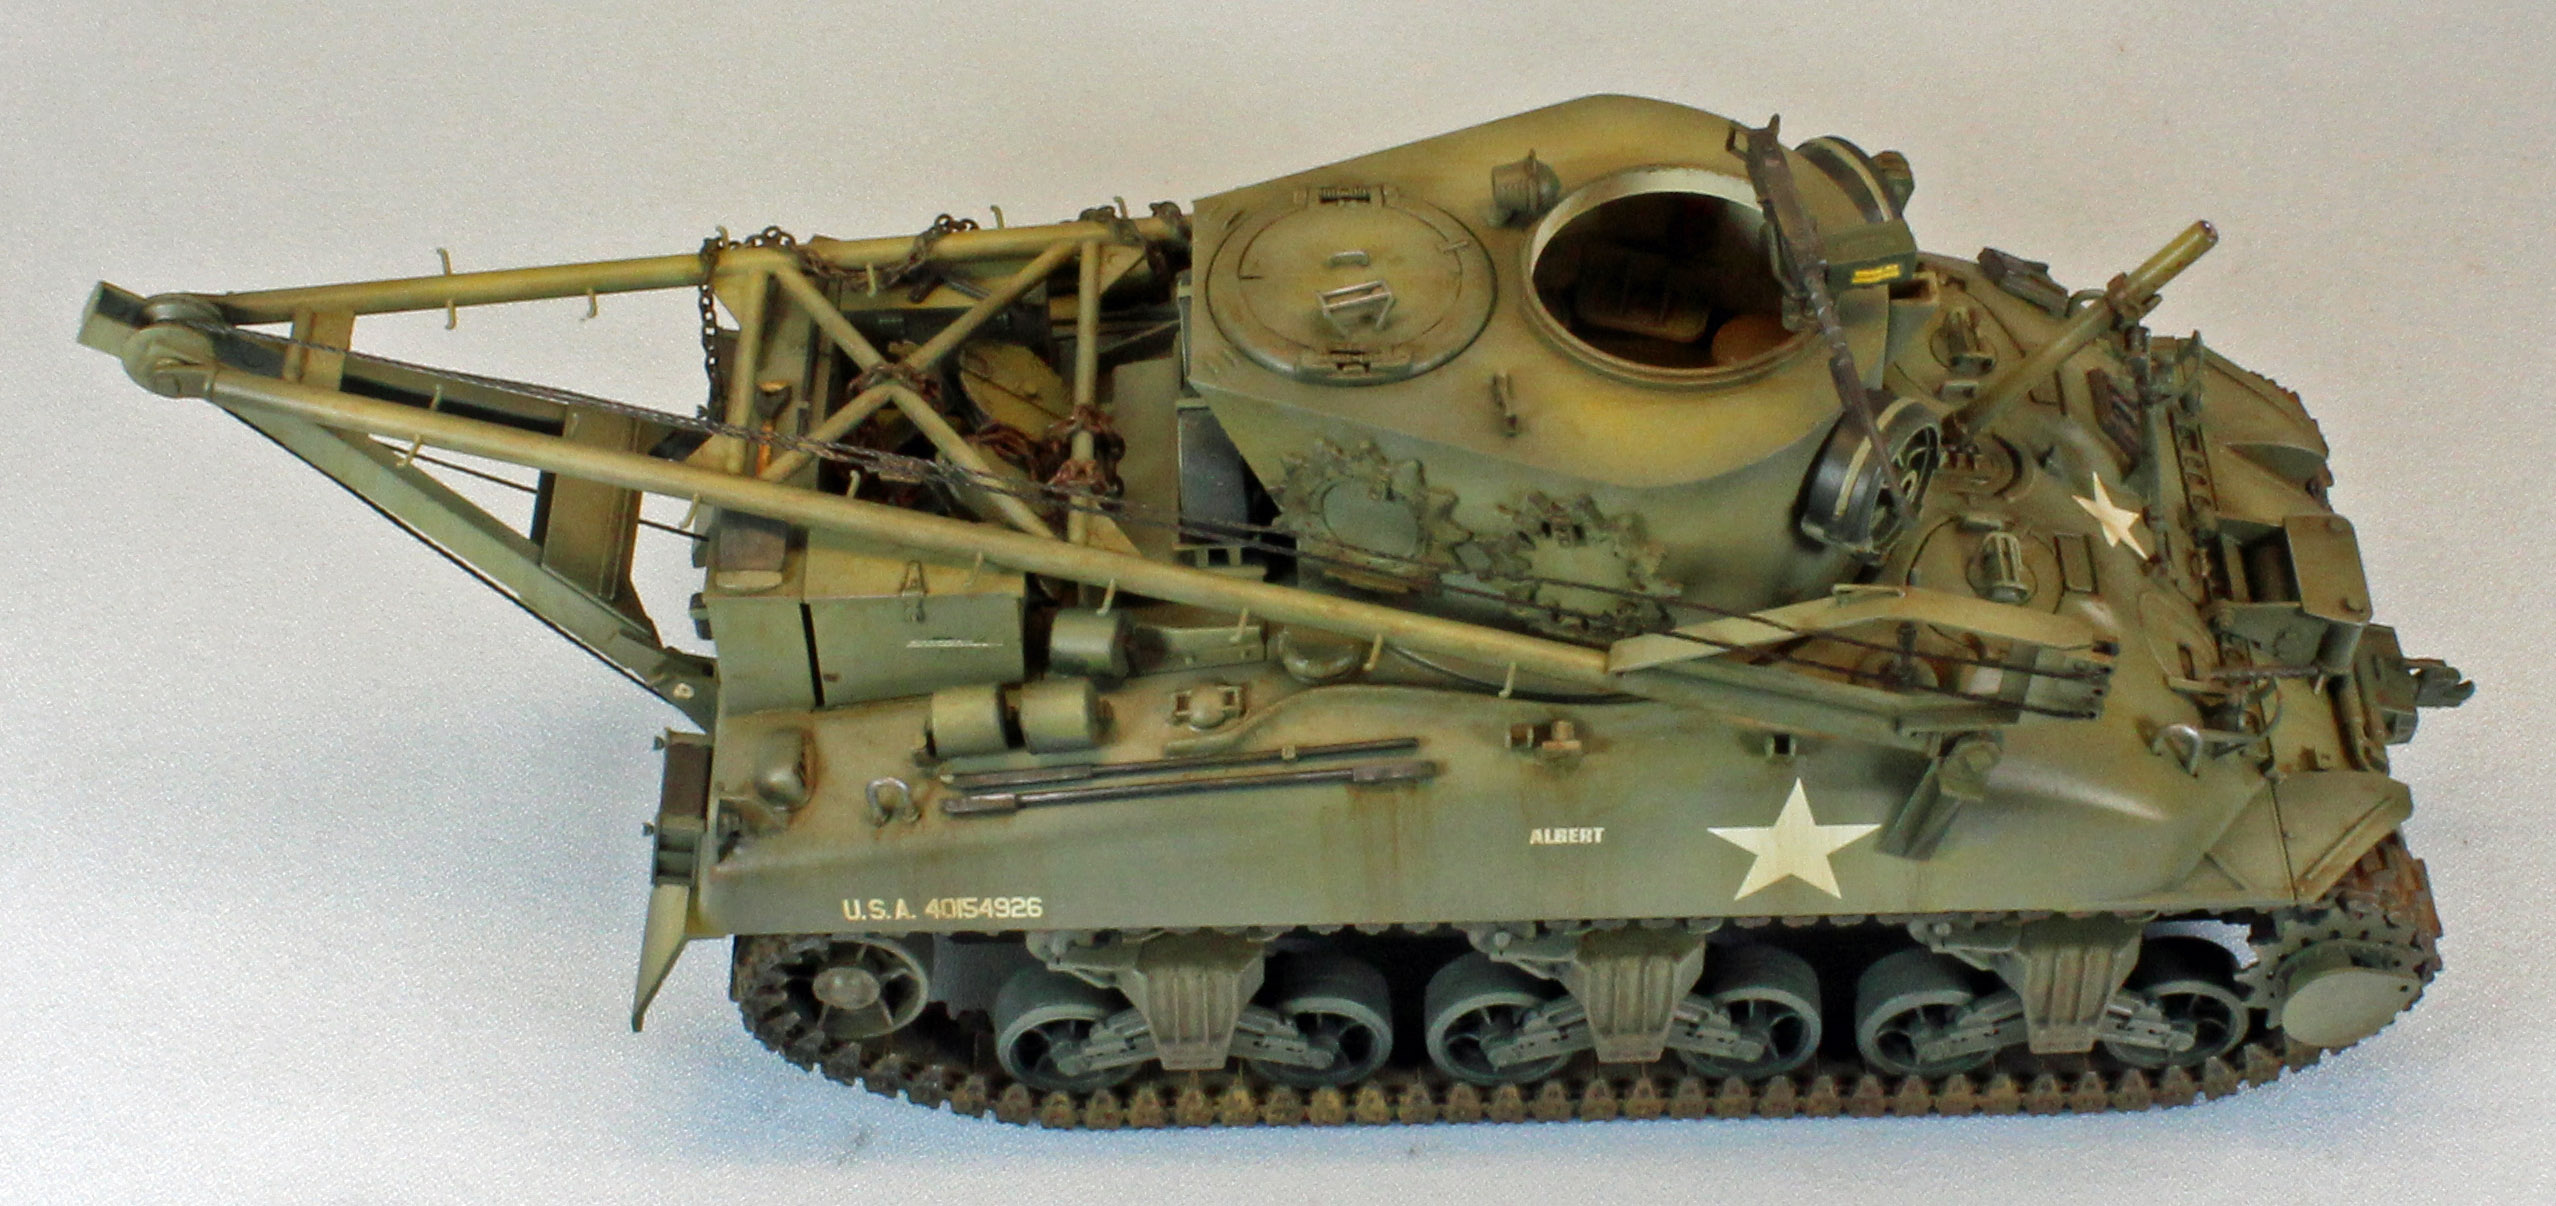
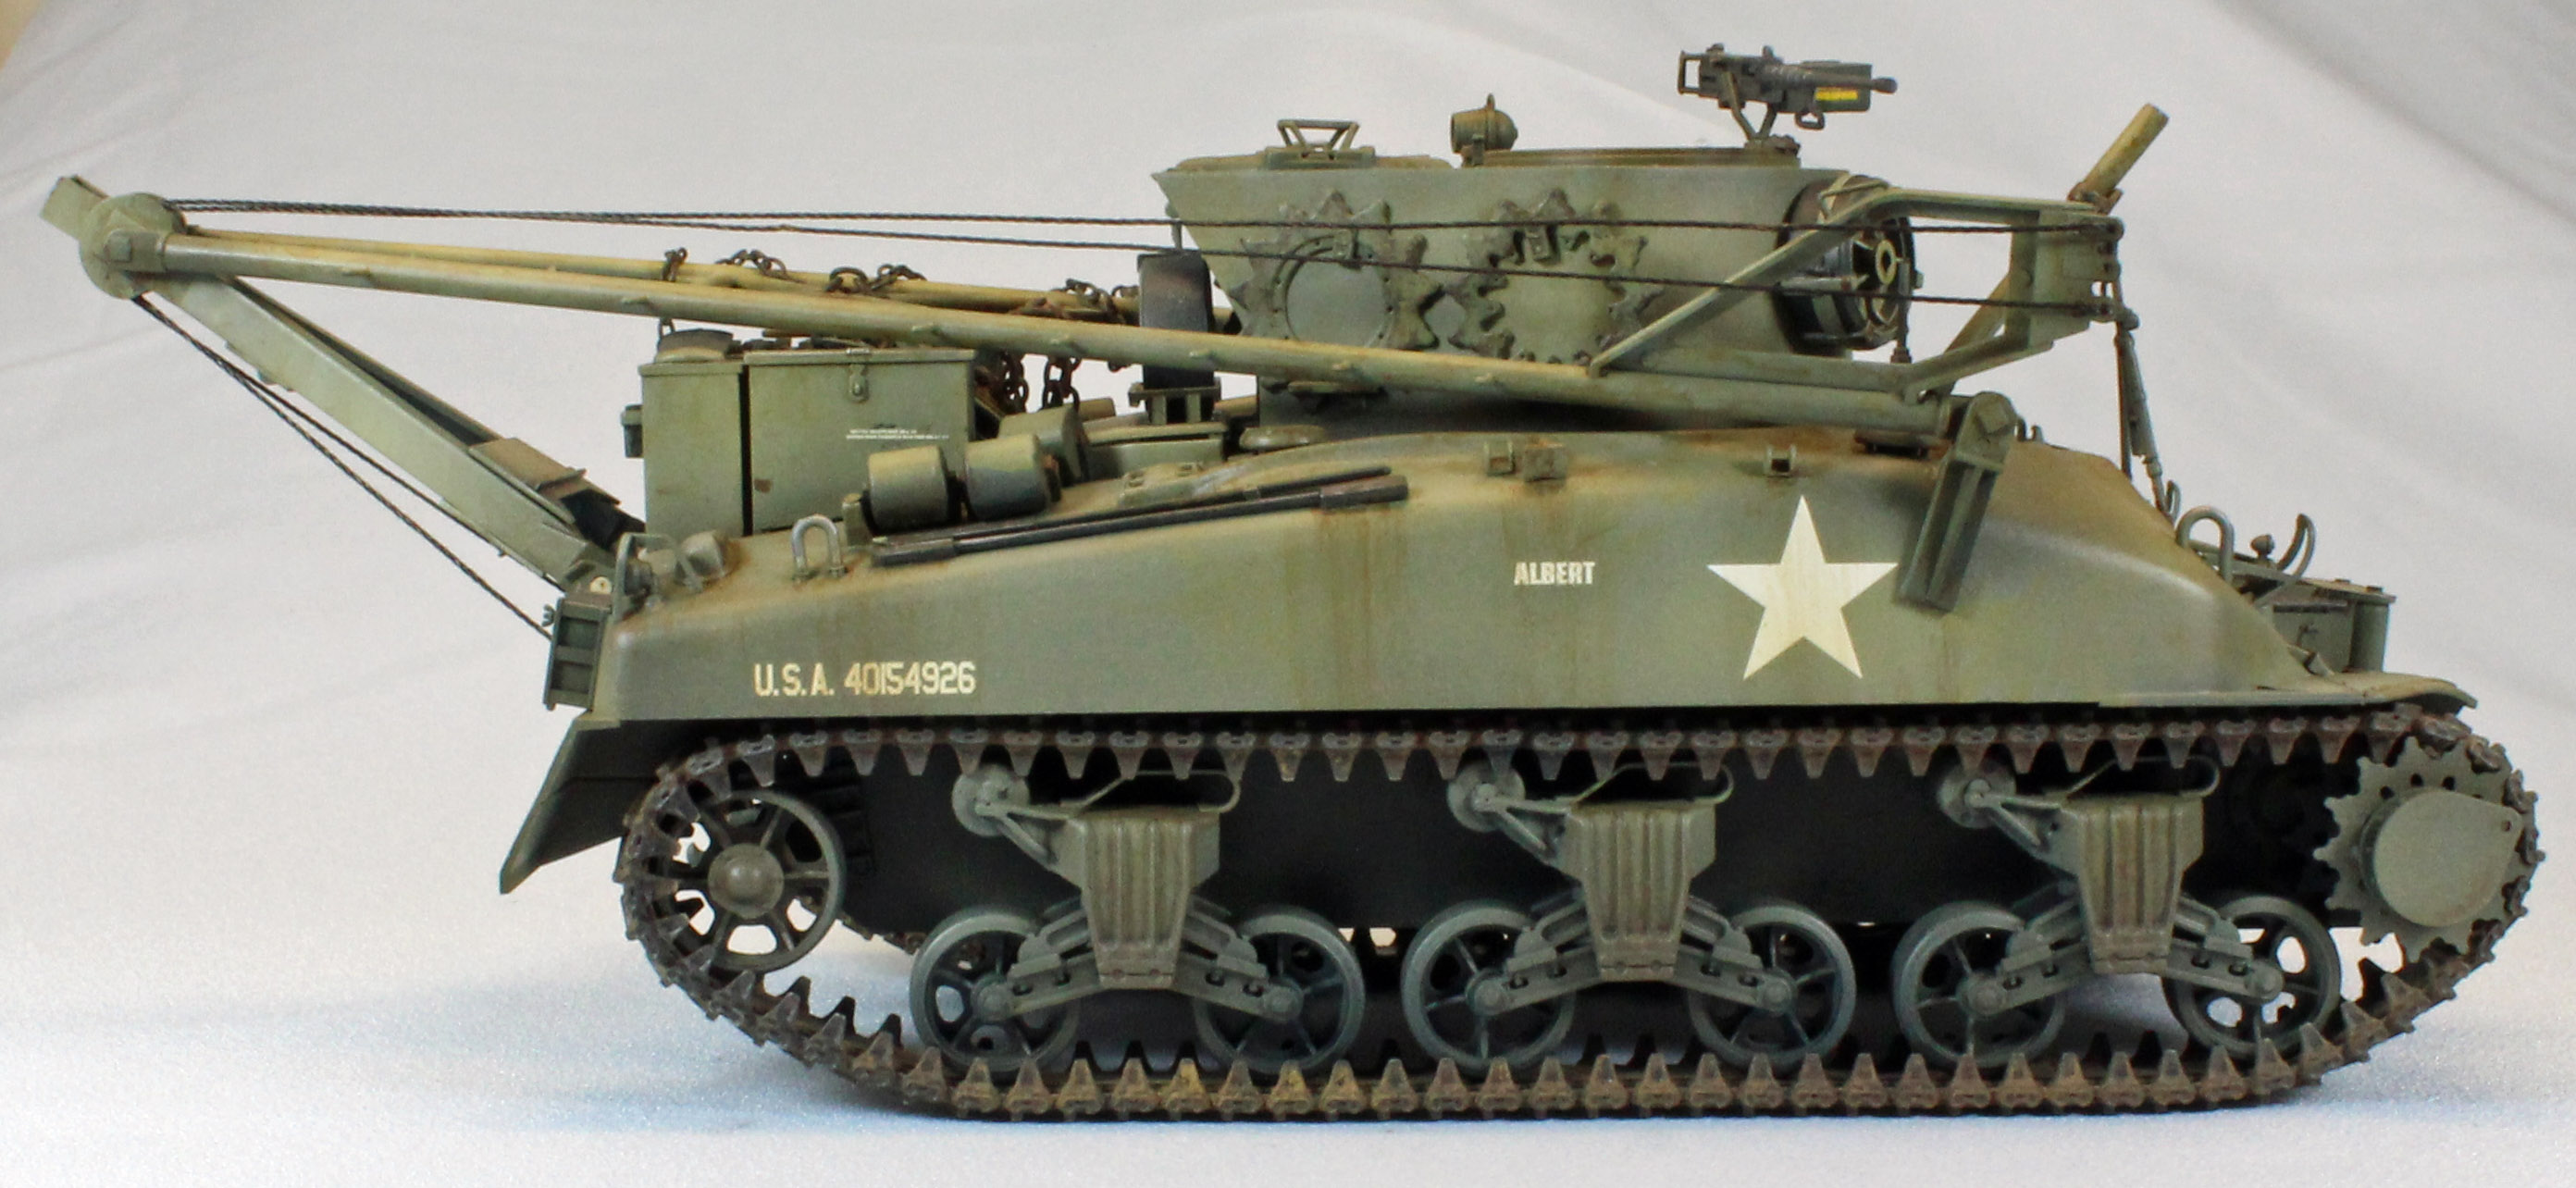
The stowed A-frame (added later) on the M32 helps to busy up the rather sparse rear end of the vehicle, which comes together without any issues in Step 3. The interior is sparse, but serves as a good start for super-detailing. A surprising amount of it can easily be seen from the two turret hatches.
I halted assembly after Step 4 to paint and weather the interior, completed Step 5 and halted again to paint the lower chassis, before adding the tracks.
The Track
Italeri has included two runs of nylon track that are supposed to be held together using super glue. The track itself is reasonably detailed on both sides and appears to take (Tamiya) paint just fine. That said, I have had trouble in the past with Italeri track breaking apart after the finished model has sat for a period of time, possibly due to the paints and weathering products I use weakening the track - I don’t know. Consequently, I decided to use a spare set of early Sherman track for the build.
Normally when I have access to the area under the fenders I leave the track off until the end of the build. On this vehicle, however, with all of its fragile detail added later, I thought it best to follow the directions and paint, weather and attach the track up front.
Main Deck and Rear Hull
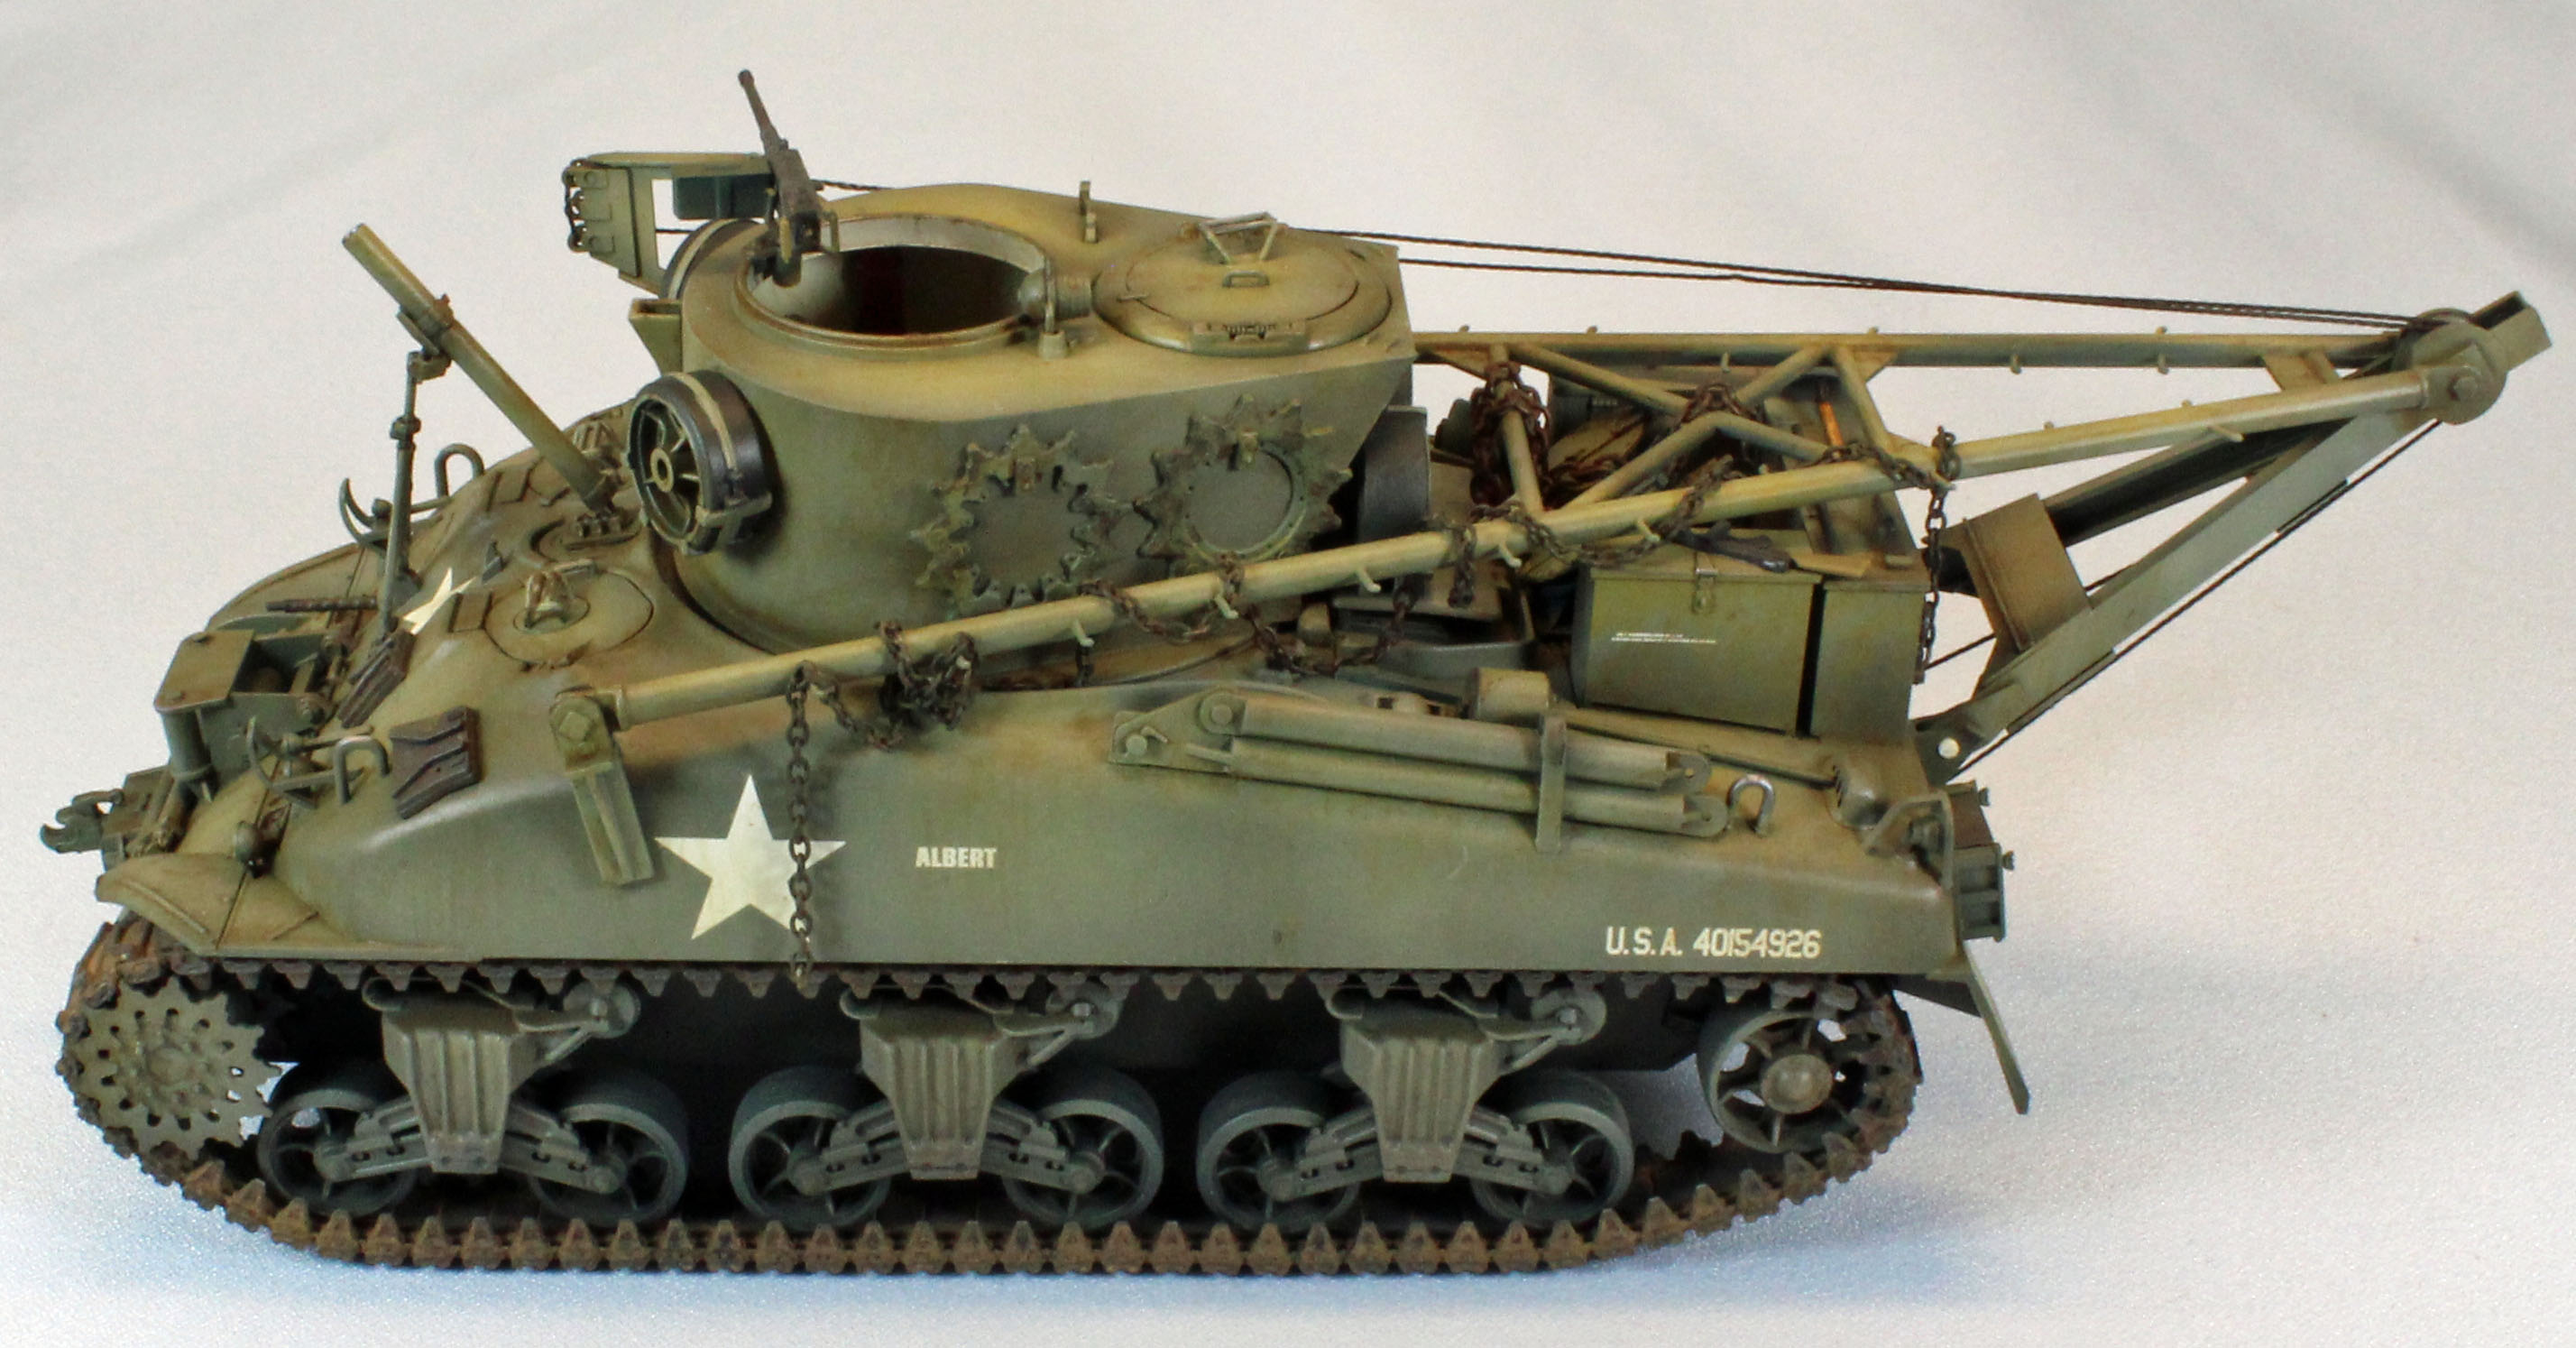
Once I had the lower chassis built up and painted, it was time to drop the upper hull down onto the chassis. I had to poke and prod some of the edges into place, but once that was done, the fit was perfect. All the hatches on the M32 can be modeled open or closed, and while the hatches contain interior handles, the two in front expose an empty interior unless filled with a figure.
The M32 contains a normal complement of pioneer tools and then some. These are stuck here and there on the hull as well as on three large stowage bins arrayed across the back of the rear deck. The placement of a lot of other detail is up the modeler. You may want to consider finishing some of it off the vehicle and adding it later since once the A-frame is added you will have limited access to most of what’s on the rear. The fit of everything (that DOES have a place to go) is perfect.
A tow cable runs from the rear along the port side of the vehicle to the front, but I could not seem to get it to look convincing so I left it off.
Turret and Remaining Exterior Detail
The simple two-piece turret comes together well in Step 10 and contains a variety of visible interior detail, although Italeri wants you to add it in Step 12 after you start working on the A-frame. I added it in Step 10 and worked through the remaining steps, leaving off the mortar, machine gun, spare wheels and drive sprockets to paint and weather separately, along with the main hull. Once that was done, I attached everything and then went back to add the A-frame assembly.
A-Frame
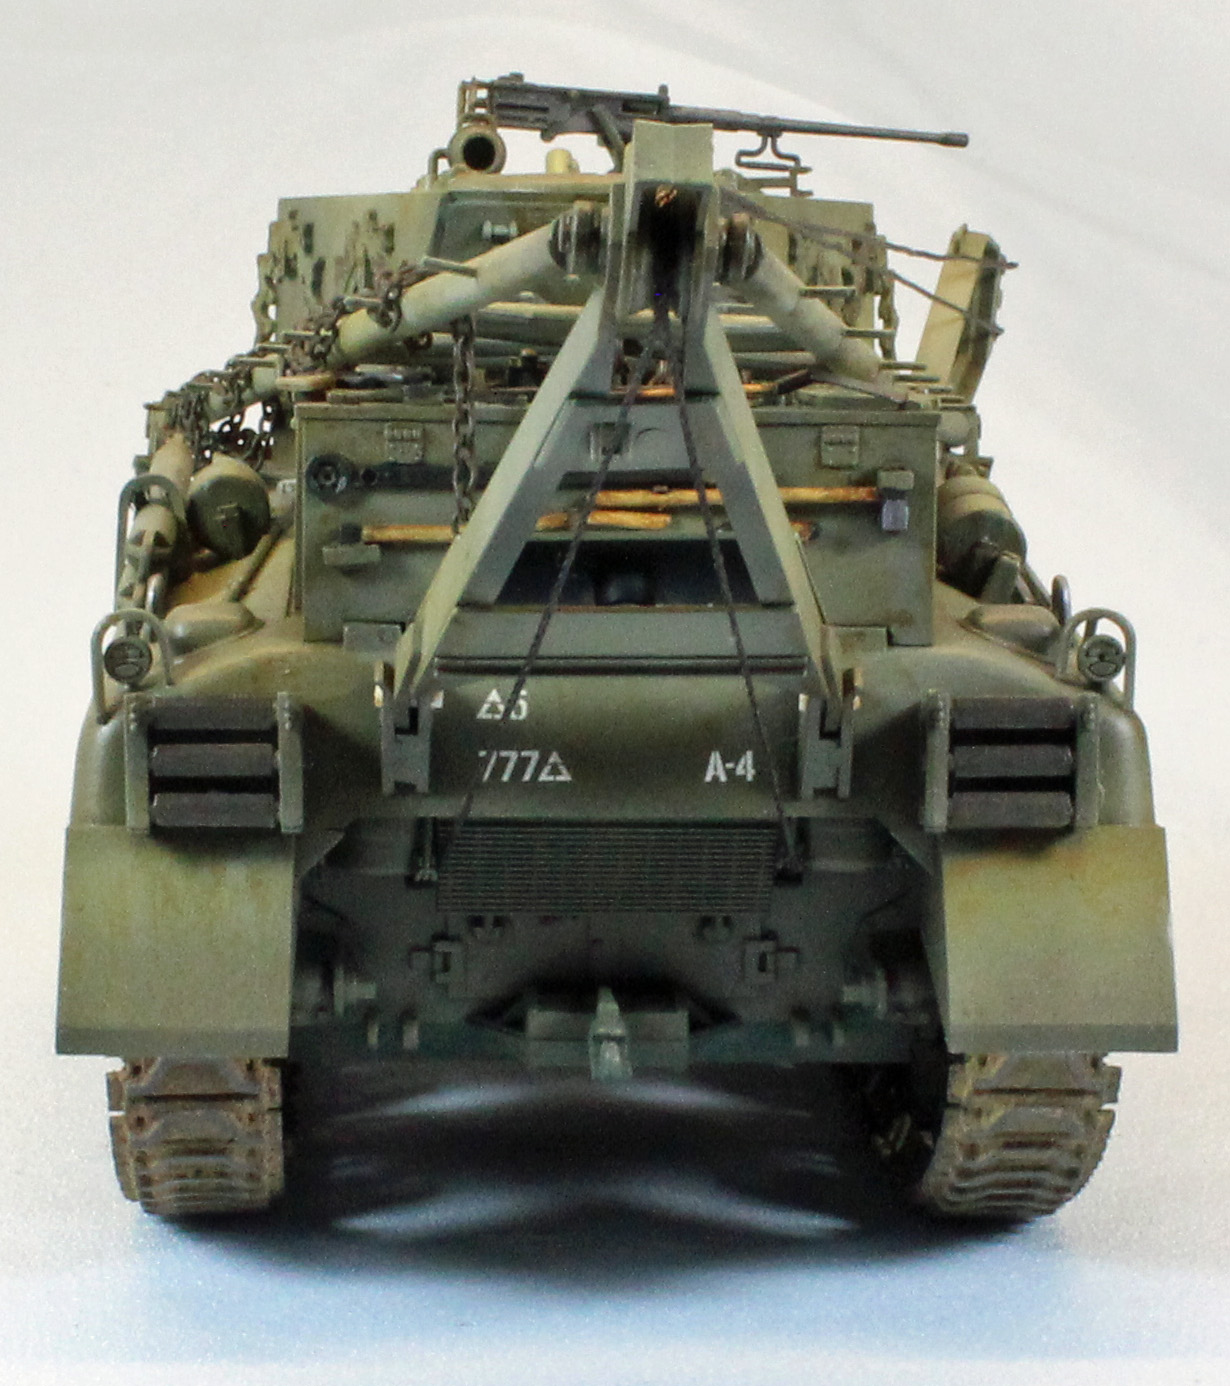
A heavy-hinged A-frame provides the main focal point of the M32, and Italeri did a good job designing and engineering it. You will have a much easier time attaching it to the rear of the vehicle if you first attach the two bracket assemblies (II and III in Step 12) to the hull and let them dry first. That makes dropping the rear portion of the A-Frame structure into the brackets a piece of cake and gives you a solid foundation to pose the long arms along the sides to the front of the vehicle afterwards.
The entire complicated-looking assembly consists of just a few simple parts, and attaches to the hull perfectly. Great job here Italeri!
Finally, the last step in the instructions provides a roadmap for adding the cables and such if you want to deploy the A-Frame forward. Since there is no comparable diagram for assembly in its stowed configuration, you’re on your own here.
Painting and Finish
As a U.S. Army combat vehicle, the M32 is going to be U.S. Army green, period, so my challenge would be to try and put as much life as I could into all that monochromatic finish. I came across an excellent article in Military Modelcraft International magazine that incorporated a medium-blue pre-shade for a British Sherman Firefly that looked interesting, so I decided to try that on my M32.
Primer, Pre-Shade and Hairspray
I remain a stalwart believer in using cheap rattlecan primers when I can. Accordingly, I started by applying a primer coat using Krylon Color Master with Durable ColorMax Technology rattlecan (Flat Black) enamel paint. This is the third rattlecan primer I’ve tried, and I’m glad I kept going because this stuff is a superior product, drying super thin and very, very tough - not to mention cheap and quick.
Once the hot enamel had a chance to de-gas overnight, I toned down the ‘very black’ tire portions of the wheels with Mission Models NATO Black. I then waited 20 minutes and shot the lower chassis with hairspray to make it easier to clean up overspray later when I applied additional coats of paint.
I next applied Alclad Light Grey Primer to the upper surfaces that would be exposed to sunlight. This will insure that the camouflage coat to come will lay down in different shades, depending of the underlying color.
I followed this with a light overall 50/50 mix of Tamiya Dark Green and Tamiya Flat Blue. Already I could see the breakup of the surface color and I didn’t even have the green applied yet! I let that dry and then laid down the standard Vallejo Model Air Olive Drab triad (71016, 71043, 71044). Working from the center of each panel outwards, I left some of the darker shades to show through around the edges.
I then mixed a highlight color to accent spots here and there, using 50% 71.044, 25% 70.847 Dark Sand, 25% 71.025 Dark Yellow (Vallejo Model Air).
Interior
I finished the interior – some of which is visible through the two large openings in the top, using Mission Models German WWII Elfinbein (Interior White). Once dry to the touch, I hand painted the various interior parts using Vallejo Panzer Aces and Model Color paints (including 314 Canvas for the seats, and Tamiya Gloss Red for the fire extinguishers.
Track
I gave the track an initial airbrushed coat of Tamiya Iron. Once that had a good chance to dry, I applied a ‘splotchy’ coat of Mig Wash Brown from the bottle, and, while still wet, applied Vallejo Light Sienna Pigment on both sides. After that had a chance to dry, I applied a coat of Uschi Chrome pigment on the part of the track that touches the pavement, spread on with my finger. I did not use a fixer because I feel it changes the color and texture of the finish, so I very carefully glued the track lengths and stretched them over the running gear. From then on, hands off!
Decals
Once the paint was dry, I airbrushed the areas that would receive decals with Future acrylic to give the decals a smooth surface to work with. I applied the decals using the Red and Blue Micro Sol/Set system without any issues.
On-Board Detail
Once the decals were on, I painted the wooden portions of the various pioneer tools with Tamiya Buff or Desert Sand, and the steel parts with (first) Tamiya NATO Black and then a quick rub using Uschi Chrome pigment applied with a rubber-tipped artist’s blender. I used the same process for the two machine guns.
I then airbrushed Future over the entire vehicle to seal the decals and to prepare the surfaces for washes, trying to avoid the track as much as possible.
Once the Future had dried overnight I started the weathering process. To give the wooden parts of the tools more depth, I brushed on a little Mig Wash Brown oil paint straight from the tube and let that set overnight. Since the surfaces were covered beforehand with Future, the oil paint will be easy to work with. In the morning I carefully removed most of the oil paint using a Q-tip, leaving the areas near the latches and metal parts darker than the center of the wooden shafts. I then let a little black wash puddle up on the horizontal surfaces of the metal axe and shovel heads. When dry, I think this gives them a convincing look of used steel.
Pin Wash, Streaking
With a glossy coat still on the model, I applied a pin wash to highlight the detail all over the vehicle, starting with Mig Dark Wash (aka Raw Umber) mixed 10:2 (Mona Lisa thinner to Wash) applied with a small, long-bristled, red sable brush, concentrating on the panel lines, recesses, buckles, pioneer tools, etc. Next I added dots of Wilder Products ‘Bright Ochre’ and ‘Grey Blue’ filters here and there, swirling and pushing the enamel paint around using a small brush damp with Mona Lisa.
I then clamped a bit of sea-sponge and used it to add chips to the edges of the vehicle using Vallejo German Cam. Black Brown.
Finally, I used two of the new Mig Oilbrushers (enamel paint applicators) – Dark Mud and Ochre – the latter shade as a dot filter on the horizontal surfaces, and ‘Dark Mud’ for streaking vertical surfaces and lining the recesses and edges to add grime deposits. The goal of all of this was to break up the overall green color as much as I could without making things look garish.
Once satisfied, I gave the entire model a coat of Vallejo Matt Varnish, mixed 50/50 with Vallejo thinner and a couple drops of Liquitex Flow-Aid, and followed that with a light dusting of the tracks and bogies using Vallejo Model Air Light Brown. Off to the photobooth!
Conclusion
Italieri kits are a great value – they go together well, are reasonably detailed, and are never hard on the pocketbook. If some other company decides to release an M32, you can bet that it will cost three times as much and have 10 times the number of parts. My bet is that the final result will be hard to distinguish from what Italeri has produced here, with a little attention. Throughout the build, Italeri’s solid engineering effort allowed me to concentrate less on the assembly, and more on the presentation. In the hands of a decent modeler, this old Italeri M32 ARV will remain a favorite (and a heck of a value) for Sherman fans.
I would like to thank Italeri for providing this kit for review, and to IPMS USA for giving me the opportunity to review it.