Reviews
Armor
Magach 6B Gal Batash
by Eric Christianson
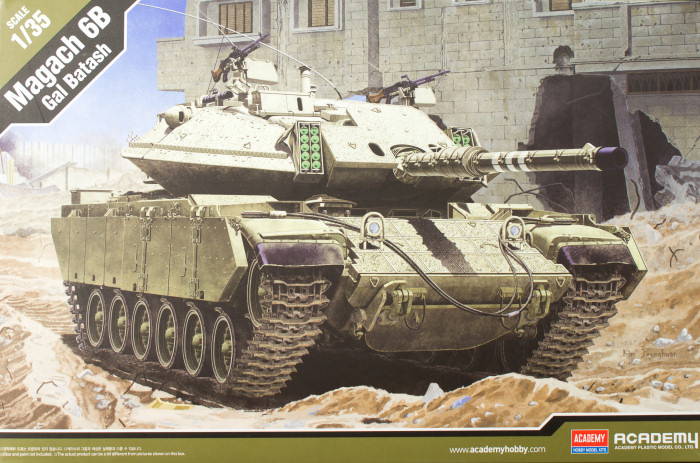 Model: Magach 6B Gal Batash
Reviewed by: Eric Christianson, IPMS # 42218
Scale: 1/35
Company: Academy
Price: $59.00
Product/Stock #: 13281
Website: Dragon Models
Product Web Page: View
Product provided by: Academy
Summary
Academy has just released the first kitted example of the Magach 6B Gal Batash, an Israeli built derivative of the American M60A1 Main Battle Tank. The name is a derivative itself: as a result of the Yom Kippur war, Israel began a series of survivability and capability upgrades to their tanks. In the case of the M60 (designated as Magach 6), the type received the M60 RISE updates becoming Magach 6B. Fitting the Gal fire control system created the Magach 6B Gal, while the upgrades adding the 908 horsepower engine and Generation-4 passive armor rendered the Magach 6B Gal Batash configuration.
Background
During the 1960’s and 1970’s, tanks were sold to the Israel Defense Forces (IDF) by West Germany and later by the United States. Several dozen Jordanian M48 tanks, captured intact during the 1967 Six Day War were also commissioned into service, adding to Israel's 150 vehicles already in service at that time. During that war, the Israeli tanks served in their original (American) configuration.
Following the 1967 war, several modifications were made to improve the tank to the M48A3 level, resulting with the Magach 3. These modifications included replacement of the original 90 mm cannon gun with the British 105 mm L7, lowering the command turret's profile, upgrading the communication suite, and replacing the flammable and underpowered gasoline engine with a 750hp diesel one.
When the Yom Kippur War broke out in 1973, Israel had a total of 540 M48A3 (with 105mm gun) and M60A1 tanks. During the war, the tanks suffered heavy losses. The location of flammable hydraulic fluid at the front of the turret was discovered to be a severe vulnerability. At the conclusion of hostilities, Israel had only about 200 M48A3 and M60A1 tanks remaining; the majority of which falling victim to entrenched Egyptian infantry armed with AT-3 Sagger anti-tank missiles. The war's losses were replaced with new M48A5 (Magach 5) and M60 (Magach 6) tanks during the 1970s.
Prior to the 1982 invasion of Lebanon (1982 Lebanon War), Magach 6 tanks were fitted with explosive reactive armor (ERA). Further work had been done on the upgraded Magach 6 models, including new armor, Merkava-based tracks, a new fire control system, a thermal sleeve for the gun and smoke dischargers, eventually resulting in the Magach 7 model which is still in use with the IDF.
Since the 1980s and 1990s, the Magachs have been gradually replaced with Merkava tanks as Israel's front-line main battle tank. However, the large majority of the IDF's armored corps continued to consist of Magach variants up until the 1990s, and the tank was continuously upgraded during this time. By 2006 all Magachs in regular units had been replaced with the Merkava.
What's in the Box
- 8 sprues of soft, tan-yellow plastic
- 2 lengths of black, one-piece ‘rubber-band’ track
- 1 sprue of tan-yellow polyurethane wheel caps
- 1 2-foot long piece of white twisted cotton string
- 1 small sheet of decals
- Separate, turret, upper and lower hulls, individually wrapped
- Folded 8-page Instruction Sheet with 12 steps, printed in black and white ink
- Lower hull, packaged separately.
The decals are printed by a company out of Korea and are slightly thick but in register. One (un-named) color scheme is represented by a very handy black and white, 8 ½ x 11, double sided sheet containing seven photographs of the finished model. Not only are these photographs crucial in understanding the placement of some of the parts, they are annotated with decal placement as well.
No less than eleven paint product callouts are included in the instructions. These include Humbrol (Enamel and Acryl), GSI Creos Acrylic, GSI Mr. Color Lacquer, Life Color, Testor/Model Master Acrylic and Enamel, Revell Acrylic and Enamel, and Vallejo Model Color and Model Aire lines.
While I applaud Academy for including the sheet of photographs, I do not understand why it was printed in black and white. Fortunately, a quick check online will produce the same images in color.
The Instructions
Academy is generally pretty good with their instructions, with some exceptions which are pointed out where appropriate below. The only real irritant is that in some cases the placement of significant parts is represented by a simple arrow saying, essentially, ‘put it there someplace’. This results in things not fitting later due to improper placement (as with the side skirts in my case). The photo insert helped a lot, but I still had problems in places. On the good side, there is an excellent parts map, and a comprehensive set of paint callouts is included.
Construction
Lower Hull and suspension
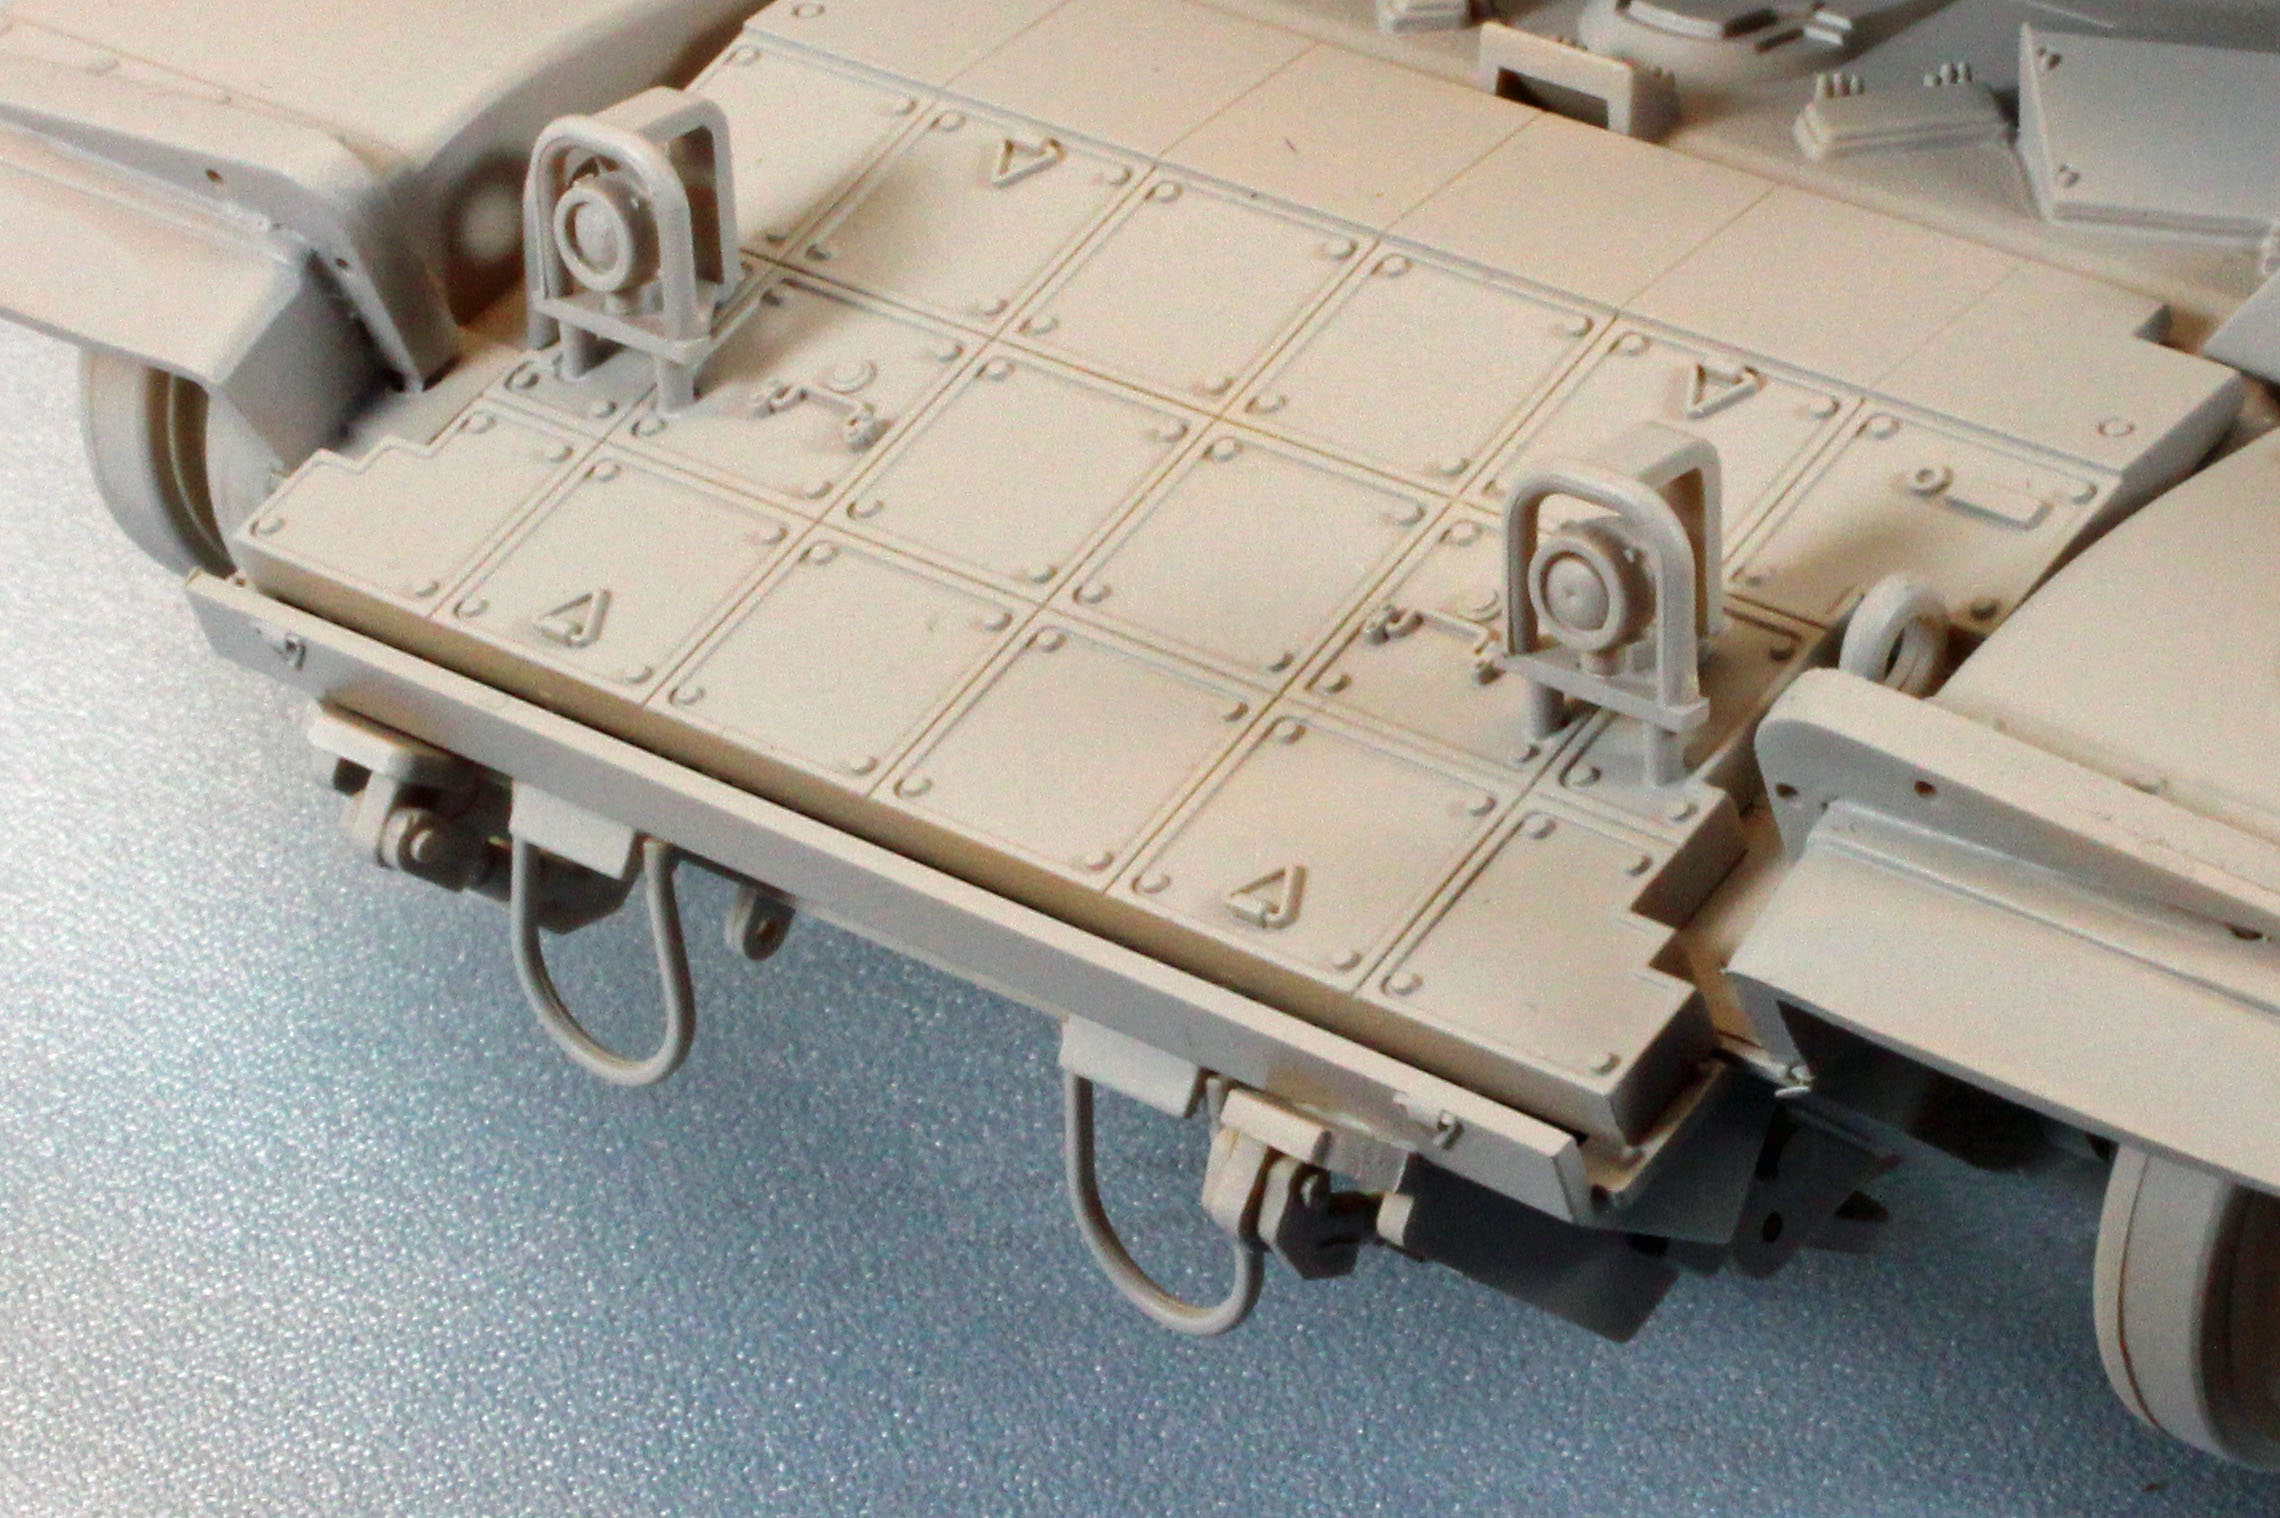
Construction starts with the hull and suspension and, like the rest of the kit, the fit is good. Some of the parts do not seat firmly and must be coaxed to remain lined up and in place while drying. I like the way Academy engineered the three-part return rollers – the long posts allow you to secure them tightly.
In Step 4 there is a multi-part assembly of what looks like extra armor that runs down the front of the hull and along the bottom back to the rear. The instructions here are vague - I ended up attaching parts M16/M17 first, and then working my way front to back, attaching all the various plates and such in order. I suggest you use a slow drying adhesive (like Testors ‘black bottle’ liquid cement) so that you can move things around to fit once attached.
Main Deck
In Step 5, again, I had problems deciphering where parts went, using the photo’s where possible. The placement of the side skirt stanchions and the optional part (M12/M13) is difficult to discern without the side skirts they support in place, and the locations of the stanchions (Parts L35/L36, L14/L15, and L40/L41) are critical in order to make the side skirts fit correctly. In the end, I decided to extend all the stanchions out just a little past the edge of the hull. Later I would sand the parts flush so the side skirts would have a nice even set of connecting points when attached, even if the points didn’t line up with where they were supposed to go on the inside of the skirts. The design here could have been better.
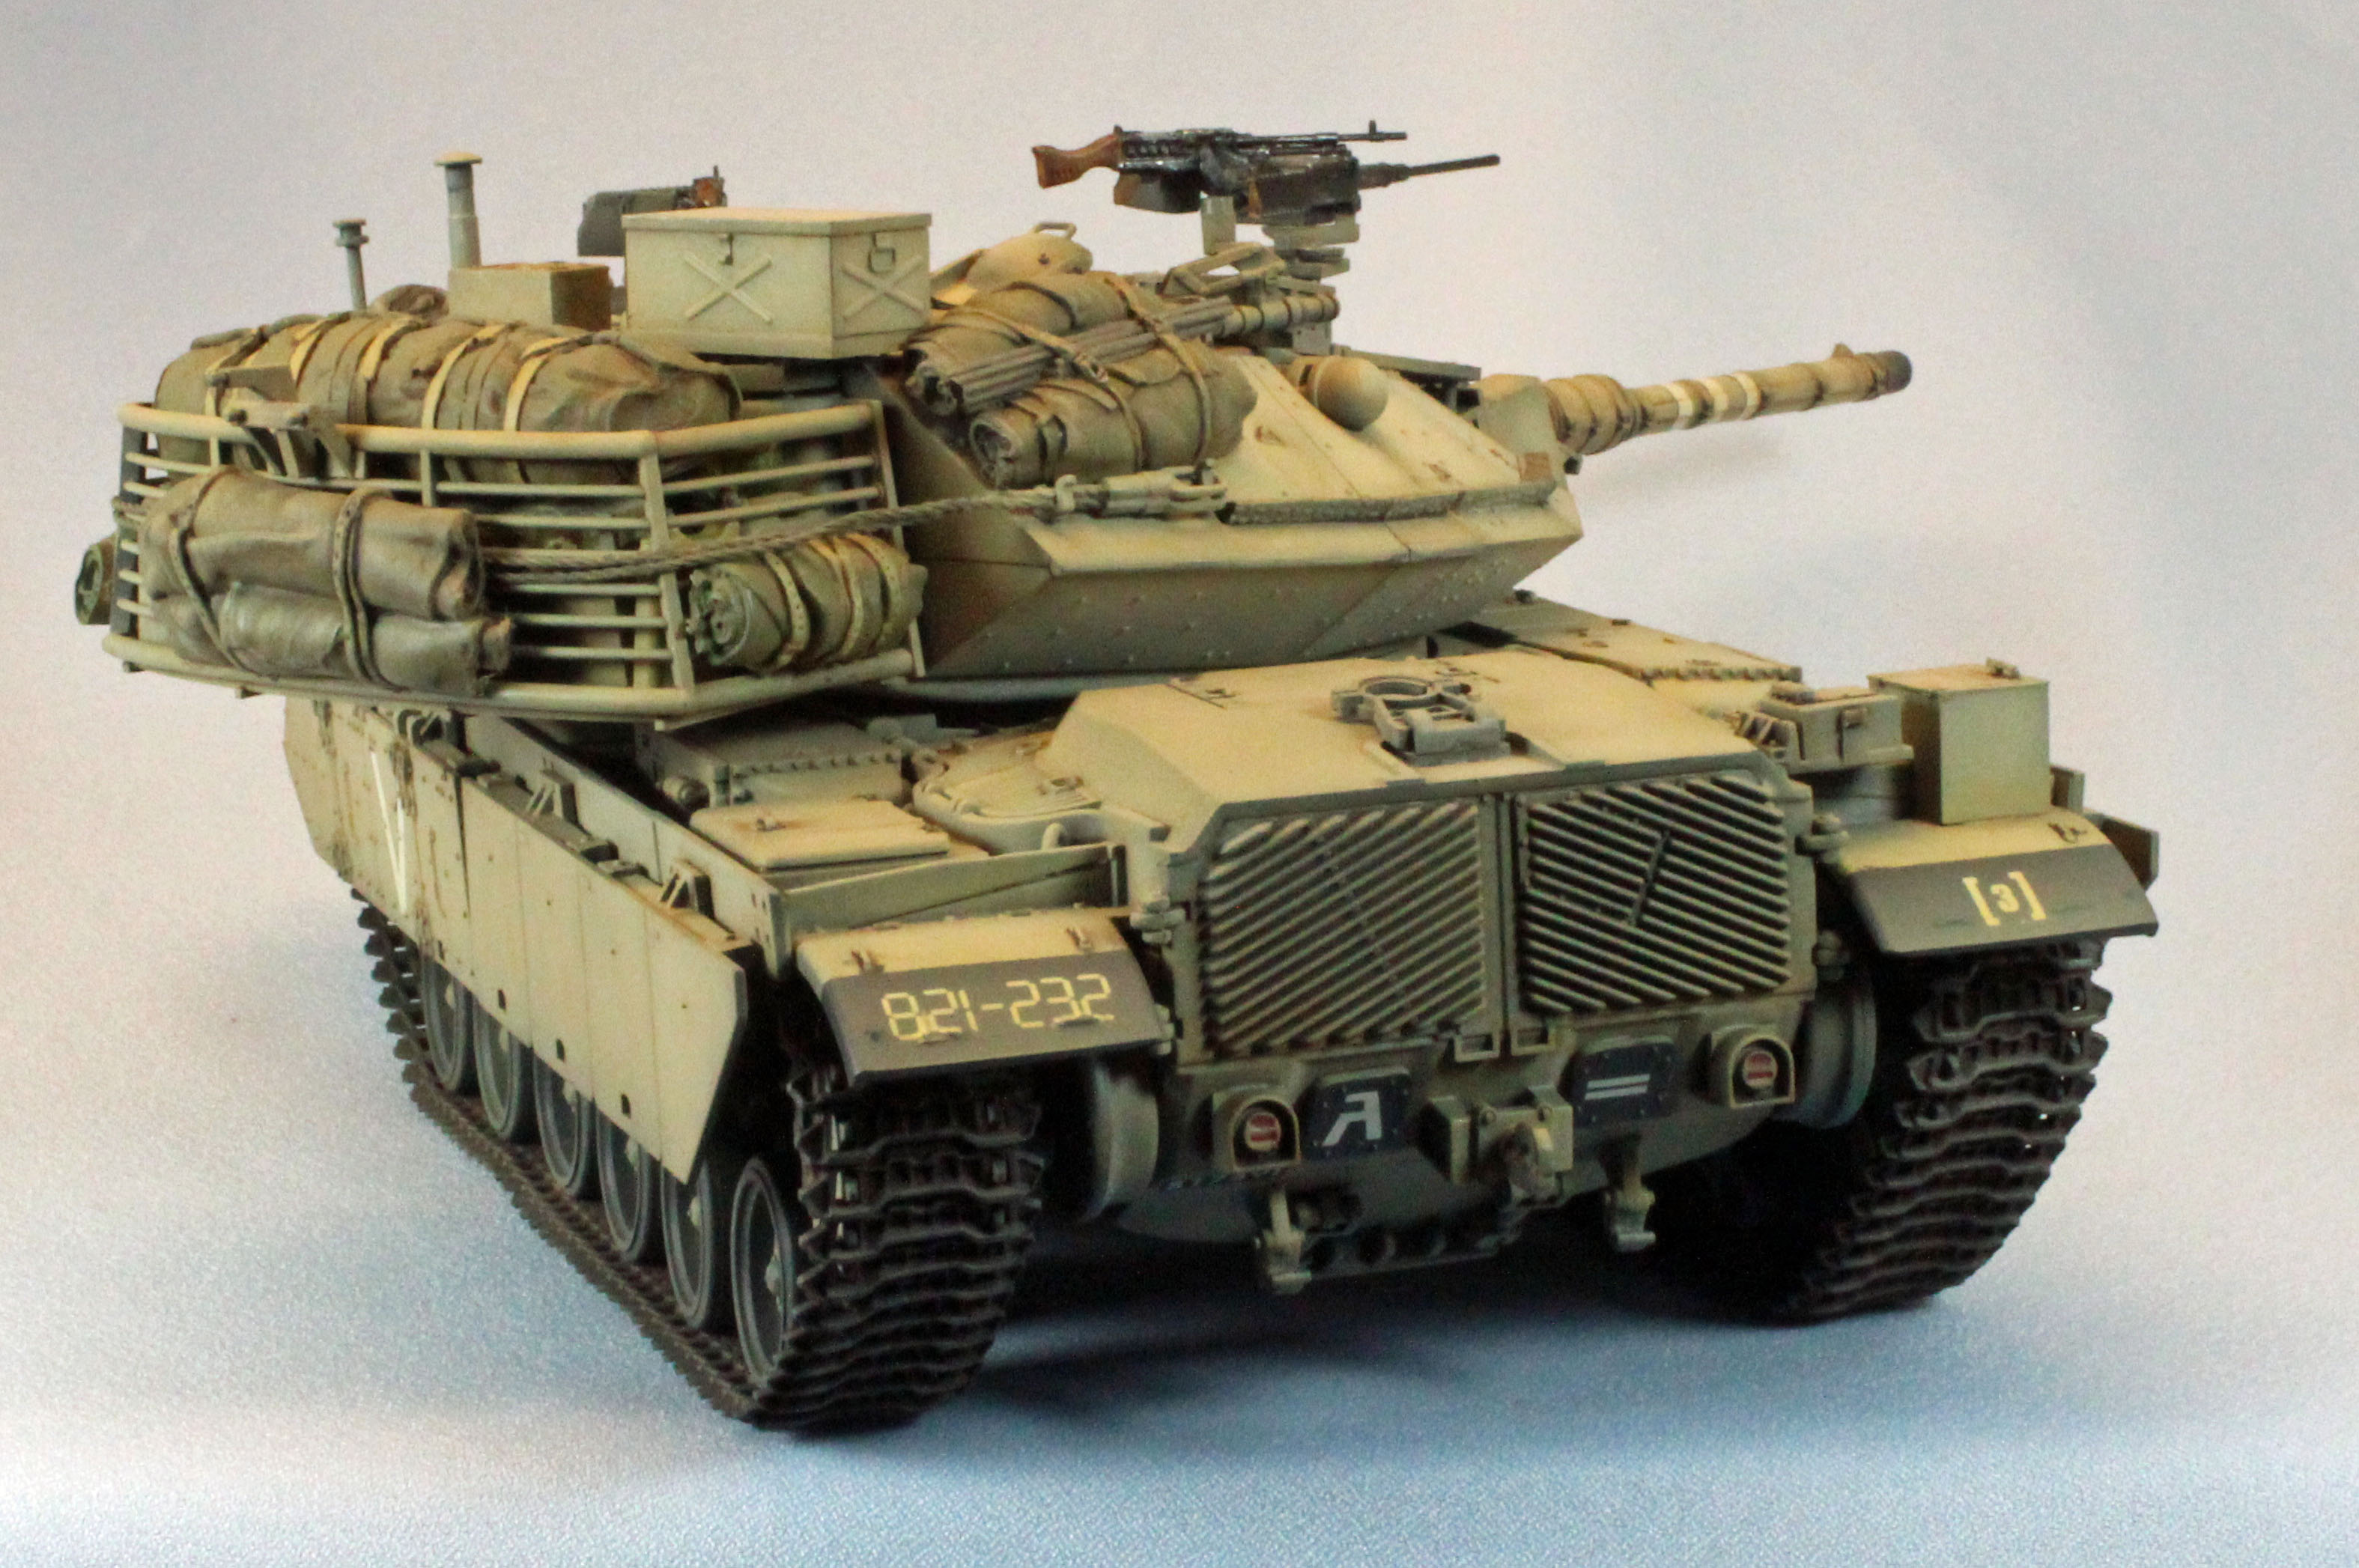
In Step 6 you attach the first two of four tow cables. Academy always provides thick, twisted cotton string to represent steel tow cables in their AFV kits. These can work fine if they are cut precisely and if you can find a way to attach the string to the cable ends, which usually have openings that are too small to accept the string. Out of the four cables, after much trouble, I was able to use only two, and these were slightly too long for where they went (along the rear of the turret). The cables for the front of the hull were a total loss and I left them off. I suggest you look to replace the string with a thinner kind since you have very little leeway for opening the holes in the cable ends that receive it.
The instructions never actually show the upper and lower hulls coming together. When I did put them together there was a significant gap in the front, where the upper hull is supposed to meet the lower hull (see image). Fortunately, the gap is symmetrical and straight, so it was easy to fill with some sheet styrene.
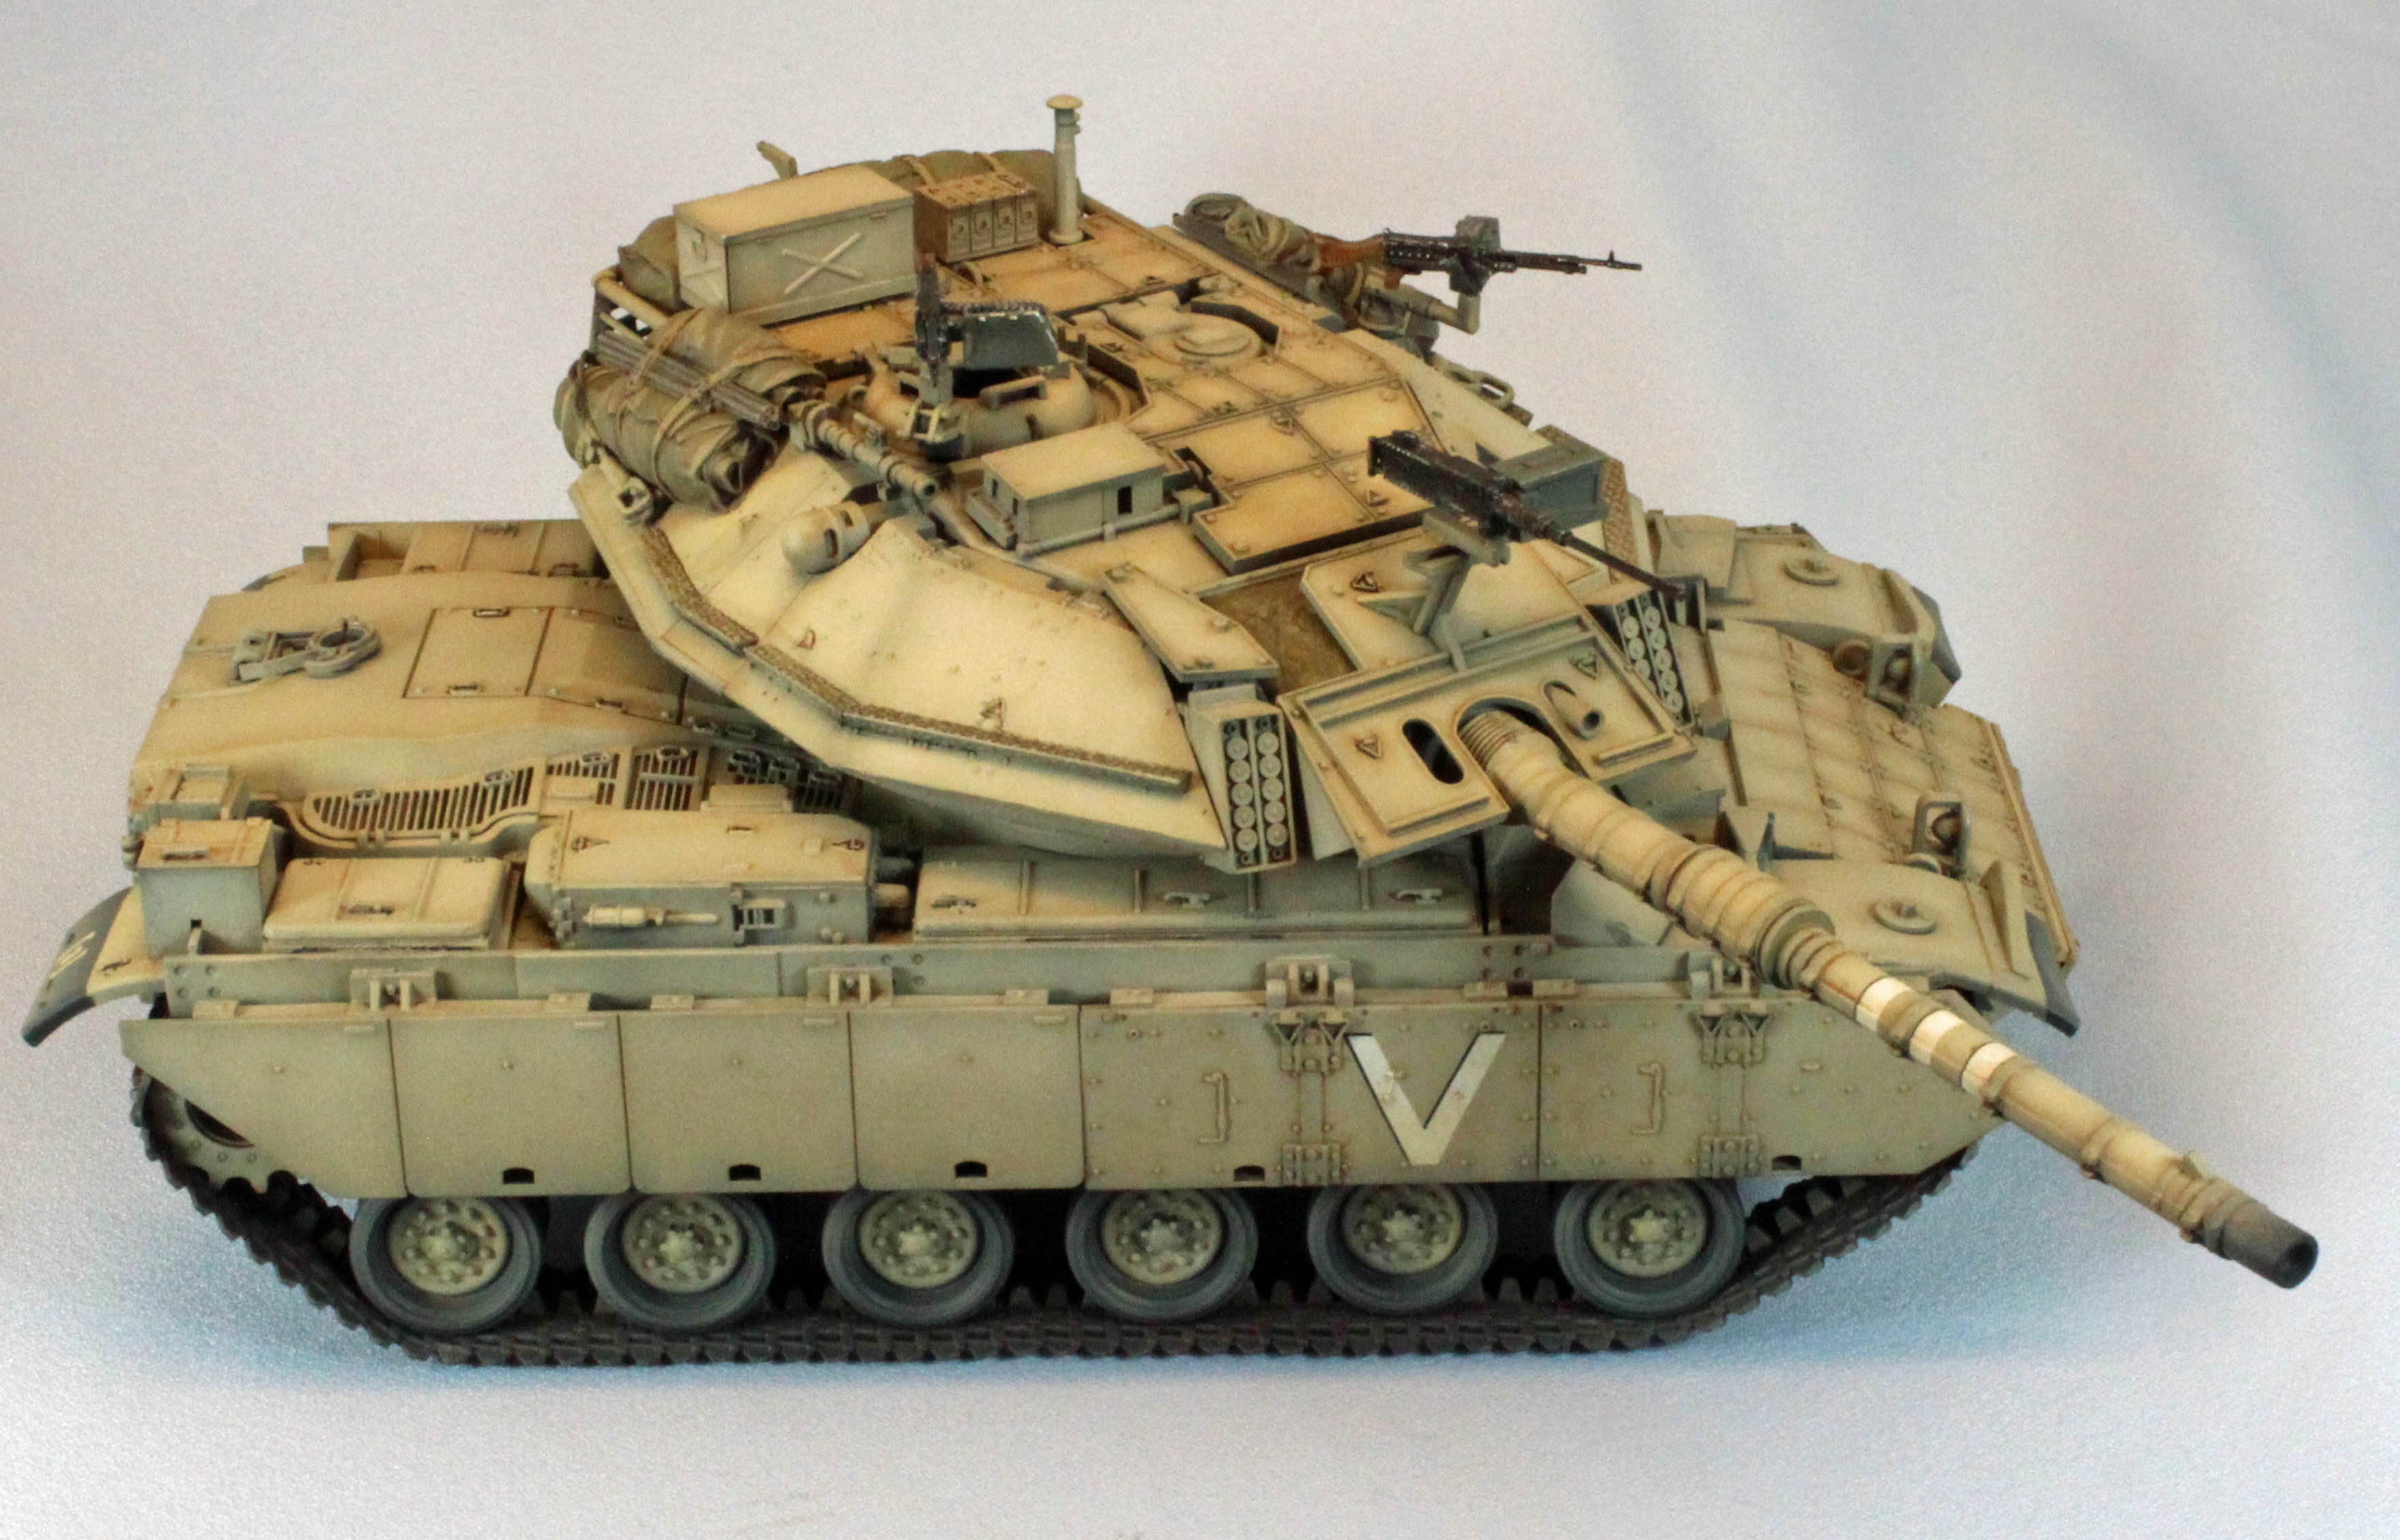
Side Skirts
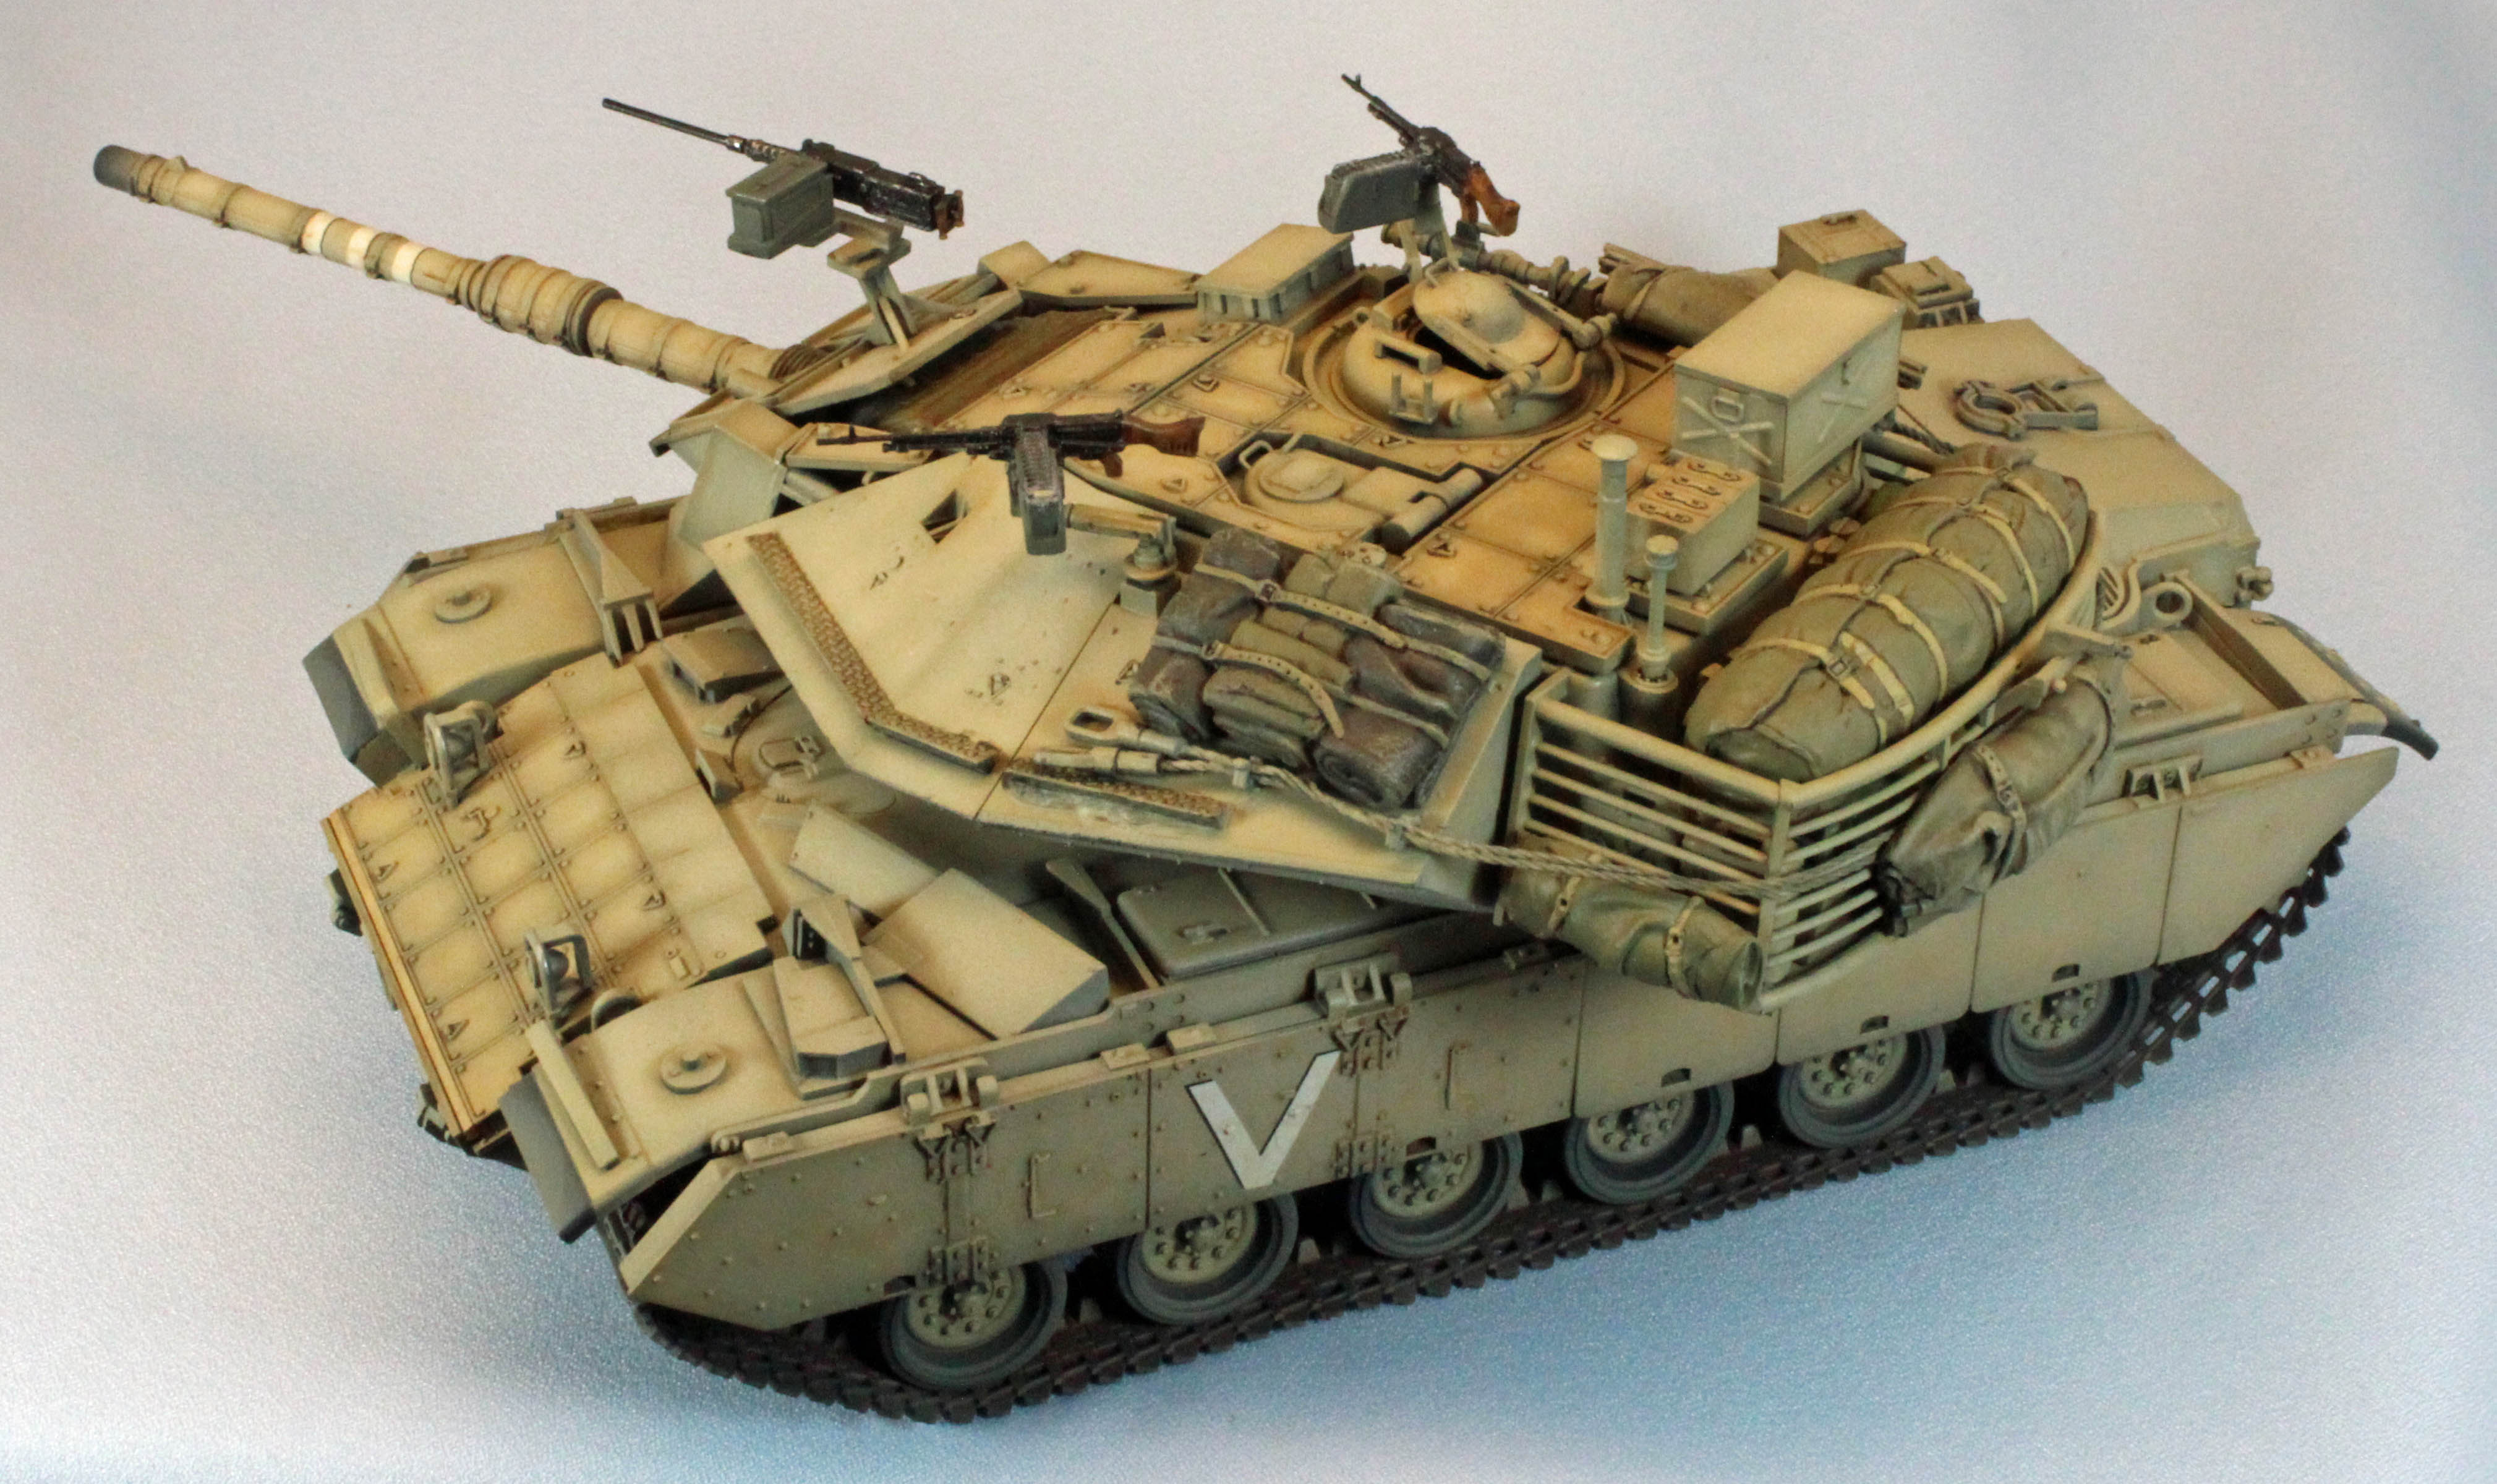
The two side skirts are beautifully rendered and fit very well. To assist in painting, I left them off and painted/decaled/weathered them separately, attaching them at the very end of the build. When I did attach them, the stanchions (see Step 5, above) did not line up with the female receptacles molded for them so I sanded the stanchions to a consistent surface and slapped the skirts on with a lot of glue, making sure to line everything up properly. They ended up looking fine – crisis averted.
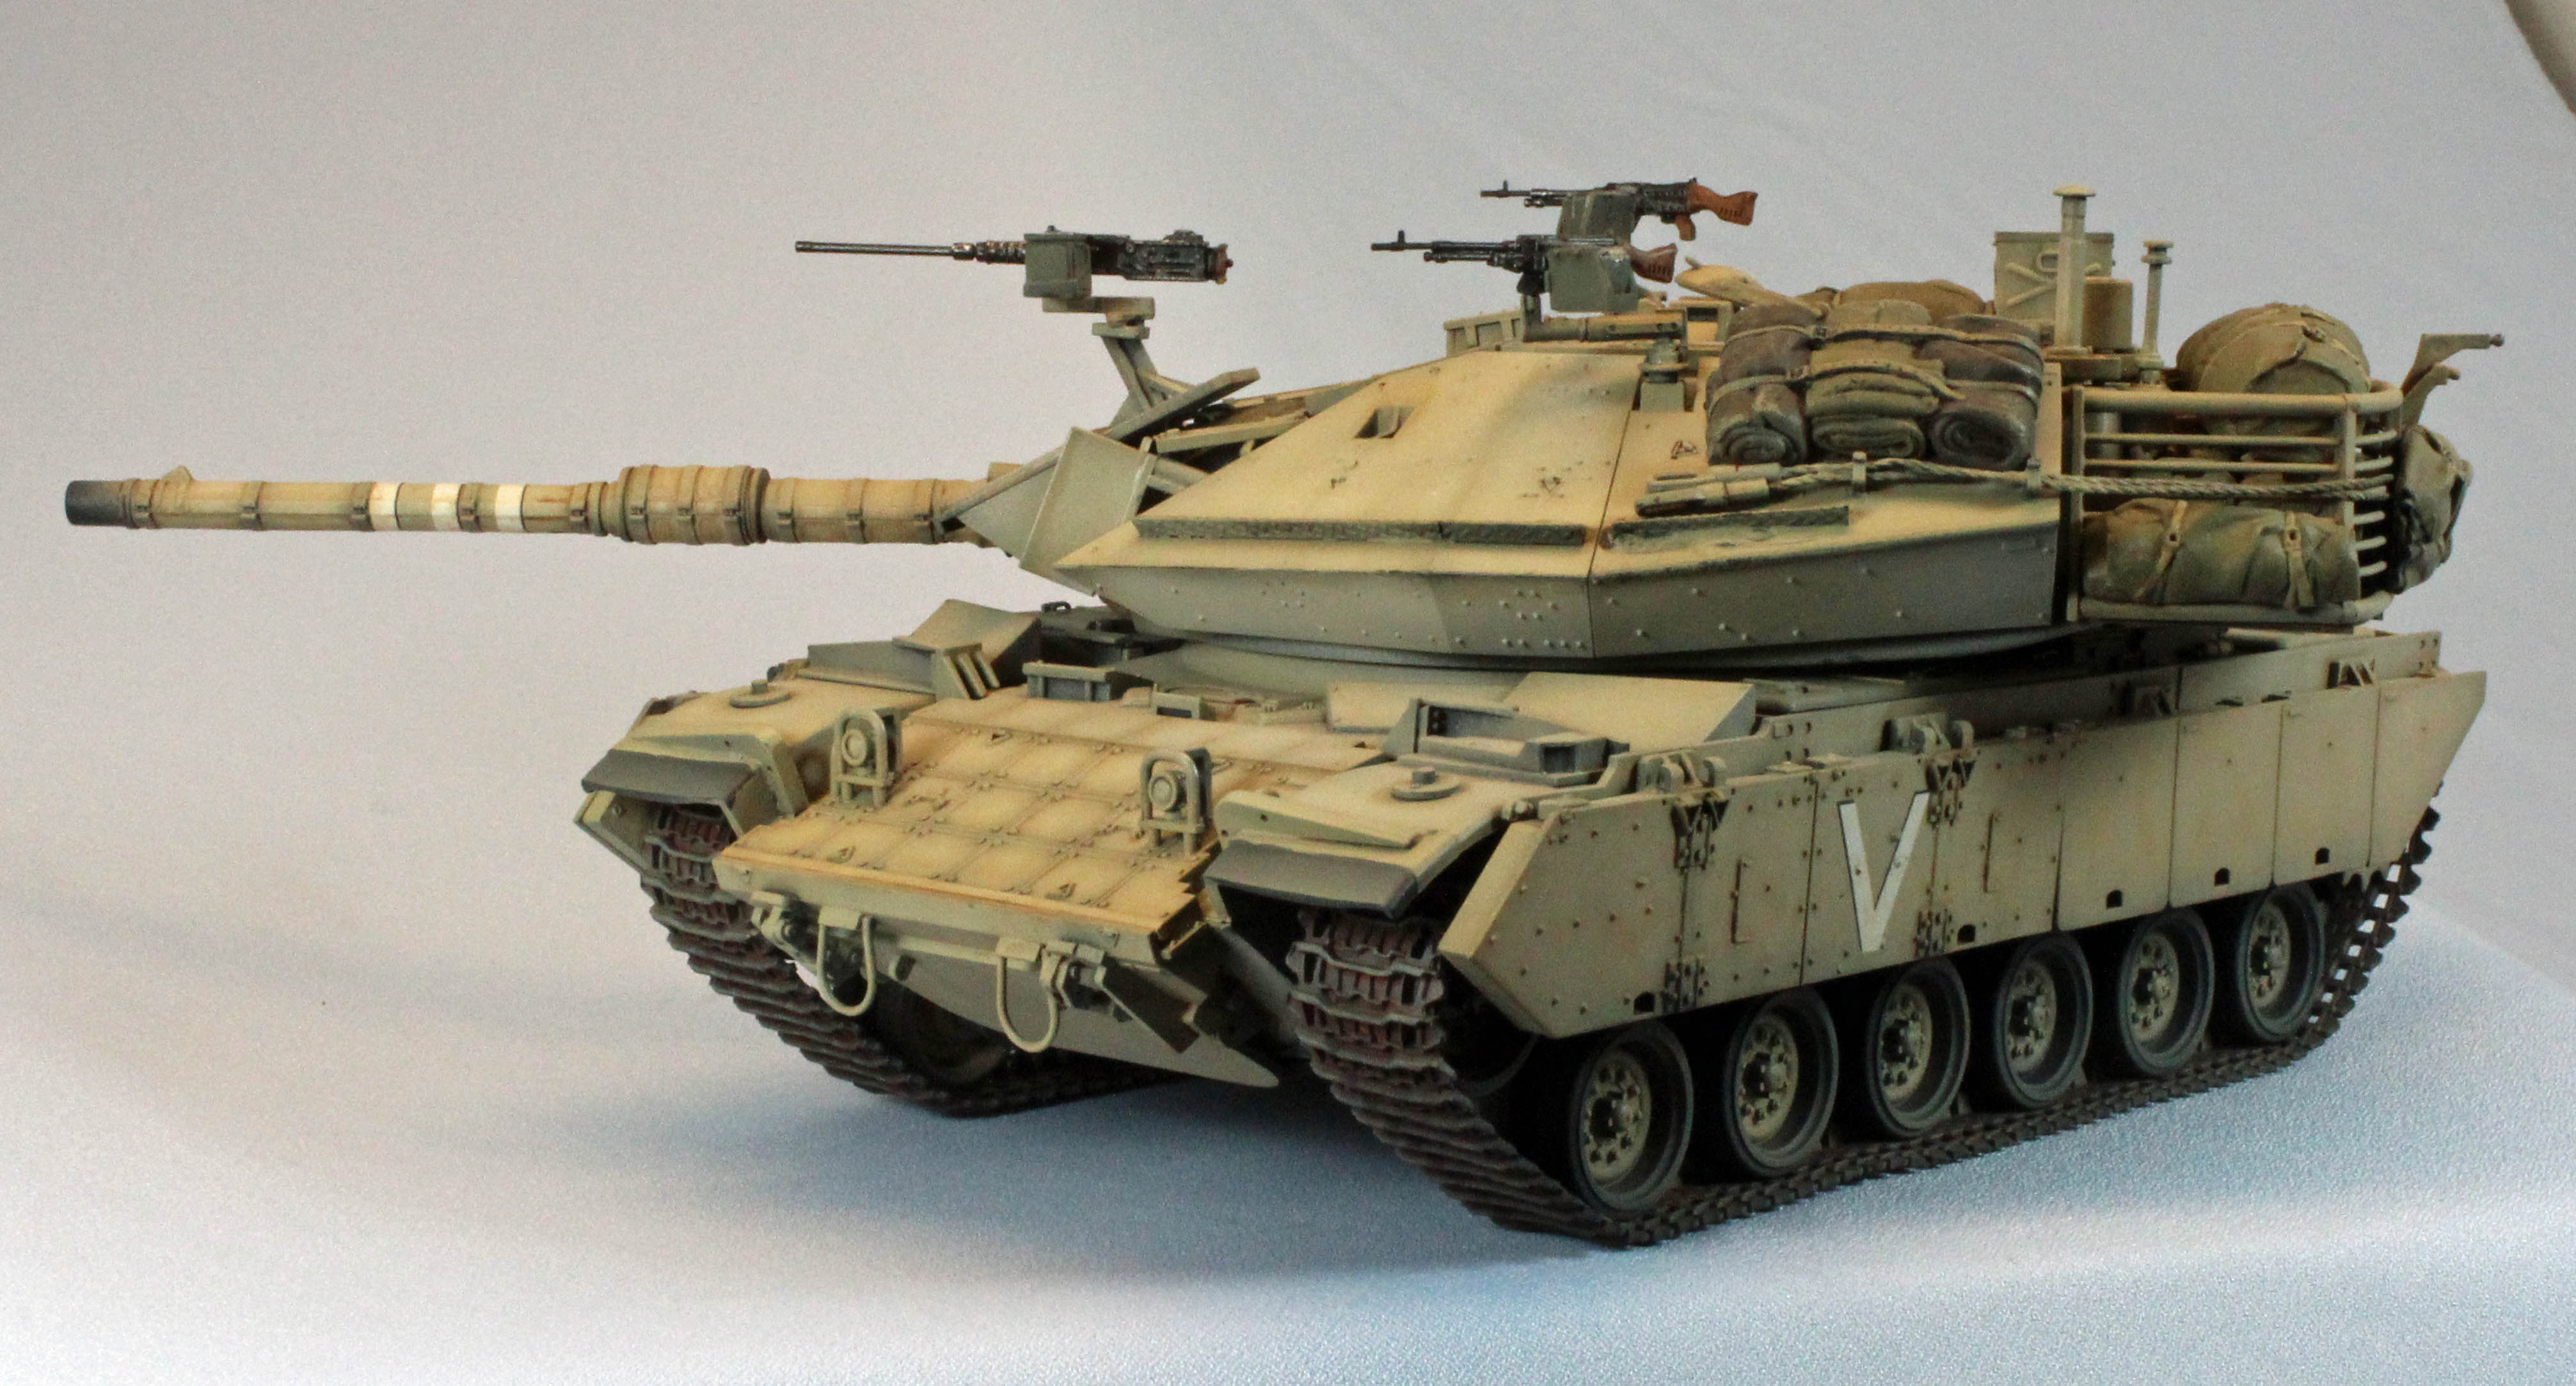
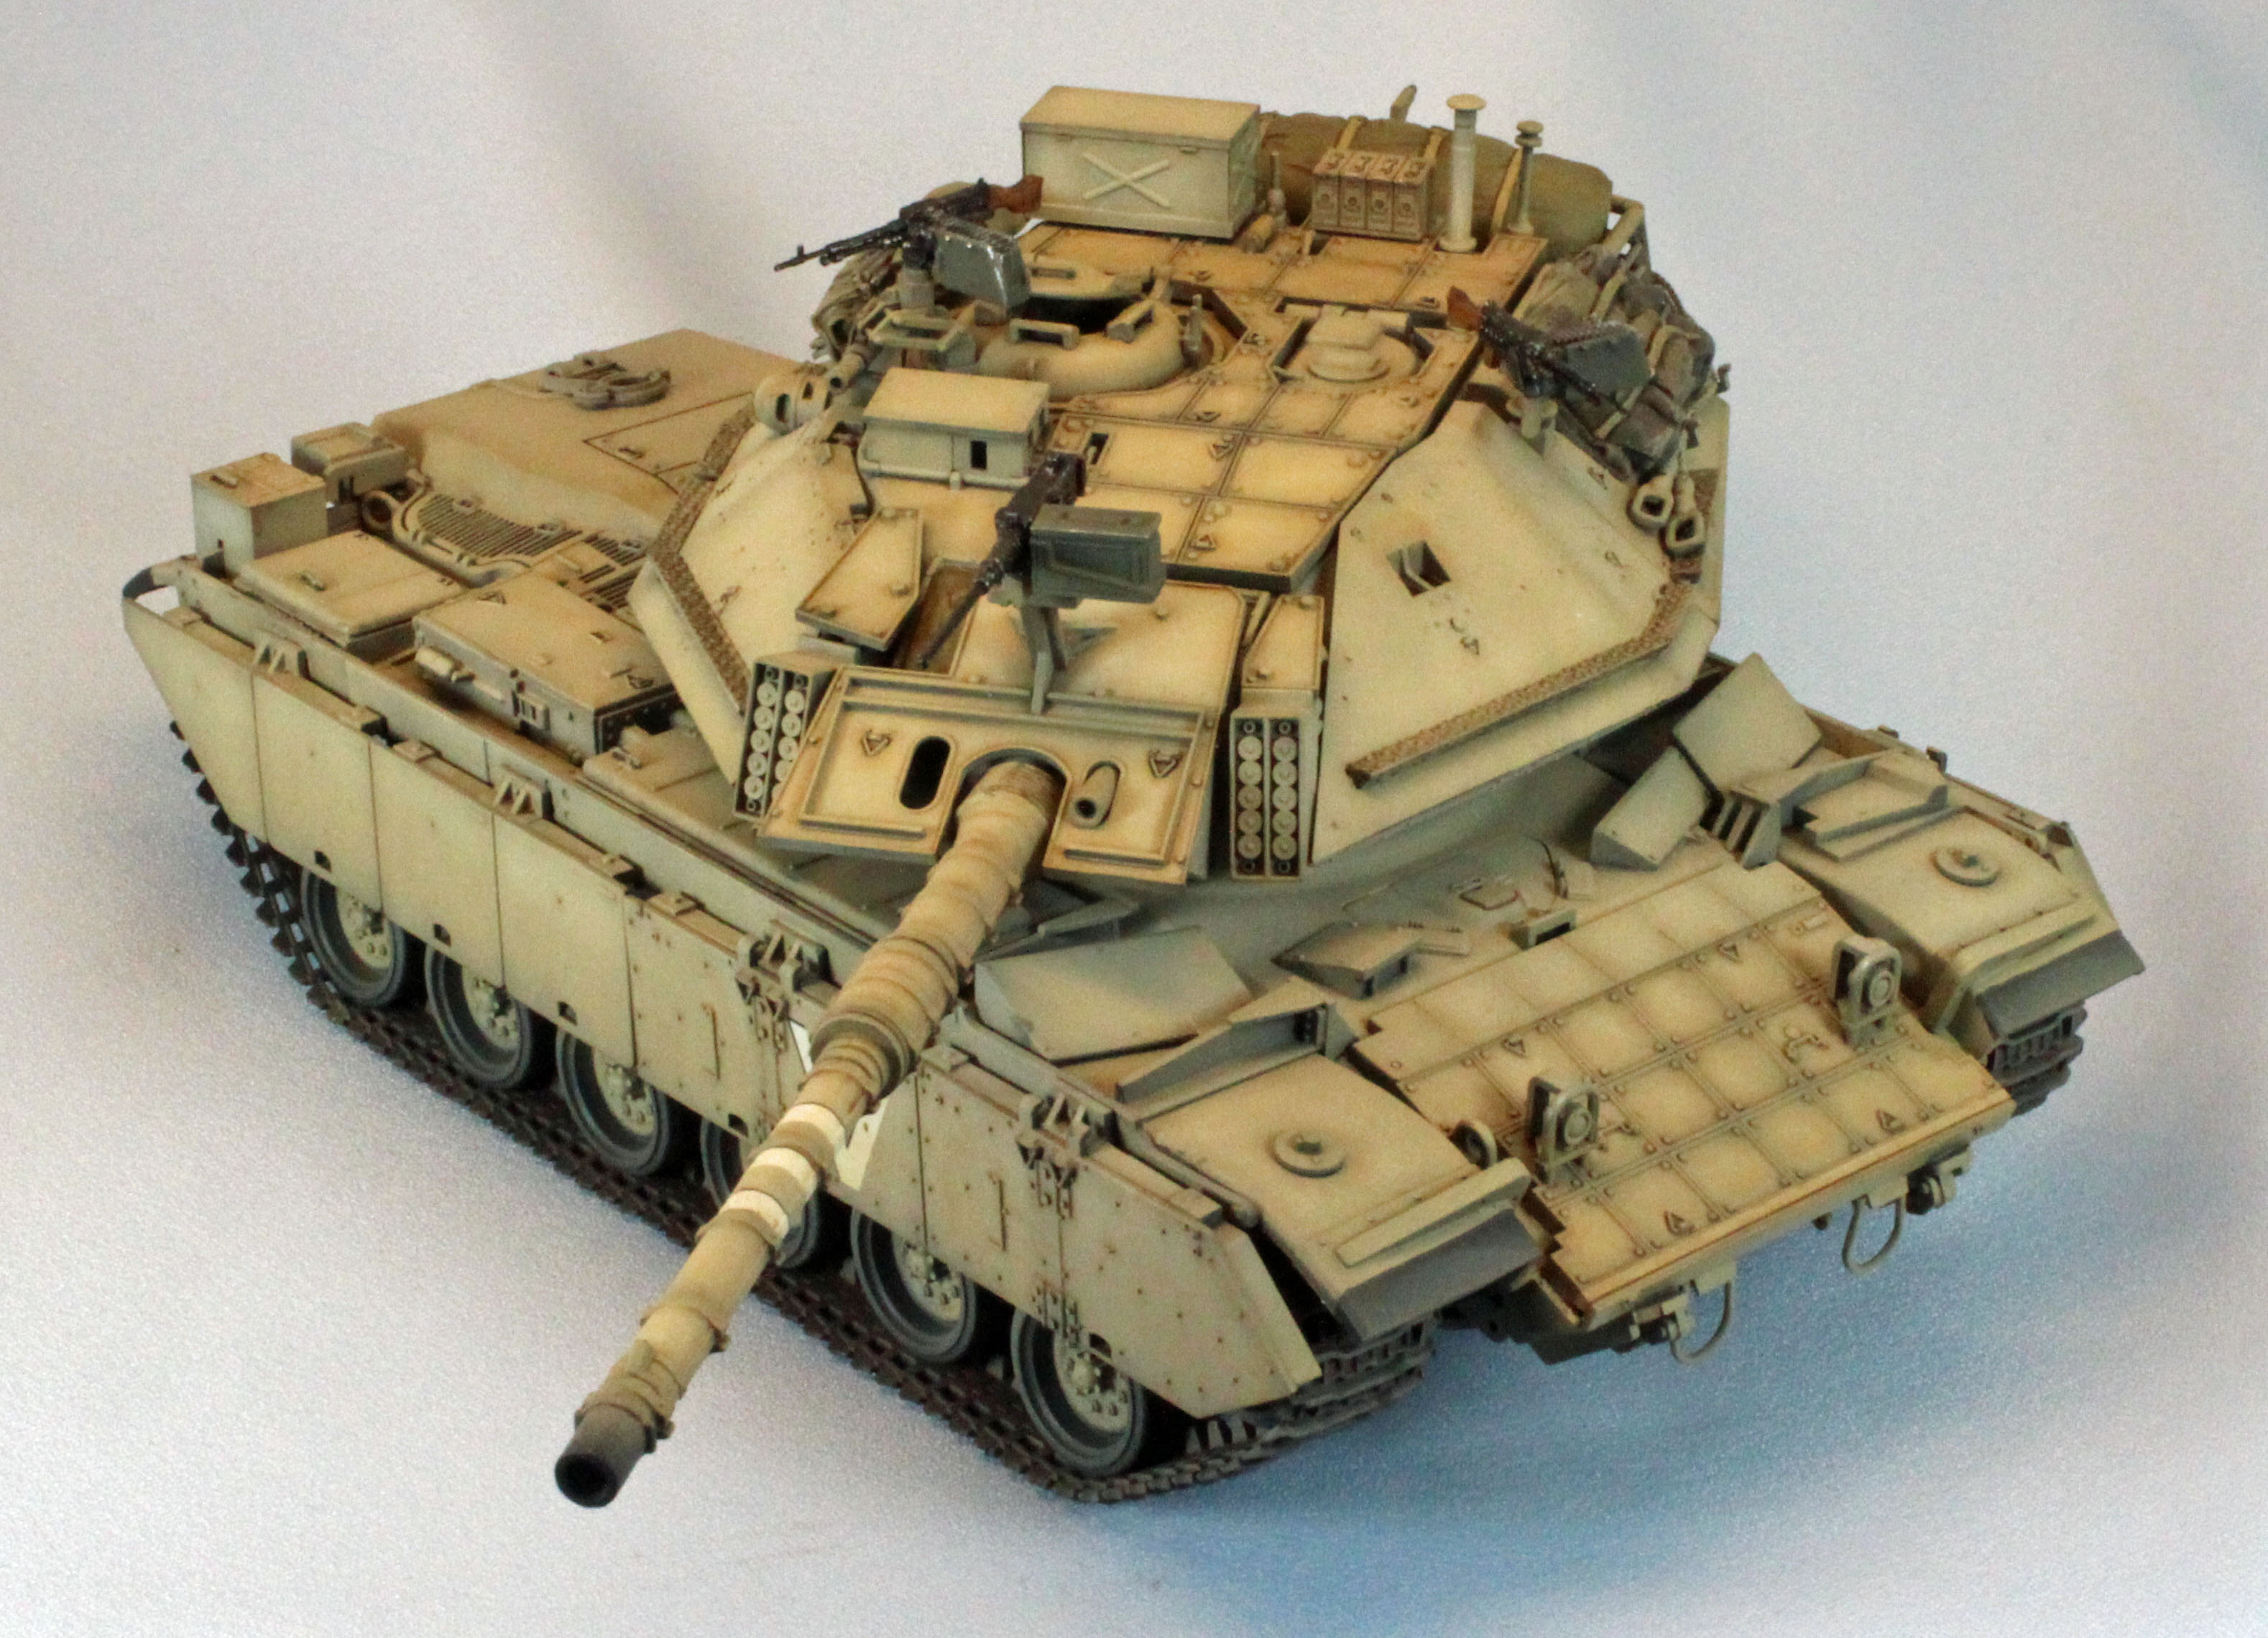
Turret
The fit and finish of everything on and around the turret was superb. At the bottom of Step 9 there is an optional assembly that surrounds the main weapon. It is not clear that option A, to the left, is for adding the 3rd machine gun (the 50cal) and the one on the right is used if you do not want to add the 3rd gun. This is a good example of why you need to read the directions thoroughly before beginning assembly. In Step 10, Parts K22 and K21 are mislabeled (switched) in the instructions.
The bustle at the turret rear fits well and is HUGE – quite a space to fill – so start thinking about that before you add the spare track and twin fire extinguishers which may not be seen if you choose to fill the bustle up.
As mentioned before, the two tow cables that I was successful in assembling came out to be a little long, so I attached them to the hooks on one side of the turret and simply strung the cables over the hook on the other side.
All in all, the busy turret comes together very well and looks positively intimidating when complete.
Filling the Bustle at the rear of the Turret
The bustle on the Magach is positively cavernous and, in my opinion, cries out for something other than a tarp laid over the top. I collected a small pile of military detritus including spare kit parts, jerry cans and even a large rear ammunition locker from a WWII German sIG-33(!), among other things. I then broke into a couple of packages of ‘Tents, Tarps and Sherman Deck Equipment’ by a company called Value Gear (http://www.valuegeardetails.com/) and came up with enough stuff to fill the bustle and array various bags and such around the back of the turret. The neat thing about Value Gear’s products is that they are made up of solid chunks of finished plastic instead of resin. No sprues, no cleanup, just paint em’ and glue em’ on.
The Track
The two runs on one-piece ‘rubber band’ track are beautifully detailed and take paint well, but not cement. There are four pins on each run that are supposed to fit into similar holes to bring the two ends together for each side, but that didn’t work for me. Fortunately, the side skirts hide the big staples I used to do the job instead.
Painting and Finishing the AFV
The Magach could be a challenge to paint and finish depending on just how far you’re willing to go; with so much going on up on top it’s hard to say ‘done’. I could have spent weeks on this, but (luckily) this is a review (!) I painted 99% of the model after assembly, and 90% of that was done with an airbrush.
Tamiya (acrylic-lacquer) paints are my normal go-to choice for armor due to their ease of use and excellent coverage, but I thought this time I would try something new. Lately, many modelers are using LifeColor acrylic paints and I wanted to see what using ‘real’ acrylic paint would entail. While I found the results satisfactory, I still haven’t been able to dial into the ideal thinning and cleaning procedures, ratios or thinners. Since this is an armor kit review and not a paint review, I will simply discuss what I used this time and my overall experience with this paint.
(Note: I thinned all LifeColor paints with their own thinner, trying different ratios but settling on a 1:1 mix. I thinned Gunze Mr. Surfacer 1200 primer and all Tamiya paints 1:1 with Gunze Mr. Color Leveling Thinner, which has its own retarder for airbrushing. For hand-brushing I use Vallejo's own thinner for their paints. I use a Pasche-H Single-Action airbrush, Number #3 tip, and while I experimented around with pressure, I settled with my normal 20 lbs. pressure for everything.)
I set the three machine guns, the track, and the side skirts aside so I could paint them separately; everything else was painted as assembled, following these steps:
Track
- I started with an overall coat of Tamiya (XF-10) Flat Brown.
- Once that was dry I applied a generous filter made of Mig Dark Rust, heavily thinned with Mona Lisa White Spirit.
- I finished with detailing the parts that touched the ground and wheels using Model Master Dark Anodonic Gray Buffing Metalizer, applied with a Q-tip.
Machine Guns
- I started by hand brushing the metallic portions of the guns and the ammo belts with Testors Flat Black – the only time I ever use flat black.
- I painted the wooden parts with Vallejo New Wood. Once the paint was dry, I coated the stocks with Mig Wash Brown oil paint straight from the tube and let that sit overnight. In the morning I moistened (and then wiped ‘dry’) a small brush with Mona Lisa White Spirit and brushed off most of the oil paint, leaving the stock darker near the edges where it met the metal parts and lighter in the middle.
- I painted the ammunition cases Model Master Faded Olive Drab.
- I then used a silver Prismacolor Artist Pencil to liberally highlight the flat black metal parts and the ammunition cases.
- Finally I gave everything a filter using Mig Wash Brown thinned with Mona Lisa.
Bags, Tarps and Tents
- I started by airbrushing a primer coat of Gunze Mr. Surfacer 1200 to give the plastic some grip for the following coats, followed by an overall pre-shade coat of Tamiya (XF-69) NATO Black – this would fill in the dark recesses and provide the shadows near the flat surface edges, adding depth to the camouflage coat to come.
- Next I used Model Master Olive Drab, Model Master Faded Olive Drab, and Tamiya (XF-58) Olive Green as the main camouflage coat on various packs. I used Vallejo (340) Highlight Afrika Korps for the straps, and Tamiya (XF-56) Metallic Grey for the tent poles.
- Once the flat paint was dry, I brushed on several liberal filter coats made of Mig Wash Brown oil paint, heavily thinned with Mona Lisa thinner.
- Next I laid down a coat of Future acrylic to create a smooth gloss finish, perfect for pin washes.
- Once the future was dry I gave everything a pin wash of Mig Dark Wash (aka Burnt Umber) straight from the bottle.
- Once I was happy with the results, I set everything aside to attach later, before the final flat coat was applied to the AFV.
The rest of the vehicle
- I started with a primer coat of Gunze Mr. Surfacer 1200 to give the plastic and PE some bite.
- I then sprayed an overall pre-shade coat of Tamiya (XF-69) NATO Black to provide the depth and shadow to the light camouflage and filter coats to come.
- I followed this with a base coat of LifeColor Sand Grey. I had clogging problems but eventually came out with a decent base, leaving just enough of the NATO black peeking through along the edges and recesses.
- Next I laid down a post-shading coat of a 50/50 mix using LifeColor Sand Grey and LifeColor Matt White. Regardless of the thinner ratios or pressure settings, I still had clogging problems with my Pasche, even after a thorough cleaning. With a little determination, however, I eventually got what I wanted: a light shade of the base coat in the middle of all the various panels and upper hull sections, giving everything a little depth.
- Decals were next. I airbrushed a coat of Future acrylic on the portions of the vehicle and side skirts that would receive decals. I then applied the decals using the MicroSol/MicroSet line of products without any problems. The unit symbols on the side skirts and the turret rings needed a little more coaxing to settle down over the sharp protuberances here and there, so I pulled out my old bottle of Solvaset and used that to do the job with the help of an ear plug – the flesh–colored spongy kind – a great tool for this kind of task where a soft, yet firm pressure is needed. I laid down another coat of Future to seal the decals and let that dry completely before moving on.
- While the Future was drying I masked off the front and rear rubber portions of the fenders and brush painted them using Tamiya (XF-69) NATO Black and I touched the tail lights using Tamiya (X27) Clear Red.
- At this point the painting was complete, and I wanted everything on the vehicle before weathering started so I attached the track, side skirts, machine guns and deck/bustle packs, etc.
- I shot the shiny spots with Vallejo Flat Varnish to bring everything back to a dead flat finish. Multiple layers of Future and Vallejo products make the decal edges simply disappear into the plastic. Nice.
- Next, with a flat coat on the model, I applied several filters to enhance the base colors. I first gave the whole vehicle a filter of Mig Wash Brown, followed by a filter of Mig Black on the exhaust filters on the rear deck. I heavily thin all of my washes and filters with Mona Lisa White Spirit, which does not affect the underlying coats in any way.
- For years I used to give the surface of my model a glossy coat of Future acrylic at this point in the weathering process to prepare it for an oil-based pin wash and possibly some streaking. With experimentation, however, I found that the filters I applied gave the surfaces a slightly satin finish that assisted in spreading a pin wash like it should, using capillary action. Furthermore, using the very mild Mona Lisa thinner with Mig oils did not disturb the underlying paint and/or finishes, no matter how thick I slathered stuff on. So - I gave the entire vehicle a pin wash using Mig Dark Wash (aka Raw Umber) straight from the bottle. This wash goes on very dark but, on the smooth surface, it stays wet and workable for a long time. Using a clean brush, Mona Lisa thinner and a paper towel, I worked the wash around until I had it just the way I wanted it.
- I wanted some of the reactive armor panels on the front hull and turret to stand out and give the overall surface some variation, so I repeated the Mig Wash Brown filter until I had the shade I was looking for.
- Finally, after I shot the whole vehicle with Vallejo Flat Varnish to kill any remaining shine, I laid down a dusting of Vallejo Light Brown, starting from the bottom, working up. I thinned both 50/50 with Vallejo Airbrush Thinner to improve flow.
Conclusion
The Magach is an intimidating beast when loaded for combat. I think Academy did an excellent job of translating that look into this scale representation. A perfect kit would have included ample stowage gear, a color set of photographs, and better tow cables, but that kit would have cost more as well. I think what you get in the box is a good compromise, and a good value.
There are design issues with some of the assemblies, and the instructions could use some rework, with better angles in the drawings. That said, I can recommend this kit to all levels of model builders. If you go slow and follow the suggestions above, you should be able to have a lot of fun building this Israeli beast.
I would like to thank Academy Models and Stevens International for providing this kit for review, and to Internet Modeler for giving me the opportunity to build it.